Audi A6 Typ 4G: Lock Carrier
Overview - Lock Carrier
Overview - Lock Carrier, Vehicles through MY 2014
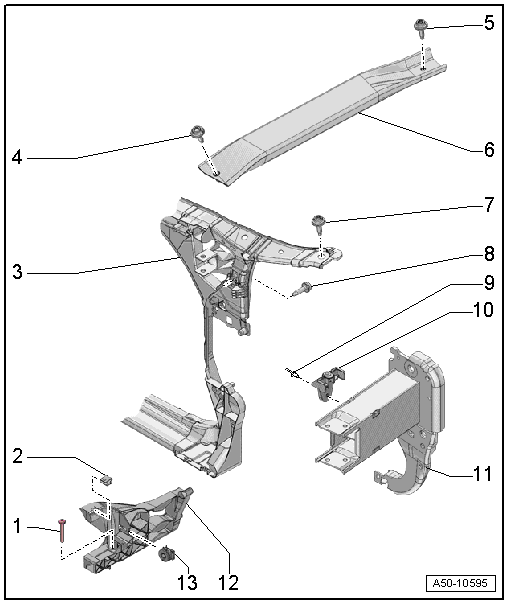
1 - Bolt
- 8 Nm
2 - Spring Nut
3 - Lock Carrier
- For the correct allocation. Refer to the Parts Catalog.
- Removing and installing. Refer to → Chapter "Lock Carrier, Removing and Installing".
4 - Bolt
- 20 Nm
5 - Bolt
- 20 Nm
6 - Brace
- For the lock carrier
- For the correct allocation. Refer to the Parts Catalog.
- Removing and installing. Refer to → Chapter "Lock Carrier Brace, Removing and Installing".
7 - Bolt
- 10 Nm
8 - Bolt
- 8 Nm
- Quantity: 2
9 - Rivet
- Quantity: 2
10 - Counterholder
- For mount with adjusting mechanism
- Removing and installing. Refer to → Chapter "Bumper Cover Mount Counterholder, Removing and Installing".
11 - Impact Member Mount
- Overview. Refer to → Chapter "Overview - Impact Member".
12 - Mount
- With adjusting element
- For the front bumper cover, headlamp housing bracket
- Removing and installing. Refer to → Chapter "Bumper Cover Mount, Removing and Installing, Vehicles through MY 2014".
13 - Adjusting Element
Overview - Lock Carrier, Vehicles from MY 2015
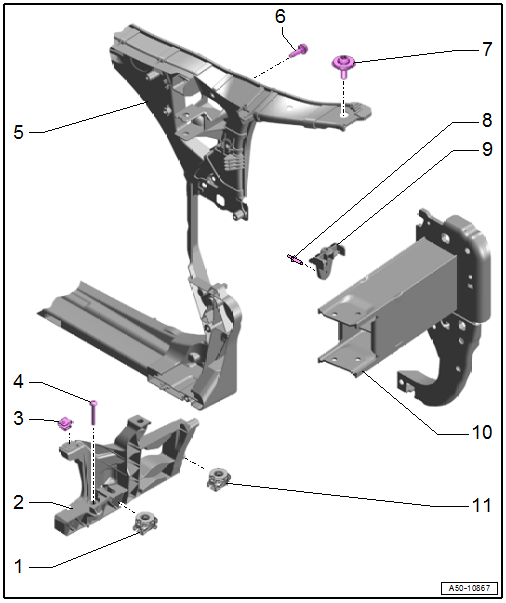
1 - Adjusting Element
2 - Mount
- With adjusting element
- For the front bumper cover, headlamp housing
- Removing and installing. Refer to → Chapter "Bumper Cover Mount, Removing and Installing, Vehicles from MY 2015".
3 - Spring Nut
4 - Bolt
- 8 Nm
5 - Lock Carrier
- Removing and installing. Refer to → Chapter "Lock Carrier, Removing and Installing".
6 - Bolt
- 8 Nm
- Quantity: 2
7 - Bolt
- 10 Nm
8 - Rivet
- Quantity: 2
9 - Counterholder
- For mount with adjusting mechanism
- Removing and installing. Refer to → Chapter "Bumper Cover Mount Counterholder, Removing and Installing".
10 - Impact Member Mount
- Overview. Refer to → Chapter "Overview - Impact Member".
11 - Adjusting Element
Lock Carrier, Removing and Installing
Lock Carrier, Removing and Installing, Audi A6
Removing
- Remove the front noise insulation. Refer to → Chapter "Front Noise Insulation, Removing and Installing".
- Remove the impact member. Refer to → Chapter "Impact Member, Removing and Installing".
- Remove the coolant cooler with the fan shroud. Refer to → Rep. Gr.19; Radiator/Coolant Fan; Radiator, Removing and Installing.
- Remove the bolt -4-.
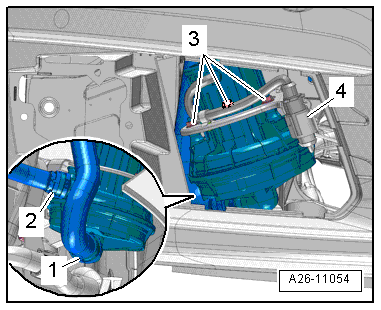
- Disconnect the connectors -1 and 2-.
- Disconnect the connector -3- to the front airbag crash sensor. Pay attention to the Safety Precautions. Refer to → Body Interior; Rep. Gr.00; Safety Precautions; Pyrotechnic Components Safety Precautions.
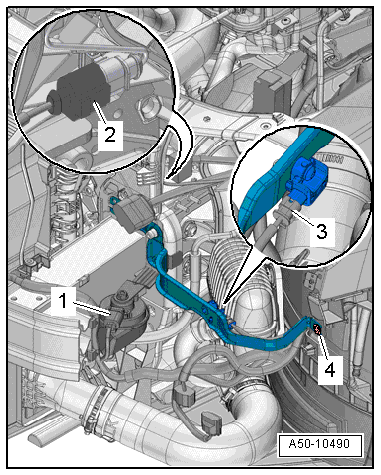
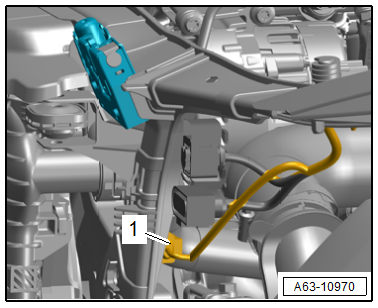
- Disconnect the connector -4- from the Secondary Air Injection Pump Motor -V101-, if equipped.
- Press the release buttons and remove the secondary air hoses -1- and -2-.
- Disconnect the hood lock cable at the coupling and place it on the lock carrier. Refer to → Chapter "Overview - Release Cable".
 Note
Note
Ignore -item 3-.
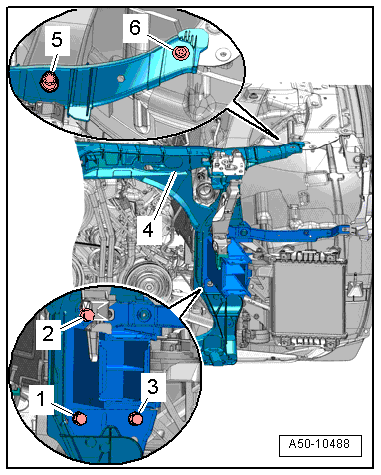
- Remove the bolt -5-, if applicable.
- Remove the bolt -6-.
- Have a second technician hold the lock carrier -4- and remove the bolts -1 through 3-.
- Remove the lock carrier with the mounts for the impact member with a second technician.
If is necessary to remove the impact member mount and, if equipped, the bracket for the secondary air injection pump motor in order to remove the lock carrier.
- Remove the impact member mount. Refer to → Chapter "Left Impact Member Mount, Removing and Installing".
- Remove the Secondary Air Injection Pump Motor bracket. Refer to → Engine Mechanical, Fuel Injection and Ignition; Rep. Gr.26; Secondary Air Injection System; Overview - Secondary Air Injection System
Installing
Install in reverse order of removal. Note the following:
- Install the headlamp housing. Refer to → Electrical Equipment; Rep. Gr.94; Headlamp; Headlamp, Removing and Installing.
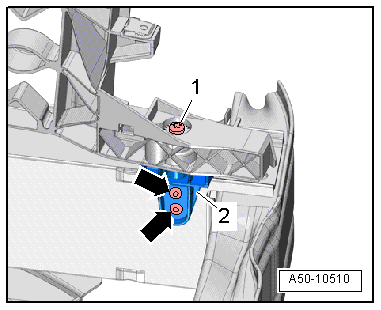
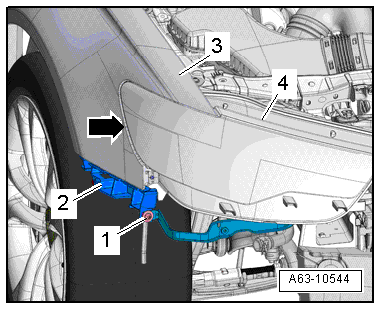
- Align the front bumper cover mount -2- and tighten the bolt -1-.
- The headlamp housing -4- must be flush with the fender -3--arrow-.
Lock Carrier, Removing and Installing, Audi S6/RS 6
Removing
- Remove the front noise insulation. Refer to → Chapter "Front Noise Insulation, Removing and Installing".
- Remove the impact member. Refer to → Chapter "Impact Member, Removing and Installing".
- Remove the coolant cooler with the fan shroud. Refer to → Rep. Gr.19; Radiator/Coolant Fan; Radiator, Removing and Installing.
- Remove the bolt -4-.
- Disconnect the connectors -1 and 2-.
- Disconnect the connector -3- to the front airbag crash sensor. Pay attention to the Safety Precautions. Refer to → Body Interior; Rep. Gr.00; Safety Precautions; Pyrotechnic Components Safety Precautions.
- Disconnect the hood lock cable at the coupling and place it on the lock carrier. Refer to → Chapter "Overview - Release Cable".
- Remove the bolt -6-.
- Have a second technician hold the lock carrier -4- and remove the bolts -1 to 3-.
Note
-Item 5- is not installed.
- Remove the lock carrier and the impact member mounts with a second technician.
It is necessary to remove the impact member mount in order to remove the lock carrier.
- Remove the impact member mount. Refer to → Chapter "Left Impact Member Mount, Removing and Installing".
Installing
Install in reverse order of removal. Note the following:
- Install the headlamp housing. Refer to → Electrical Equipment; Rep. Gr.94; Headlamp; Headlamp, Removing and Installing.
- Align the front bumper cover mount -2- and tighten the bolt -1-.
- The headlamp housing -4- must be flush with the fender -3--arrow-.
Lock Carrier Brace, Removing and Installing
Removing
- Remove the bolts -arrows- and then remove the upper lock carrier brace -1-.
Installing
Install in reverse order of removal.

Bumper Cover Mount, Removing and Installing, Vehicles through MY 2014
Removing
- Remove the front bumper cover. Refer to → Chapter "Bumper Cover, Removing and Installing".
- Remove the headlamp housing. Refer to → Electrical Equipment; Rep. Gr.94; Headlamp; Headlamp, Removing and Installing.
- Audi S6/RS 6, left side: Remove the Secondary Air Injection Pump Motor with the bracket. Refer to → Rep. Gr.26; Secondary Air Injection System; Secondary Air Injection Pump Motor V101, Removing and Installing.
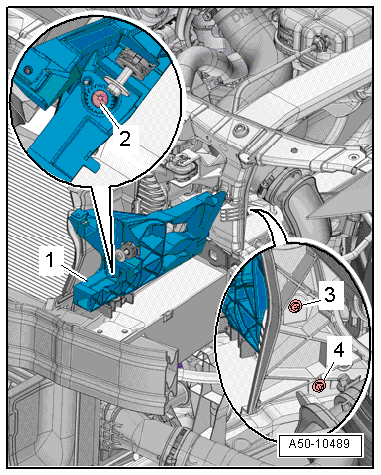
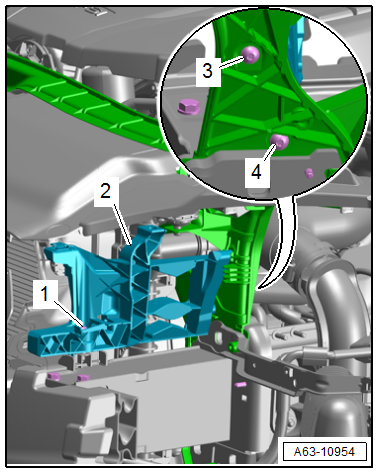
- Remove the bolts -2, 3 and 4-.
- Remove the mount -1-.
Installing
Install in reverse order of removal.
Bumper Cover Mount, Removing and Installing, Vehicles from MY 2015
Removing
- Remove the front bumper cover. Refer to → Chapter "Bumper Cover, Removing and Installing".
- Remove the headlamp housing. Refer to → Electrical Equipment; Rep. Gr.94; Headlamp; Headlamp, Removing and Installing.
- Right: Remove the air filter housing. Refer to → 6-Cylinder TDI Common Rail 3.0L 4V Fuel Injection and Glow Plug System; Rep. Gr.23; Air Filter; Air Filter Housing, Removing and Installing or → Rep. Gr.24; Air Filter; Air Filter Housing, Removing and Installing.
- Disconnect and free up the connector -1-.
- If equipped disconnect the connector for the NOx Sensor Control Module -J583-.
- Remove the bolts -1, 3 and 4-.
- Remove the mount -2-.
Installing
Install in reverse order of removal.
Bumper Cover Mount Counterholder, Removing and Installing
Special tools and workshop equipment required
- Drill
- Brill diameter 4 mm.
Removing
- Remove the front bumper cover. Refer to → Chapter "Bumper Cover, Removing and Installing".
- Release the tabs -A arrows- and remove the air guide -1--B arrow-.
- Audi RS 6: Remove the charge air cooling circuit and hang to the side with the lines attached. Refer to → Rep. Gr.19; Radiator/Coolant Fan; Charge Air Cooling Circuit Radiator, Removing and Installing.
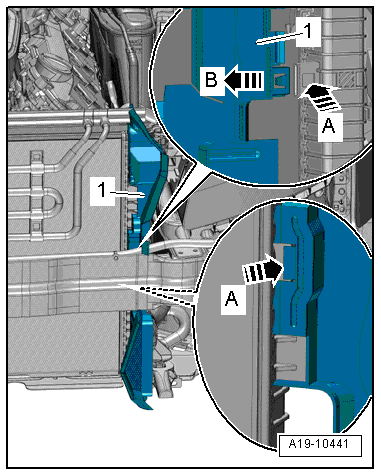
- Remove the bolt -1-.
- Drill off the rivet heads -arrows-, strike the rivet shafts and remove the counterholder -2-.
Installing
Install in reverse order of removal. Note the following:
- Check the installation position of the bumper mount and adjust if necessary. Refer to → Chapter "Front Bumper Cover, Adjusting".