Audi A6 Typ 4G: Fender
Overview - Fender
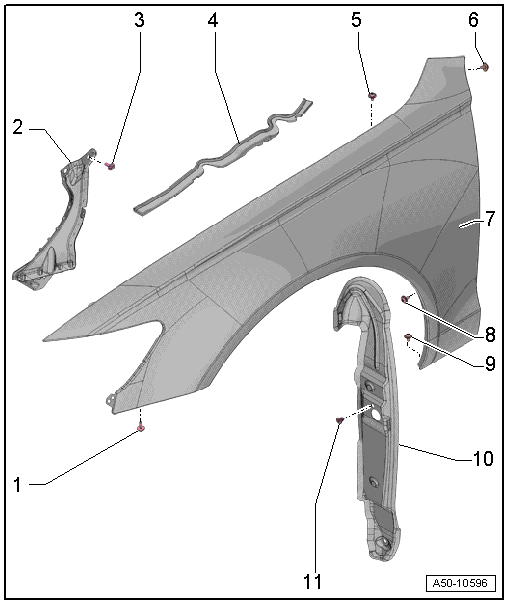
1 - Bolt
- 10 Nm
- Quantity: 2
2 - Lower Bracket
- For the fender
- Removing and installing. Refer to → Chapter "Lower Fender Bracket, Removing and Installing".
3 - Bolt
- 10 Nm
- Quantity: 2
4 - Seal
5 - Bolt
- 10 Nm
- Quantity: 4
6 - Bolt
- 10 Nm
7 - Fender
- There are different versions. Refer to the Parts Catalog.
- Removing and installing. Refer to → Chapter "Fender, Removing and Installing".
8 - Bolt
- 10 Nm
- Quantity: 2
9 - Bolt
- 10 Nm
- Quantity: 2
10 - End Plate
- There are different versions. Refer to the Parts Catalog.
- Removing and installing. Refer to → Chapter "End Panel, Removing and Installing".
11 - Expanding Rivet
- Quantity: 2
Fender, Removing and Installing
Fender, Removing and Installing
Removing
- Remove the end plate. Refer to → Chapter "End Panel, Removing and Installing".
- Remove the front bumper cover. Refer to → Chapter "Bumper Cover, Removing and Installing".
- Remove the front bumper cover mount. Refer to → Chapter "Front Bumper Cover Mount, Removing and Installing".
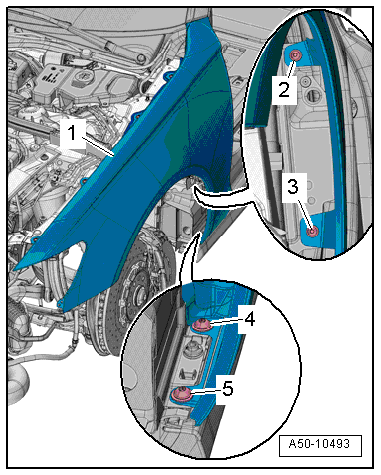
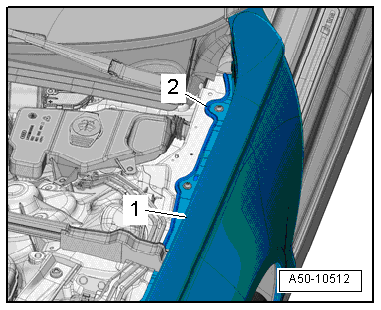
- Remove the bolts -1, 2, and 3-.
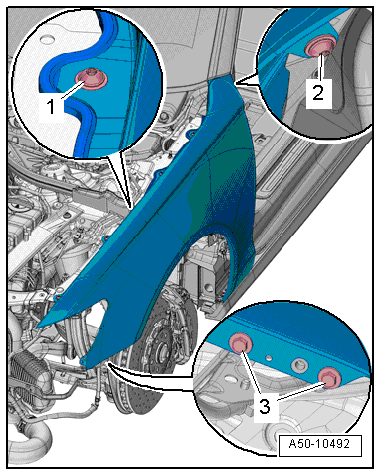
- Remove the bolts -2 to 5-.
- Remove the fender -1-.
Installing
Install in reverse order of removal. Note the following:
- Install the seal -2- between the fender flange and the fender -1- as illustrated.
End Panel, Removing and Installing
Removing
- Remove the front wheel housing liner. Refer to → Chapter "Front Wheel Housing Liner, Removing and Installing".
- Left: Remove the windshield washer fluid reservoir. Refer to → Electrical Equipment; Rep. Gr.92; Windshield Washer System; Windshield Washer Fluid Reservoir, Removing and Installing.
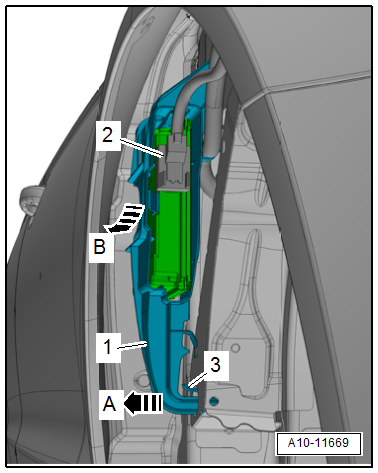
- Right: if equipped, release the retainer -3-.
- Remove the bracket -1- in the direction of -arrow A-, and disengage downward -arrow B- and remove.
- Disconnect the connector -2- on the subframe mount control module.
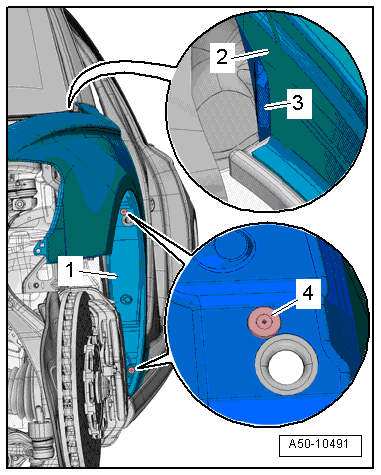
- Remove the expanding rivets -4-.
- Remove the guide -3- on the top of the fender end plate from the fender -2-.
- Remove the end plate -1- forward starting at the bottom.
Installing
Install in reverse order of removal. Note the following:
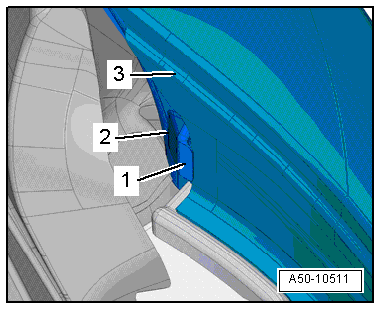
- The guide -1- on the top of the end plate -2- must be pushed onto the fender -3-.
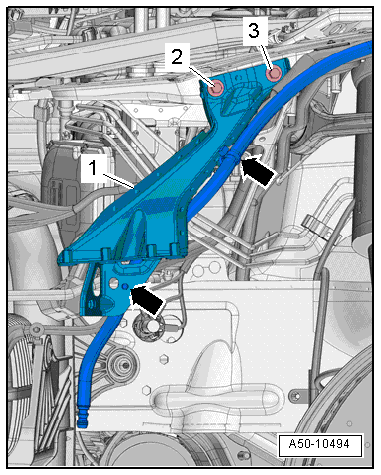
Lower Fender Bracket, Removing and Installing
Removing
- Remove the fender. Refer to → Chapter "Fender, Removing and Installing".
- Remove the headlamp housing. Refer to → Electrical Equipment; Rep. Gr.94; Headlamp; Headlamp, Removing and Installing.
- On the left side: free up the wiring harness and the windshield washer fluid hose for the headlamp washer system -arrows-.
- Right side: free up the wiring harness.
- Remove the bolts -2 and 3-.
- Remove the lower bracket -1-.
Installing
Install in reverse order of removal.