Audi A6 Typ 4G: Name Badges and Emblems
General Information
Special tools and workshop equipment required
- Roller -3356-
 Caution
- Badges and emblems that are remove must be replaced.
- The vehicle must reach room temperature before installing the name badge and emblems.
- The adhesive surface on the body must be free of dirt and grease, as well as free of adhesive residue.
- Clean the adhesive surfaces using Cleaning Solution -D 009 401 04-.
- Warm the adhesive surfaces to approximately 40 ºC (104 ºF) using a hot air blower.
- After installing, take the roller and press the brand emblems one more time.
Dimensions - Rear Lid Name Badges and Emblems
Dimensions - Rear Lid Name Badges and Emblems, Sedan
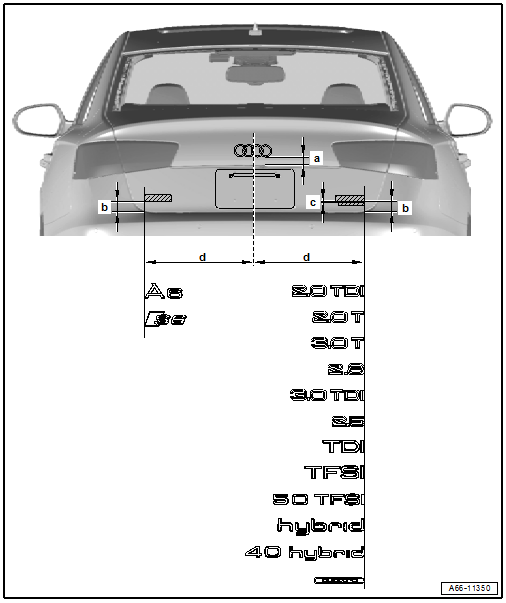
- Dimension -a- = 61 mm
- Dimension -b- = 48 mm
- Dimension -c- = 4 mm
- Dimension -d- = 482 mm
Dimensions - Rear Lid Name Badges and Emblems, Sedan, Market-Specific
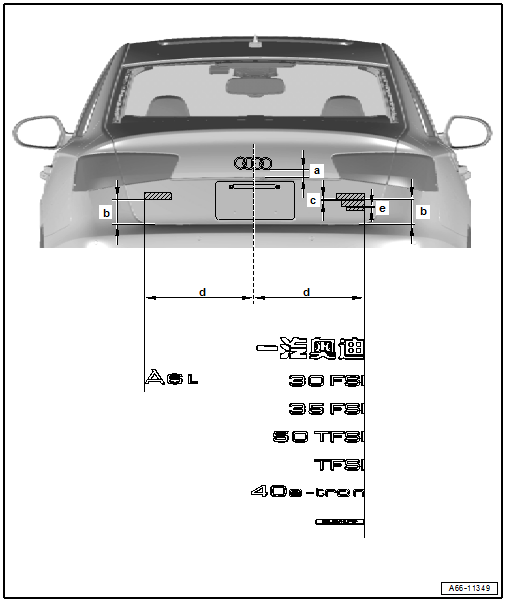
- Dimension -a- = 61 mm
- Dimension -b- = 48.5 mm
- Dimension -c- = 4 mm
- Dimension -d- = 482 mm
- Dimension -e- = 4 mm
Dimensions - Rear Lid Name Badges and Emblems, Avant
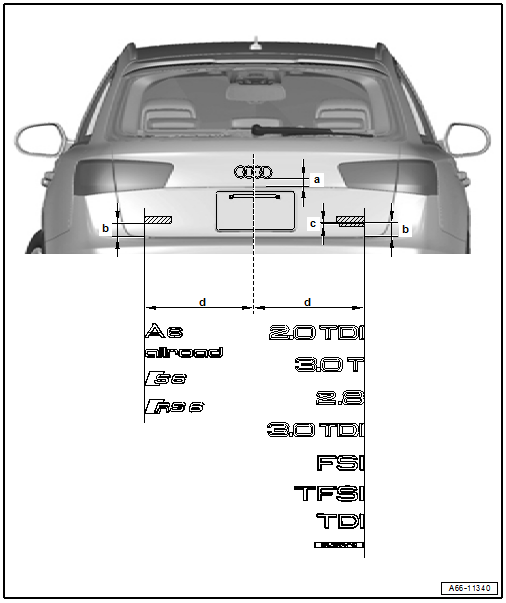
- Dimension -a- = 46 mm
- Dimension -b- = 49 mm
- Dimension -c- = 4 mm
- Dimension -d- = 528 mm
Dimensions - Name Badges and Emblems on Fender
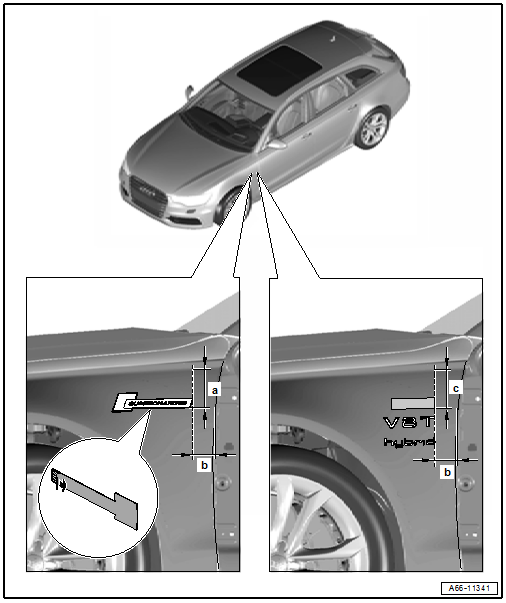
 Note
Note
The dimension -a- is measured from the lower edge (inner radius) on the fender outward.
- Dimension -a- = 60 mm
- Dimension -b- = 35 mm
- Dimension -c- = 58 mm
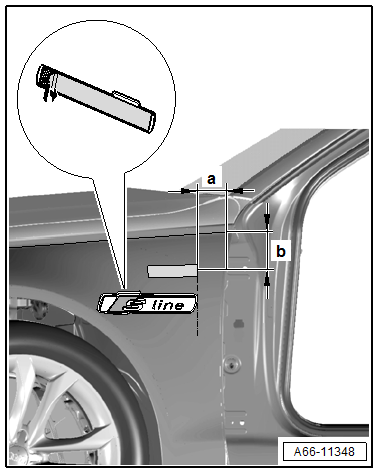
S-line
 Note
Note
The dimension -b- is measured from the lower edge (inner radius) on the fender outward.
- Dimension -a- = 37 mm
- Dimension -b- = 56 mm
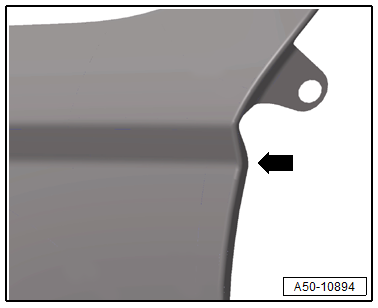
- Measure the dimension for the height distance from the inner radius -arrow- outward.
Front Emblem, Removing and Installing
Front Emblem, Removing and Installing, Audi A6/allroad/S6
Removing
- Remove the radiator grille. Refer to → Chapter "Radiator Grille, Removing and Installing, Audi A6/allroad/S6 through MY 2014".
- If equipped, remove the peripheral camera. Refer to → Communication; Rep. Gr.91; Sound System; Component Location Overview - Sound System.
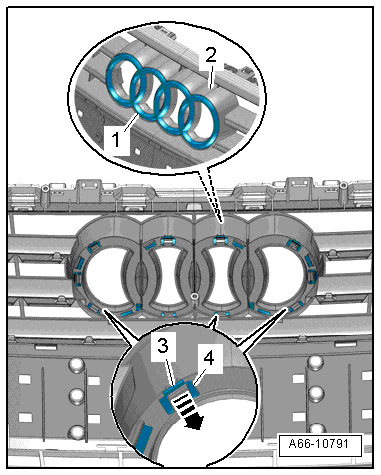
- Release the tabs -arrow- and removed the cover -1-.
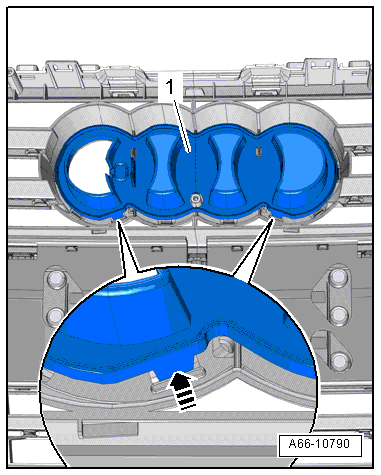
- Lift the tab -4- in direction of -arrow- and unlock the tabs -3-.
- Remove the Audi rings -1- from the radiator grille -2-.
Installing
Install in reverse order of removal. Note the following:
- Press on the Audi rings until you hear them click into place.
Front Emblem, Removing and Installing, Audi RS 6
Removing
- Remove the center reinforcement brace. Refer to → Chapter "Center Reinforcement Brace, Removing and Installing, Vehicles through MY 2014".
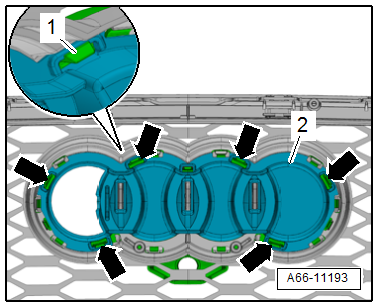
- Release the retaining tab -1--arrows- and remove the cover -2-.
- Remove the Audi rings with adapter from the radiator grille.
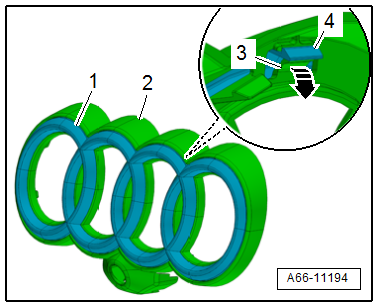
- Lift the tab -3- in direction of -arrow- and unlock the tabs -4-.
- Remove the Audi rings -1- from the adapter -2-.
Installing
Install in reverse order of removal. Note the following:
- Press on the Audi rings until you hear them click into place.
Name Badges, Removing and Installing
quattro Name Badge, Removing and Installing, Vehicles through MY 2014
Removing
- Remove the lock carrier cover. Refer to → Chapter "Lock Carrier Cover, Removing and Installing".
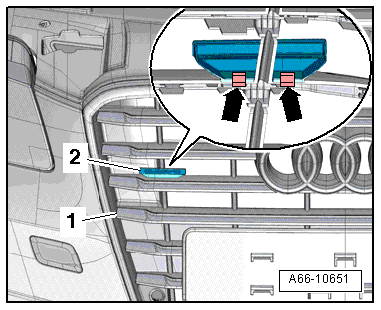
- Remove the clips -arrows-.
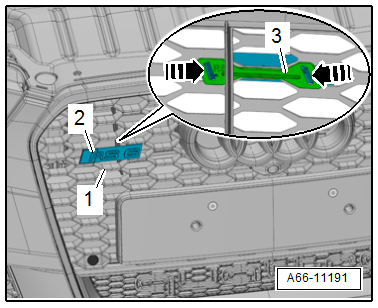
- Remove the quattro name badge -2- from the radiator grille -1-.
Installing
Install in reverse order of removal. Note the following:
- Position the quattro name badge on the radiator grille and press on the clips until they audibly engage.
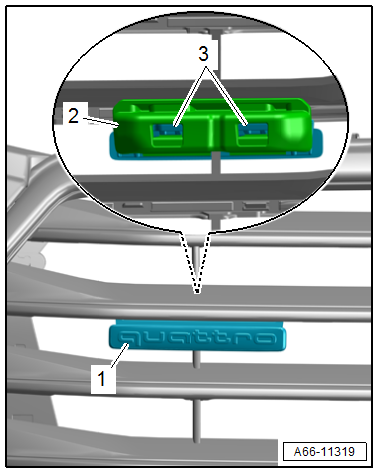
quattro Name Badge, Removing and Installing, Vehicles from MY 2015
Removing
- Remove the radiator grille. Refer to → Chapter "Radiator Grille, Removing and Installing, Audi A6 from MY 2015".
- Release the catches -3- and remove the retaining strip -2-.
- Remove the quattro name badge -1- from the radiator grille.
Installing
Install in reverse order of removal. Note the following:
- Position the quattro name badge on the radiator grille and press on the retaining strip until they audibly engage.
RS 6 Name Badge, Removing and Installing
Removing
- Remove the lock carrier cover. Refer to → Chapter "Lock Carrier Cover, Removing and Installing".
- Open the retainers -arrows- and remove the retaining strip -3-.
- Remove the RS 6 name badge -2- from the radiator grille -1-.
Installing
Install in reverse order of removal. Note the following:
- Position the RS 6 name plate on the radiator grille and press on the retaining strip until it audibly engages.
- The retaining strip can only be pressed down in one position.
