Audi A6 Typ 4G: Overview - A-Pillar Trim Panel
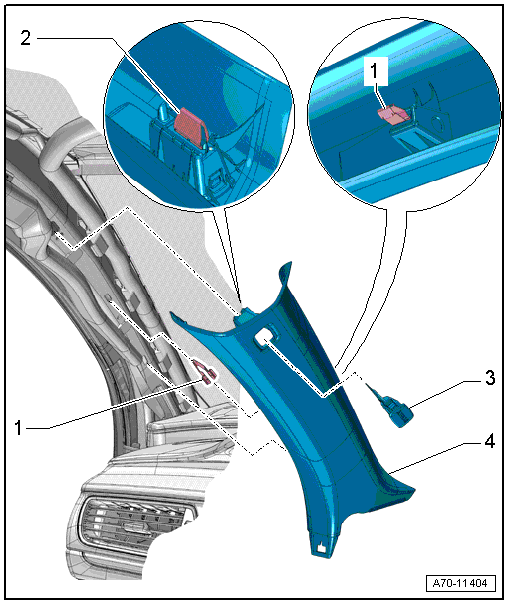
1 - Clip
- With hooks
- Quantity: 2
- Replace
- Insert in the trim panel
- Remove the clips that are still in the mounting points on the body using Omega Clip Tool -T40280-.
2 - Expanding Clip
- Insert in the trim panel
- Remove the clips that are still in the mounting points on the body using Omega Clip Tool -T40280-.
3 - Expanding Cap
- With the "Airbag" symbol
- Carefully unclip
4 - Upper A-Pillar Trim Panel
- Removing and installing. Refer to → Chapter "A-Pillar Trim Panel, Removing and Installing".
Overview - B-Pillar Trim Panel
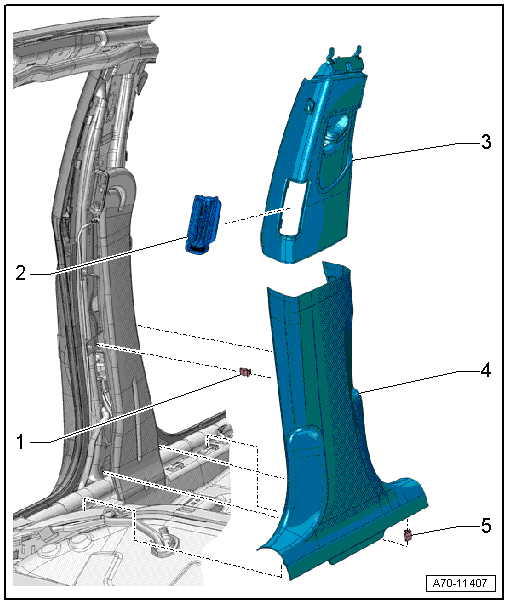
1 - Clip
- Quantity: 4
- Insert in the trim panel
- Remove any remaining clips in the body mounting points using the Omega Clip Tool -T40280-. To install, insert into the trim panel.
- Replace damaged or deformed clips
2 - Vent
- Equipment levels
- Removing and installing. Refer to → Chapter "B-Pillar Vent, Removing and Installing".
- Connect electrical harness connector, first insert lower vent in the trim and press on it until it engages audibly
3 - Upper B-Pillar Trim Panel
- Removing and installing. Refer to → Chapter "Upper B-Pillar Trim, Removing and Installing".
4 - Lower B-Pillar Trim Panel
- Removing and installing. Refer to → Chapter "Lower B-Pillar Trim Panel, Removing and Installing".
5 - Clip
- Quantity: 2
- Insert in the trim panel
- Remove the clips that are still in the mounting points on the body using the Omega Clip Tool -T40280-.
- Replace damaged or deformed clips
Frame for Air Ionization System Button
1 - Lower B-pillar trim panel
2 - Button frames
3 - Air Ionization System Button -E677-

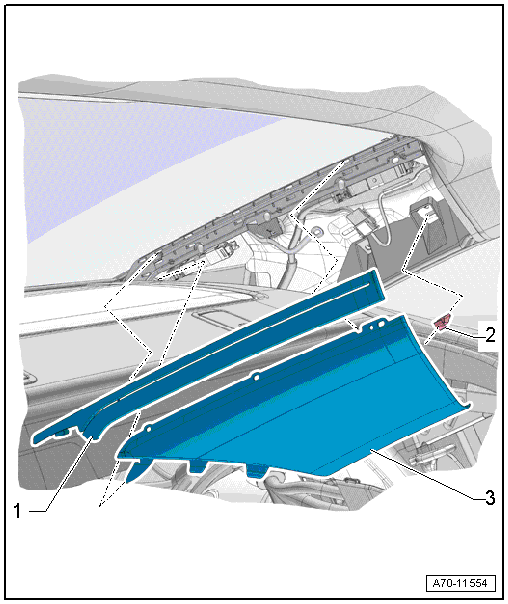
Overview - C-Pillar Trim Panel
Overview - C-Pillar Trim Panel, Sedan
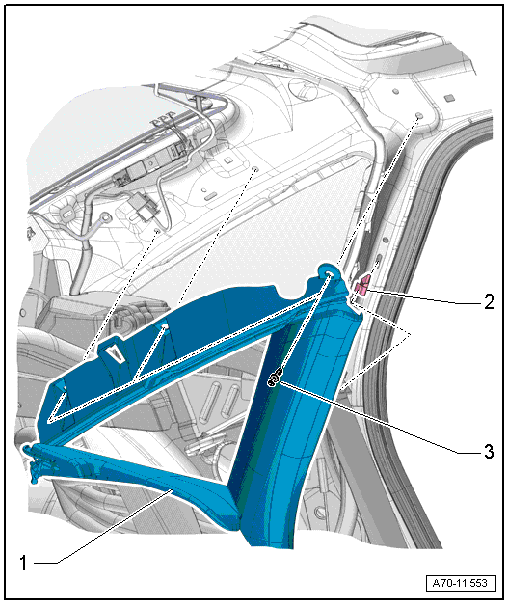
1 - C-Pillar Trim Panel
- Removing and installing. Refer to → Chapter "C-Pillar-Trim Panel, Removing and Installing, Sedan".
2 - Clip
- Insert in the trim panel
- Remove any remaining clips in the body mounting points using the Omega Clip Tool -T40280-. To install, insert into the trim panel.
- Replace any damaged or deformed clips
3 - Expanding Clip
- Quantity: 3
Overview - C-Pillar Trim Panel, Avant
1 - C-Pillar Trim Panel
- Removing and installing. Refer to → Chapter "C-Pillar Trim Panel, Removing and Installing, Avant".
- Insert in the upper part of the mounting point on the roof and clip into the C-pillar
- Press on until it engages audibly
- Stretch the door seal lip over
2 - Clip
- Insert in the trim panel
- Remove any remaining clips in the body mounting points using the Omega Clip Tool -T40280-. To install, insert into the trim panel.
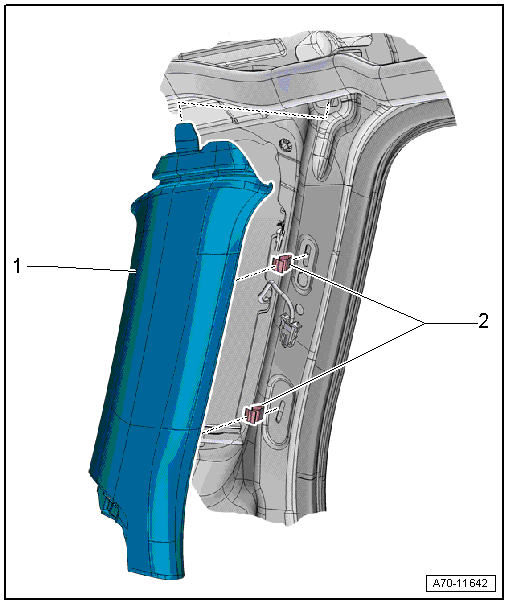
Overview - D-Pillar Trim Panel
Overview - D-Pillar Trim, Sedan
1 - Trim
- For the sun shade guide strip
- Equipment levels
- Removing and installing. Refer to → Chapter "D-Pillar Trim, Removing and Installing, Sedan".
- Attach it to the guide strip and press on it until it engages audibly
2 - Clip
- Quantity: 2
- Insert in the trim panel
- Remove any remaining clips in the body mounting points using the Omega Clip Tool -T40280-. To install, insert into the trim panel.
- Replace damaged or deformed clips
3 - D-Pillar Trim Panel
- Equipment levels
- Removing and installing. Refer to → Chapter "D-Pillar Trim, Removing and Installing, Sedan".
- Insert in the rear shelf and press on it until it audibly latches.
Overview - D-Pillar Trim Panel, Avant
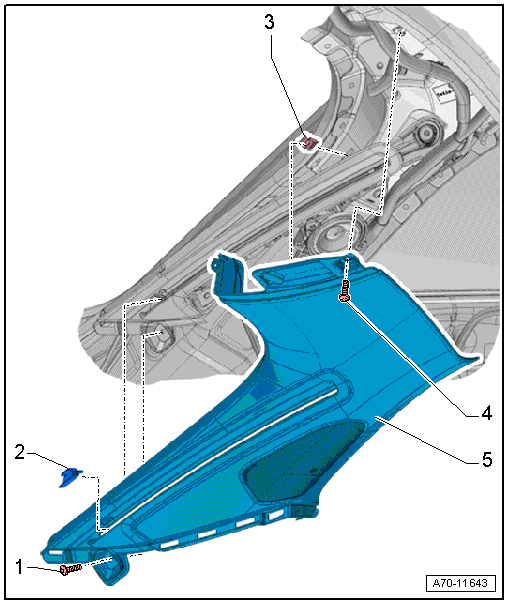
1 - Bolt
- 2 Nm
2 - Driver
- For luggage compartment cover
- Only for vehicles with luggage compartment cover motor
- Clip into the guide rails for the luggage compartment cover
3 - Clip
- Quantity: 1 or 2 depending on the equipment level
- Insert in the trim panel
- Remove any remaining clips in the body mounting points using the Omega Clip Tool -T40280-. To install, insert into the trim panel.
- Replace damaged or deformed clips
4 - Bolt
- 2 Nm
5 - D-Pillar Trim Panel
Vehicles with:
- Without luggage compartment cover motor
- With luggage compartment cover motor
- Removing and installing. Refer to → Chapter "D-Pillar Trim Panel, Removing and Installing, Avant".
- Press on until it engages audibly
- Stretch the rear lid seal lip
Overview - Foot Rest and Carpet
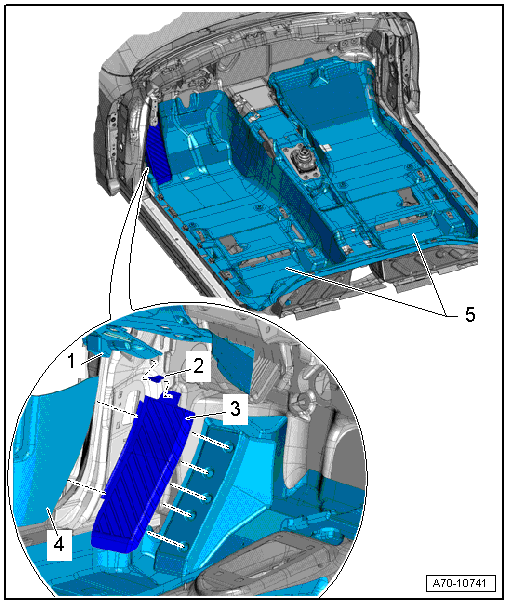
1 - Driver Side Instrument Panel Cover
2 - Clip
- Install in the foot rest
3 - Foot Rest
- Cannot be removed without damaging it
- Removing and installing. Refer to → Chapter "Foot Rest, Removing and Installing".
- Must engage completely in the mounts
4 - Front Sill Panel Strip
5 - Carpet
- One piece
- Removing and installing. Refer to → Chapter "Carpet, Removing and Installing".
Overview - Rear Shelf
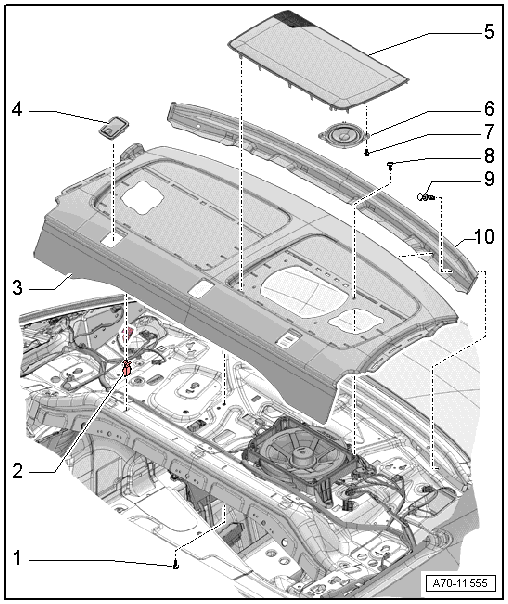
1 - Bolt
- 2 Nm
2 - Clip
- Quantity: 4
- Insert in the rear shelf
- Remove any remaining clips in the body mounting points using the Omega Clip Tool -T40280-. To install, insert into the rear shelf.
- Replace damaged or deformed clips
3 - Rear Shelf
Vehicles with:
- Without sun shade
- With sun shade
- No sound system
- With sound system
- Removing and installing. Refer to → Chapter "Rear Shelf, Removing and Installing".
- Insert the rear shelf in the rear window frame and press on the shelf until it audibly latches into place.
4 - Cap
- For child seat anchor
- Quantity: 3
- Equipment levels
- Removing and installing.
- Press on until it engages audibly
5 - Speaker Trim
- Quantity: 2
- Equipment levels
- Removing and installing. Refer to → Chapter "Speaker Trim, Removing and Installing".
- Insert in the rear shelf and press on it until it audibly latches.
6 - Speaker
- Quantity: 2
- Equipment levels
- Removing and installing. Refer to → Communication; Rep. Gr.91; Sound System; Component Location Overview - Sound System.
7 - Bolt
- Quantity: 4
- Tightening specification. Refer to → Communication; Rep. Gr.91; Sound System; Component Location Overview - Sound System.
8 - Bolt
- 2 Nm
- Quantity: 4
9 - Expanding Clip
- Quantity: 2
10 - Trim Panel
- For the rear window frame
