Audi A6 Typ 4G: Sill Panel Strip, Removing and Installing
Front Sill Panel Strip, Removing and Installing
Special tools and workshop equipment required
- Trim Removal Wedge -3409-
- Omega Clip Tool -T40280-
Removing
- Remove the instrument panel side cover. Refer to → Chapter "Instrument Panel Side Cover, Removing and Installing".
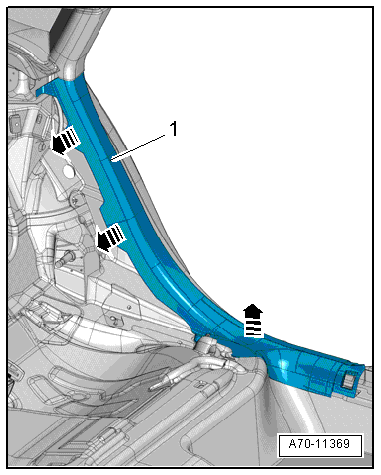
- Unclip the gap cover -1- from the lower A-pillar using the Trim Removal Wedge -3409--arrow- and remove it downward from the top of the A-pillar trim panel -2-.
- Remove the lower B-pillar trim panel. Refer to → Chapter "Lower B-Pillar Trim Panel, Removing and Installing".
Driver Side
- Remove the instrument panel cover on the driver side. Refer to → Chapter "Driver Side Instrument Panel Cover, Removing and Installing".
- Remove the hood release lever. Refer to → Body Exterior; Rep. Gr.55; Hood; Hood Release Lever, Removing and Installing.

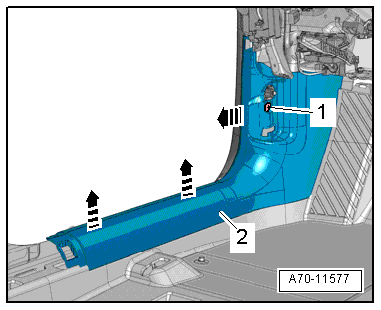
- Remove the screw -1- for the front sill panel strip.
Procedure for Both Sides of Vehicle
- Unclip the front sill panel strip -2- from the sill panel starting at the back using the Trim Removal Wedge -3409- and remove it toward the rear -arrows-.
- Remove the front sill panel strip.
Installing
Install in reverse order of removal. Note the following:
Driver Side
- Engage the front sill panel trim on the operating lever mount and push it into the foot compartment.
Front Passenger Side
- Slide the front sill panel trim guide into the carpet.
Procedure for Both Sides of Vehicle
- Clip the front sill panel trim onto the sill panel and stretch the door seal lip.
Installation notes, for example tightening specifications, replacing components. Refer to → Chapter "Overview - Front Sill Panel Strip".
Rear Sill Panel Strip, Removing and Installing
Special tools and workshop equipment required
- Trim Removal Wedge -3409-
- Omega Clip Tool -T40280-
Removing
- Remove the lower B-pillar trim panel. Refer to → Chapter "Lower B-Pillar Trim Panel, Removing and Installing".
- Remove the rear bench seat. Refer to → Chapter "Seat Bench/Single Seat, Removing and Installing".
- Remove the side cushion. Refer to → Chapter "Side Cushion, Removing and Installing".
- For vehicles with a fixed rear seat backrest: remove the rear seat backrest. Refer to → Chapter "Rear Seat Backrest, Removing and Installing".
- For vehicles with a Multi-contour seat: remove the Multi-contour seat. Refer to → Chapter "Rear Seat Backrest, Removing and Installing, Multi-contour Seat".
- Unclip the sill panel strip -1- from the sill panel strip and side panel starting at the front -arrows- using a Trim Removal Wedge -3409-.
- Pull the sill panel strip downward off the C-pillar trim and remove it.
Installing
Install in reverse order of removal. Note the following:
- Insert the sill panel strip into the C-pillar trim and press it onto the side panel until it engages audibly.
- Stretch the door seal lip over.
Installation notes, for example tightening specifications, replacing components. Refer to → Chapter "Overview - Rear Sill Panel Strip".