Audi A6 Typ 4G: B-Pillar Trim Panel, Removing and Installing
B-Pillar Vent, Removing and Installing
 Note
Note
Proceed very carefully when removing and installing because the vent is relatively easy to damage.
Special tools and workshop equipment required
- Trim Removal Wedge -3409-
Removing
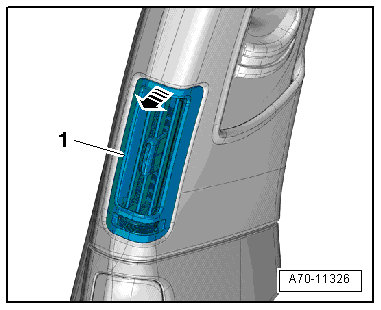
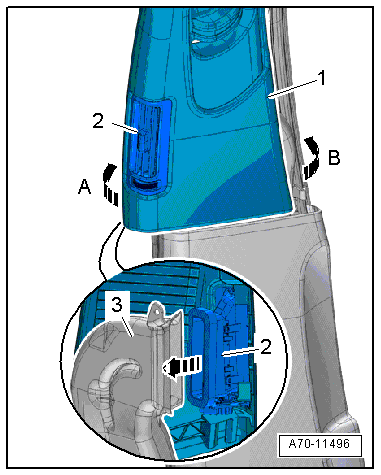
- Release the clip -1- on the top of the vent in the B-pillar with a small screwdriver.
- Carefully unclip the B-pillar vent from the upper B-pillar trim panel using the Trim Removal Wedge -3409--arrow-.
- Disconnect the connector and remove vent.
Installing
Install in reverse order of removal. Note the following:
Installation notes, for example tightening specifications, replacing components. Refer to → Chapter "Overview - B-Pillar Trim Panel".
Upper B-Pillar Trim, Removing and Installing
Special tools and workshop equipment required
- Trim Removal Wedge -3409-
Removing
 WARNING
Follow all Safety Precautions when working with pyrotechnic components. Refer to → Chapter "Pyrotechnic Components Safety Precautions".
- Remove the front belt end fitting. Refer to → Chapter "Front Belt End Fitting, Removing and Installing".
- Move seat belt height adjuster to the lowest position.
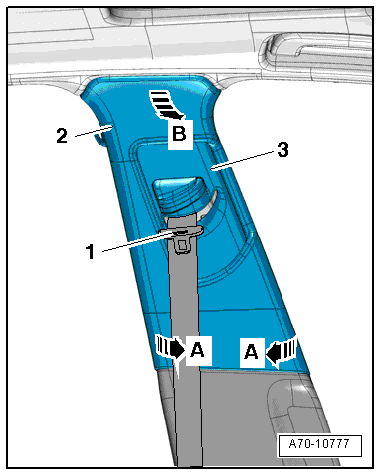
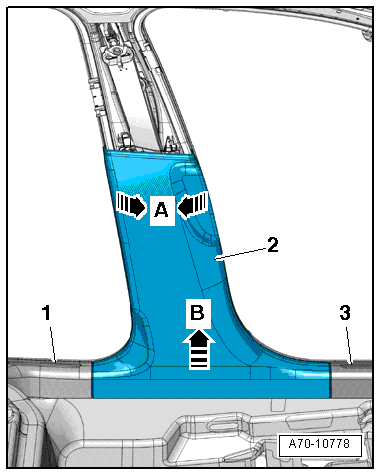
- Position the Trim Removal Wedge -3409- at the bottom edge of the trim panel and unclip the upper B-pillar trim panel -2- from the B-pillar in direction of -arrows A-.
- Vehicles with a vent: disconnect the connector.
- Remove the upper B-pillar trim panel from the bracket on the body in direction of -arrow B- by moving the trim panel toward the inside and pulling it downward at the same time.
- Guide the seat belt webbing and the belt tongue -1- out through the slide for the seat belt height adjuster -3- and then remove the B-pillar trim panel.
Installing
WARNING
- Follow all Safety Precautions when working with pyrotechnic components. Refer to → Chapter "Pyrotechnic Components Safety Precautions".
- Do not pinch the head curtain airbag when installing the B-pillar trim.
- Guide the belt webbing and seat belt latch in through the slide for the seat belt height adjuster.
Note
Ensure that the seat belt height adjuster is in the lowest position.
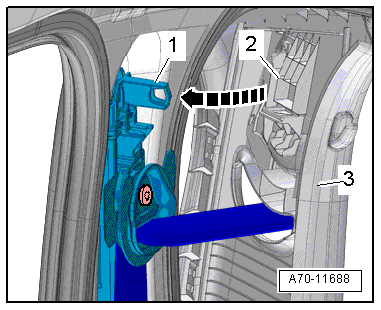
- First, insert the B-pillar trim panel -3- upward into the mount on the roof.
- The mount -2- for the sliding piece of the upper B-pillar trim panel must engage in the retaining pin -1- on the seat belt height adjuster -arrow-.
Versions with a Vent
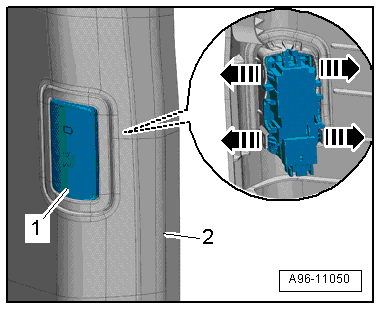
- Position the B-pillar rear trim -1- on the B-pillar so that the vent -2- locks into the air duct -3--arrow-.
- Engage the rear B-pillar trim panel on the B-pillar -arrow A-.
- Engage the front B-pillar trim panel on the B-pillar -arrow B-.
Installation is performed in reverse order of removal, while noting the following:
- Install the front belt anchor. Refer to → Chapter "Front Belt End Fitting, Removing and Installing".
- Stretch the door seal lips over the trim panel.
Installation notes, for example tightening specifications, replacing components. Refer to → Chapter "Overview - B-Pillar Trim Panel".
Lower B-Pillar Trim Panel, Removing and Installing
Special tools and workshop equipment required
- Pry Lever -80-200-
- Omega Clip Tool -T40280-
Removing
- Remove the upper B-pillar trim panel. Refer to → Chapter "Upper B-Pillar Trim, Removing and Installing".
- Starting at the top, unclip the lower B-pillar trim -2- from the B-pillar -A arrows- using the Pry Lever -80-200-.
- Unclip the lower B-pillar trim panel near the rear sill panel strip -1- and the front sill panel strip -3- from the sill panel -arrow B-.
- Vehicles with air ionization system: disconnect the connector for the Air Ionization System Button -E677--1-.
Installing
Install in reverse order of removal. Note the following:
- Press on the B-pillar trim panel until it engages audibly.
- Stretch the door seal lips over the trim panel.
Installation notes, for example tightening specifications, replacing components. Refer to → Chapter "Overview - B-Pillar Trim Panel".