Audi A6 Typ 4G: Overview - Front Backrest
Overview - Front Backrest, Standard Seat/Sport Seat
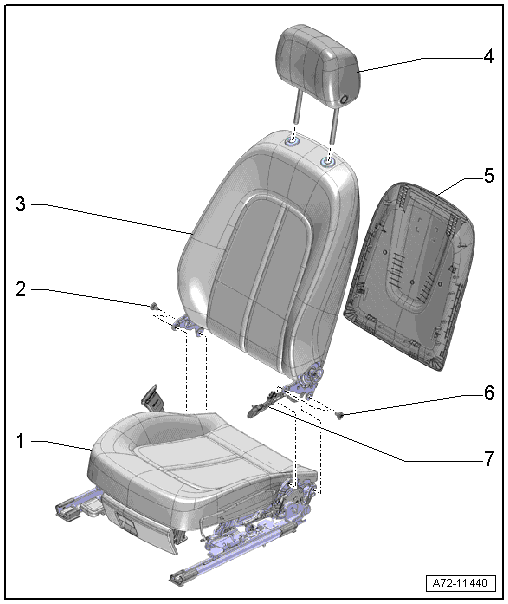
1 - Seat Pan
2 - Bolt
- 34.5 Nm
- Quantity: 2
- Self-locking
- Replace
- Threaded holes for bolts must be cleaned, for example, with a thread tap
3 - Backrest
- Removing and installing. Refer to → Chapter "Front Backrest, Removing and Installing, Standard Seat/Sport Seat/Super Sport Seat".
4 - Headrest
- Removing and installing. Refer to → Chapter "Headrest, Removing and Installing".
5 - Backrest Cover
- Vehicles with cargo net: the cargo net cannot be separated from the backrest cover.
- Removing and installing. Refer to → Chapter "Backrest Cover, Removing and Installing, Standard Seat/Sport Seat/Super Sport Seat".
- Attach to the top of the backrest frame and then press on it until it audibly locks
6 - Bolt
- 34.5 Nm
- Quantity: 2
- Self-locking
- Replace
- Threaded holes for bolts must be cleaned, for example, with a thread tap
7 - Wiring Harness
- From the side airbag to the connector station
- Depending on optional equipment, there may be more wiring harnesses, such as for the backrest heating, lumbar support
Overview - Front Backrest, Super-Sport Seat
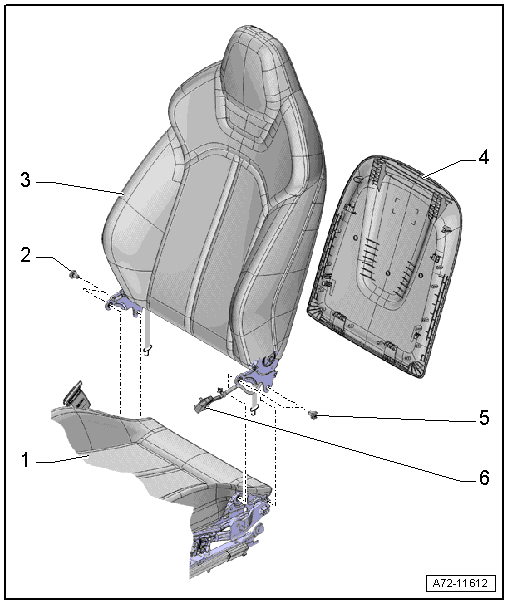
1 - Seat Pan
2 - Bolt
- 34.5 Nm
- Quantity: 2
- Self-locking
- Replace
- Threaded holes for bolts must be cleaned, for example, with a thread tap
3 - Backrest
- Removing and installing. Refer to → Chapter "Front Backrest, Removing and Installing, Standard Seat/Sport Seat/Super Sport Seat".
4 - Backrest Cover
- Vehicles with cargo net: the cargo net cannot be separated from the backrest cover.
- Removing and installing. Refer to → Chapter "Backrest Cover, Removing and Installing, Standard Seat/Sport Seat/Super Sport Seat".
- Attach to the top of the backrest frame and then press on it until it audibly locks
5 - Bolt
- 34.5 Nm
- Quantity: 2
- Self-locking
- Replace
- Threaded holes for bolts must be cleaned, for example, with a thread tap
6 - Wiring Harness
- From the side airbag to the connector station
- Depending on optional equipment, there may be more wiring harnesses, such as for the backrest heating, lumbar support
Overview - Front Backrest, Multi-contour Seat
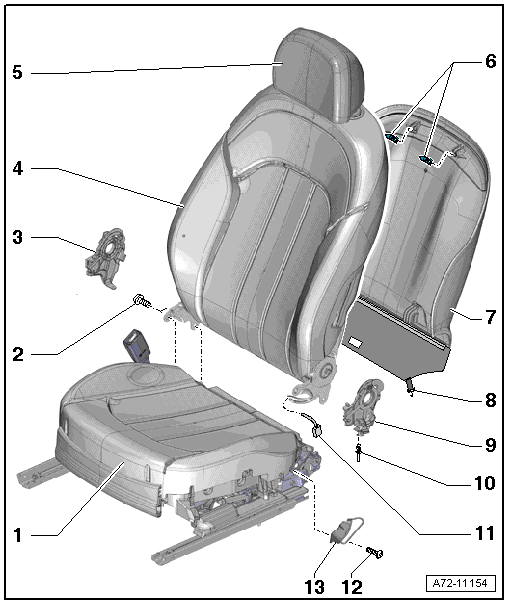
1 - Seat Pan
2 - Bolt
- 34.5 Nm
- Quantity: 4
- Self-locking
- Replace
- Threaded holes for bolts must be cleaned, for example, with a thread tap
3 - Trim
- for backrest hinge trim on tunnel side
- Removing and installing. Refer to → Chapter "Front Backrest, Removing and Installing".
4 - Backrest
- Removing and installing. Refer to → Chapter "Front Backrest, Removing and Installing".
5 - Headrest
- Removing and installing. Refer to → Chapter "Headrest, Removing and Installing".
6 - Clip
- With hooks
- Quantity: 2
- Replace
- Insert into the backrest cover
- Remove any remaining clips in the backrest frame mounting points using the Omega Clip Tool -T40280-.
- Replace damaged or deformed clips
7 - Backrest Cover
- Removing and installing. Refer to → Chapter "Backrest Cover, Removing and Installing, Multi-contour Seat".
8 - Rubber Strap
- With hooks
- Quantity: 2
9 - Trim
- For sill side backrest hinge
- Removing and installing. Refer to → Chapter "Front Backrest, Removing and Installing".
10 - Expanding Rivet
11 - Wiring Harness
- from the side airbag to the connector station
- Depending on the vehicle version, there may be more wiring harnesses, such as for the backrest heating
12 - Bolt
- 10 Nm
13 - Belt Guide
- Removing and installing. Refer to → Chapter "Front Seat Belt Guide, Removing and Installing, Multi-contour Seat".
Overview - Front Backrest, Market-Specific
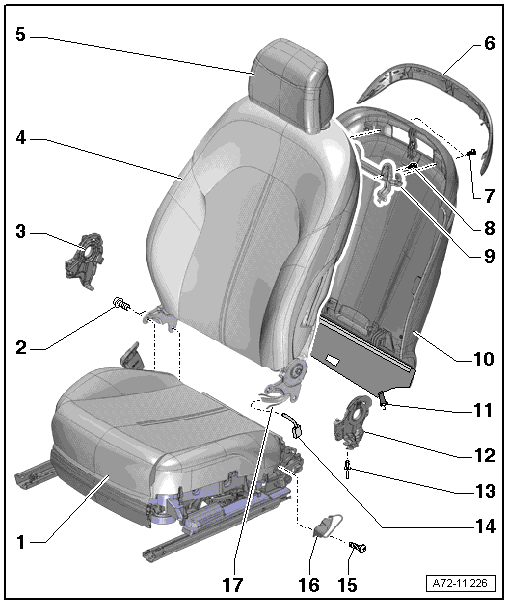
1 - Seat Pan
2 - Bolt
- 33 Nm
- Quantity: 4
- Self-locking
- Always replace if removed
- Threaded holes for bolts must be cleaned, for example, with a thread tap
3 - Trim
- For backrest hinge trim on tunnel side
- Removing and installing. Refer to → Chapter "Front Backrest, Removing and Installing".
4 - Backrest
- Removing and installing. Refer to → Chapter "Front Backrest, Removing and Installing".
5 - Headrest
- Removing and installing. Refer to → Chapter "Headrest, Removing and Installing".
6 - Trim
- For backrest cover
- Removing and installing. Refer to → Chapter "Backrest Cover, Removing and Installing, Market-Specific".
7 - Bolt
- 6.5 Nm
- Quantity: 2
8 - Bolt
- 6.5 Nm
- Quantity: 2
9 - Bracket
- For backrest cover
- Removing and installing
10 - Backrest Cover
- Removing and installing. Refer to → Chapter "Backrest Cover, Removing and Installing, Market-Specific".
11 - Rubber Strap
- Quantity: 2
- With hooks
12 - Trim
- For sill side backrest hinge
- Removing and installing. Refer to → Chapter "Front Backrest, Removing and Installing".
13 - Expanding Rivet
14 - Wiring Harness
- From the side airbag to the connector station
- Depending on the vehicle version, there may be more wiring harnesses, such as for the backrest heating
15 - Bolt
- 10 Nm
16 - Belt Guide
- Removing and installing. Refer to → Chapter "Front Seat Belt Guide, Removing and Installing, Multi-contour Seat".
17 - Pneumatic Line
- To the Multi-contour seat compressor
- Depending on vehicle version, there may be even more pneumatic lines, such as for side panel adjustment.
Overview - Front Backrest, Spring Mat
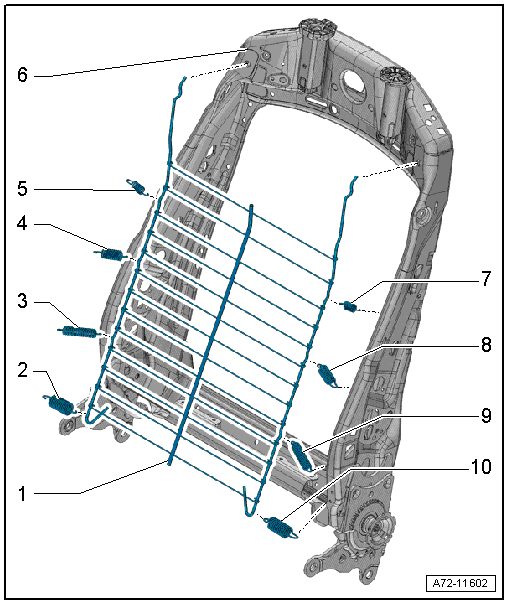
1 - Spring Mat
- Removing and installing. Refer to → Chapter "Spring Mat, Removing and Installing".
- can be removed and installed with and without the pull-springs
2 - Bottom Spring
- Not available individually
3 - Center Spring
- Not available individually
4 - Center Spring
- Not available individually
5 - Top Spring
- Not available individually
6 - Backrest Frame
7 - Top Spring
- Not available individually
8 - Center Spring
- Not available individually
9 - Center Spring
- Not available individually
10 - Bottom Spring
- Not available individually
Overview - Front Backrest, Lumbar Support
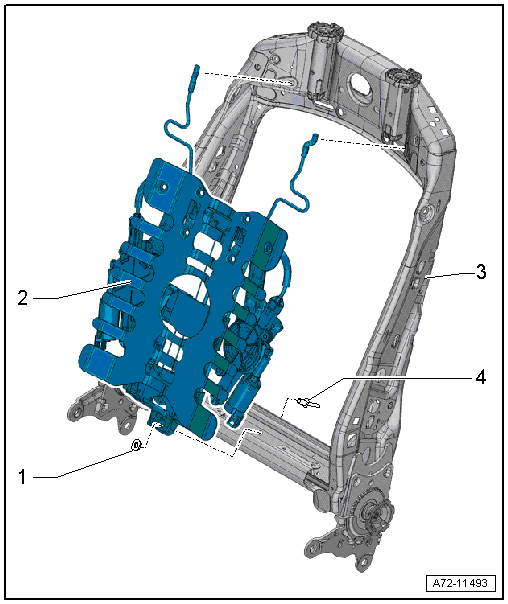
1 - Metal Washer
- Make sure the metal washer is inserted into the lumbar support from the front before riveting
2 - Lumbar Support
- Driver side with Driver Seat Lumbar Support Curvature Adjustment Motor -V125-/Driver Seat Lumbar Support Height Adjustment Motor -V129-
- Front passenger side with Front Passenger Seat Lumbar Support Curvature Adjustment Motor -V126-/Front Passenger Seat Lumbar Support Height Adjustment Motor -V130-
- Removing and installing. Refer to → Chapter "Lumbar Support Adjustment Motors -V125-/-V126-/-V129-/-V130-, Removing and Installing".
3 - Backrest Frame
4 - Rivet
Overview - Front Backrest, Backrest Adjustment Motor
 Note
Note
For the sake of clarity, seat cushion and seat cover are not depicted.
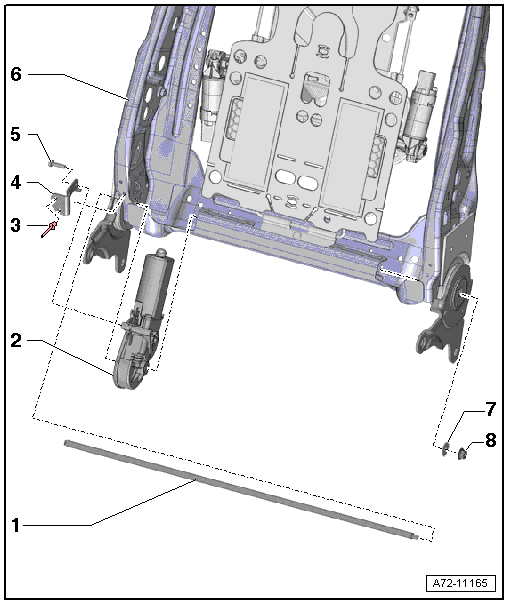
1 - Shaft
- The threaded hole for the nut -8- must be cleaned, for example, with a thread tap.
- Coat the threads on the shaft with locking fluid before installing the nut. For the correct locking fluid. Refer to the Parts Catalog.
2 - Driver Backrest Adjustment Motor -V45-
- Front passenger side Front Passenger Backrest Adjustment Motor -V46-
- Removing and installing. Refer to → Chapter "Backrest Adjuster, Removing and Installing".
3 - Rivet
- Quantity: 2
4 - Bracket
5 - Bolt
- 3.7 Nm
- Replace
- Clean the threaded hole with a thread tap.
- Use locking fluid when installing the bolt. For the correct locking fluid. Refer to the Parts Catalog.
6 - Backrest Frame
7 - Washer
8 - Nut
- 6 Nm
- Replace
Overview - Front Backrest, Rear Seat Entertainment Mount/Bracket
Rear Seat Entertainment Mount/Bracket
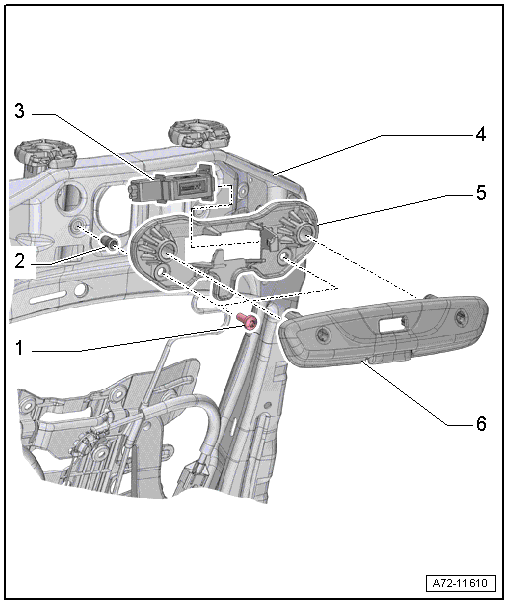
1 - Bolt
- 4 Nm
- Quantity: 2
2 - Internally Threaded Pop Rivet
- Quantity: 2
- For riveting to backrest frame
3 - Contact Connector
- For rear seat entertainment
- Clip to the bracket
4 - Backrest Frame
5 - Bracket
- For rear seat entertainment
- Removing and installing. Refer to → Chapter "Rear Seat Entertainment Mount/Bracket, Removing and Installing".
- Hook into the backrest frame
6 - Mount
- For rear seat entertainment
- Cannot be removed without damaging it
- Removing and installing. Refer to → Chapter "Rear Seat Entertainment Mount/Bracket, Removing and Installing".
- Press on until it engages audibly
Rear Seat Entertainment Mount/Bracket, Market-Specific
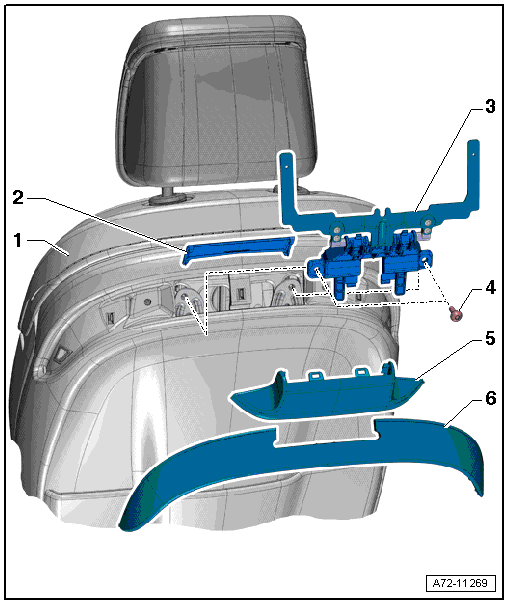
1 - Front Seat
2 - Front Cover
- Removing and installing. Refer to → Chapter "Rear Seat Entertainment Mount/Bracket, Removing and Installing, Market-Specific".
- Press until it engages completely
3 - Mount
- For rear seat entertainment
- Removing and installing. Refer to → Chapter "Rear Seat Entertainment Mount/Bracket, Removing and Installing, Market-Specific".
- Hook into bracket and bolt down
4 - Bolt
- 6.5 Nm
- Quantity: 2
5 - Rear Cover
- Removing and installing. Refer to → Chapter "Rear Seat Entertainment Mount/Bracket, Removing and Installing, Market-Specific".
- Press until it engages completely
6 - Trim
- For backrest cover
- Removing and installing. Refer to → Chapter "Rear Seat Entertainment Mount/Bracket, Removing and Installing, Market-Specific".
- Press until it engages completely

