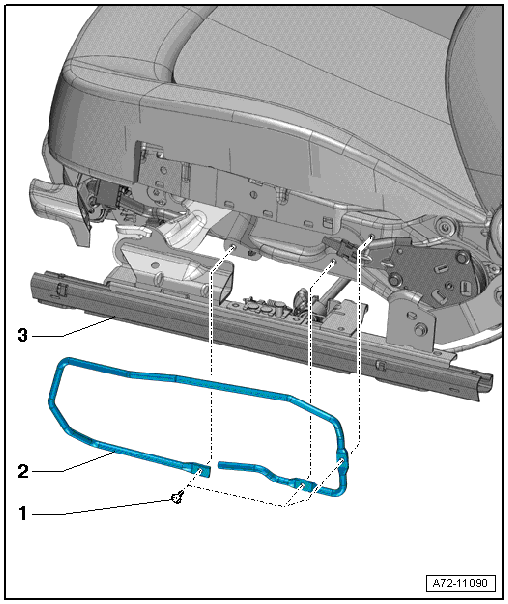
Audi A6 Typ 4G: Overview - Seat Pan, Modular Wiring Routing
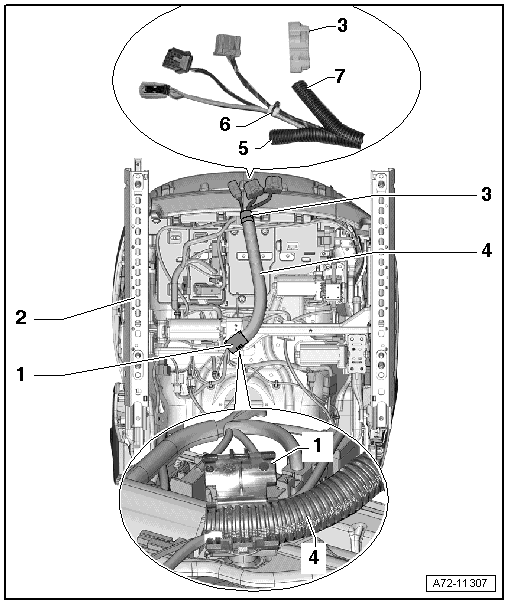
1 - Rear Wiring Bracket
- Attach back at the same location when installing
2 - Front Seat
3 - Front Wiring Bracket
- Attach back at the same location when installing
4 - Wiring Harness
- Do not twist installed wires
5 - Corrugated Tube Lower Section
- Must end flush with the rear cable holder
6 - Cable Tie
- Attach back at the same location when installing
7 - Corrugated Tube Upper Section
- Must end flush with the rear cable holder
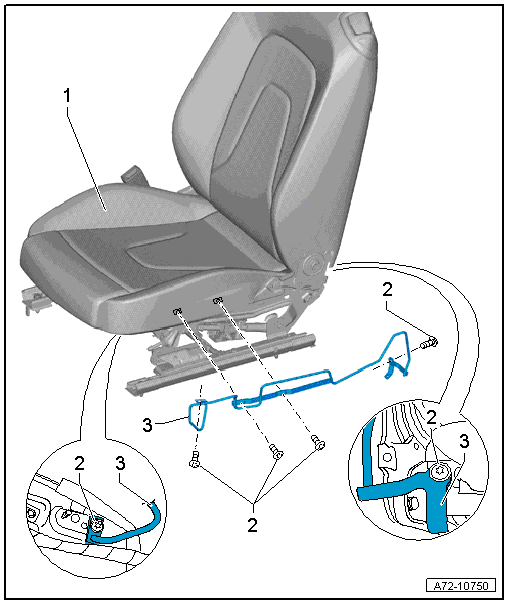
Overview - Seat Pan, Sill Panel/Tunnel Side Seat Side Trim
Sill Panel/Tunnel Seat Side Trim, Front Seat (Manual)
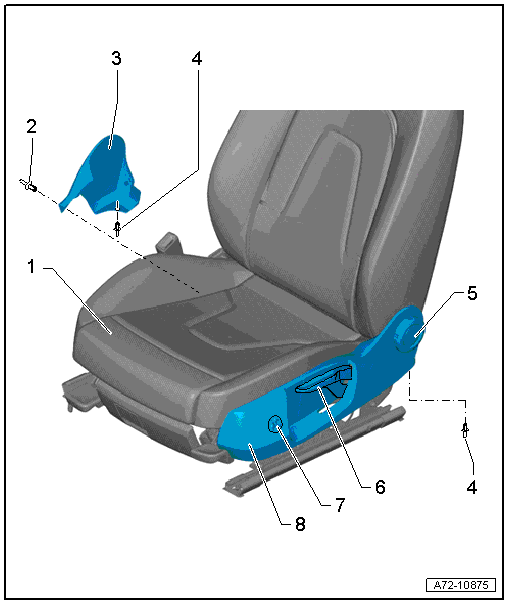
1 - Front Seat
2 - Expanding Rivet
3 - Tunnel-Side Trim
- Removing and installing. Refer to → Chapter "Seat Side Trim on the Tunnel Side, Removing and Installing".
4 - Expanding Rivet
5 - Hand Wheel
- For backrest adjustment
- Removing and installing. Refer to → Chapter "Seat Side Trim on Sill Panel Side, Removing and Installing, Front Seat (Manual)".
- Press on until it engages audibly
6 - Seat Height Adjustment Handle
- Removing and installing. Refer to → Chapter "Seat Height Adjuster Handle, Removing and Installing".
- Push the handle all the way on
7 - Driver Seat Lumbar Support Adjustment Switch -E176-
- Front passenger side Front Passenger Seat Lumbar Support Adjustment Switch -E177-
- Equipment levels
- Overview
8 - Sill-Side Trim
- Removing and installing. Refer to → Chapter "Seat Side Trim on Sill Panel Side, Removing and Installing, Front Seat (Manual)".
Sill Panel/Tunnel Seat Side Trim, Front Seat (Power)
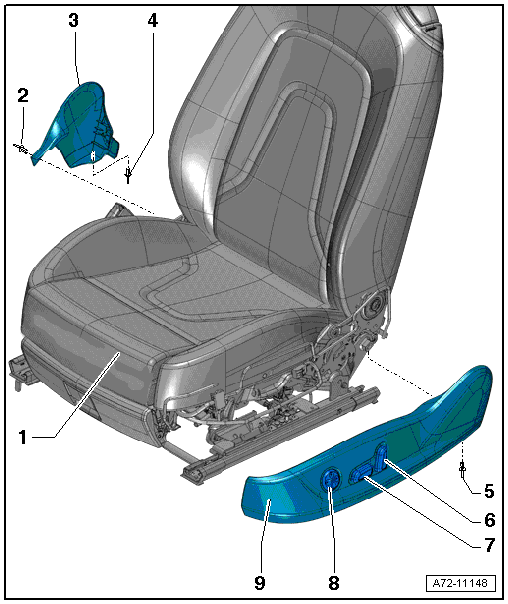
1 - Front Seat
2 - Expanding Rivet
3 - Tunnel-Side Trim
- Removing and installing. Refer to → Chapter "Seat Side Trim on the Tunnel Side, Removing and Installing".
4 - Expanding Rivet
5 - Expanding Rivet
6 - Driver Seat Adjustment Control Head -E470-
- Front passenger side: Front Passenger Seat Adjustment Control Head -E471-
- Overview
7 - Driver Seat Adjustment Control Head -E470-
- Front passenger side: Front Passenger Seat Adjustment Control Head -E471-
- Overview
8 - Driver Seat Lumbar Support Adjustment Switch -E176-
- Front passenger side Front Passenger Seat Lumbar Support Adjustment Switch -E177-
- Overview
9 - Sill-Side Trim
- Removing and installing. Refer to → Chapter "Seat Side Trim on Sill Panel Side, Removing and Installing, Front Seat (Power)".
- Attach to the bracket and storage compartment
Front Seat Trim, Sill Panel/Tunnel Seat Side Trim, Multi-contour Seat
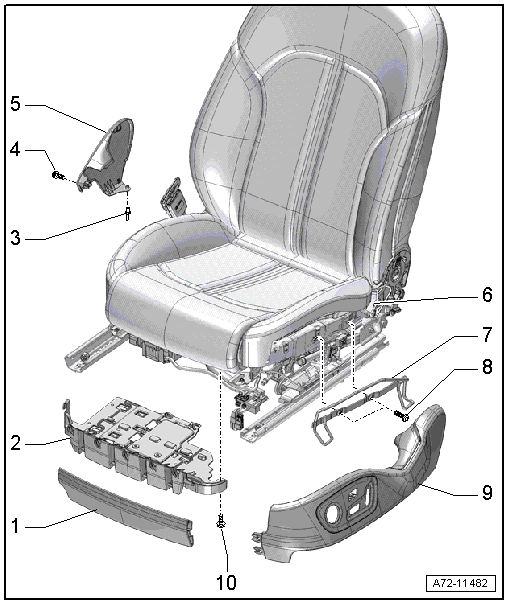
1 - Front Trim
- Removing and installing. Refer to → Chapter "Seat Side Trim on Sill Panel Side/Front Seat Trim, Removing and Installing, Multi-contour Seat".
2 - Bracket
- For front trim, compressor and Multi-contour seat control module
- Removing and installing. Refer to → Chapter "Front Seat Trim Bracket/Compressor/Control Module, Removing and Installing, Multi-contour Seat".
- To replace, install the compressor for the Multi-contour seat into the new bracket
3 - Expanding Rivet
4 - Bolt
- 6.5 Nm
- Clean the threaded hole with a thread tap.
- Install with locking compound. For the correct locking compound. Refer to the Parts Catalog.
5 - Tunnel-Side Trim
- Removing and installing. Refer to → Chapter "Seat Side Trim on the Tunnel Side, Removing and Installing".
6 - Front Seat
7 - Bracket
- For sill side trim
- Removing and installing. Refer to → Chapter "Seat Side Trim on Sill Panel Side/Front Seat Trim, Removing and Installing, Multi-contour Seat".
8 - Bolt
- 8 Nm
- Quantity: 2
9 - Sill-Side Trim
- Removing and installing. Refer to → Chapter "Seat Side Trim on Sill Panel Side/Front Seat Trim, Removing and Installing, Multi-contour Seat".
- Lock into the bracket and to the trim
10 - Bolt
- 3.5 Nm
- Quantity: 2
- Threaded holes for bolts must be cleaned, for example, with a thread tap
- Install with locking compound. For the correct locking compound. Refer to the Parts Catalog.
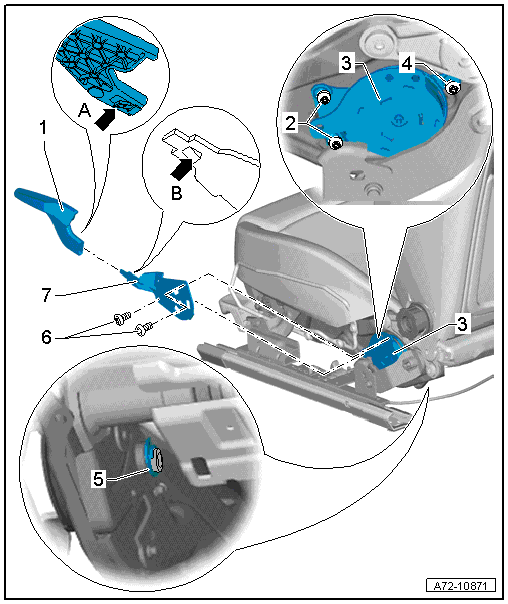
Overview - Seat Pan, Seat Side Trim Bracket on Sill Panel Side
Sill Panel Side Seat Side Trim Bracket, Front Seat (Manual)
1 - Bolt
- 3.5 Nm
- Quantity: 3
2 - Bracket
- For sill side trim
- Removing and installing. Refer to → Chapter "Seat Side Trim on Sill Panel Side, Removing and Installing, Front Seat (Manual)".
3 - Front Seat
Sill Panel Side Seat Side Trim Bracket, Front Seat (Power)
1 - Front Seat
2 - Bolt
- 8 Nm
- Quantity: 4
3 - Bracket for Sill-Side Trim
- Removing and installing. Refer to → Chapter "Seat Side Trim on Sill Panel Side, Removing and Installing, Front Seat (Power)".
Overview - Seat Pan, Seat Height Adjustment
Seat Height Adjustment (Manual)
1 - Seat Height Adjustment Handle
- Removing and installing. Refer to → Chapter "Seat Height Adjuster Handle, Removing and Installing".
- Push the handle all the way on
- Replace the seat height adjustment if the tab -arrow A- is damaged
- Lock the tab -arrow A- with the catch -arrow B-.
2 - Bolt
- 6.5 Nm
- Quantity: 2
- Note the different bolt length -4-
3 - Seat Height Adjuster
- Removing and installing. Refer to → Chapter "Seat Height Adjuster, Removing and Installing".
4 - Bolt
- 10 Nm
- Note the different bolt lengths -2-
5 - Lock Washer
- Always replace if removed
6 - Bolt
- 8 Nm
- Quantity: 2
7 - Lever
- For seat height adjustment handle
- Removing and installing. Refer to → Chapter "Seat Height Adjuster, Removing and Installing".
Seat Height Adjustment Motor
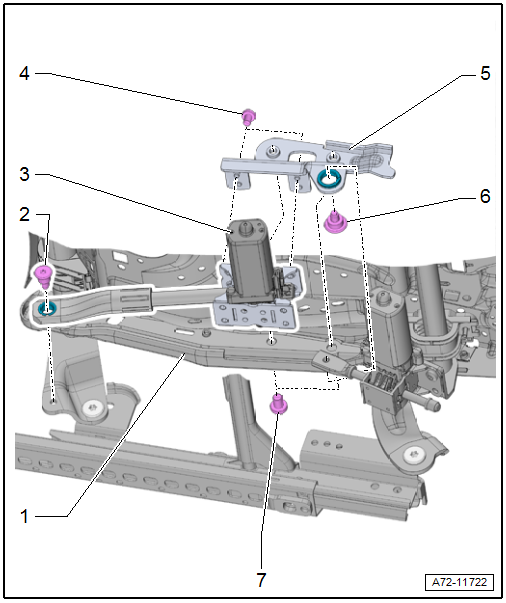
1 - Seat Pan
2 - Bolt
- 22 Nm
 Caution
The bolt has a left-hand thread.
- Self-locking
- Replace
- Removing and installing. Refer to → Chapter "Seat Height Adjustment Motor, Removing and Installing".
- Clean the threaded hole with a thread tap.
3 - Driver Seat Height Adjustment Motor -V245-
- Front passenger side: Front Passenger Seat Height Adjustment Motor -V246-
- Removing and installing. Refer to → Chapter "Seat Height Adjustment Motor, Removing and Installing".
4 - Bolts
- 10 Nm
- Quantity: 2
- Self-locking
- Replace
- Threaded holes for bolts must be cleaned, for example, with a thread tap
5 - Bracket
- Bolted with the seat pan
6 - Bolt
- Self-locking
- Replace after removing
- Clean the threaded hole with a thread tap.
- Tightening specification
7 - Bolts
- 20 Nm
- Quantity: 2
- Self-locking
- Replace
- Threaded holes for bolts must be cleaned, for example, with a thread tap
