Audi A6 Typ 4G (2011–2018) Workshop Manual / Body / Body Interior / Seat Frames / Overview - Headrest
Audi A6 Typ 4G: Overview - Headrest
Overview - Headrest, Basic
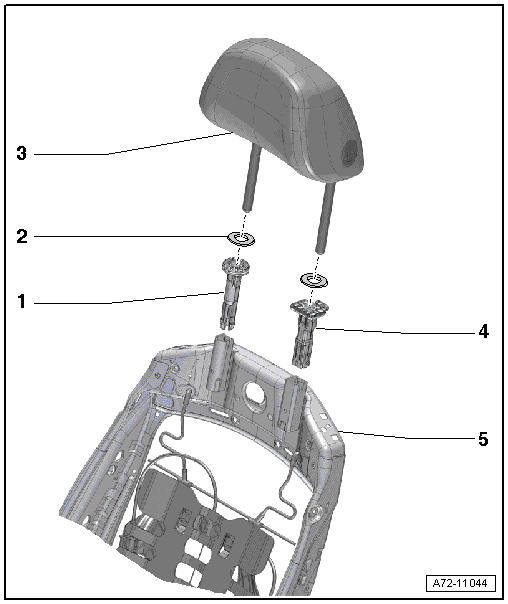
1 - Right Headrest Guide
- Without release button
- Always installed on right side of backrest
- Removing and installing. Refer to → Chapter "Headrest Guide, Removing and Installing".
2 - Cover
- Quantity: 2
- Attached to the backrest cover
3 - Headrest
- Removing and installing. Refer to → Chapter "Headrest, Removing and Installing".
- Must be correctly locked in the headrest guides
4 - Left Headrest Guide
- With release button
- Always installed on left side of backrest
- Removing and installing. Refer to → Chapter "Headrest Guide, Removing and Installing".
5 - Backrest Frame
Overview - Headrest, Convenience
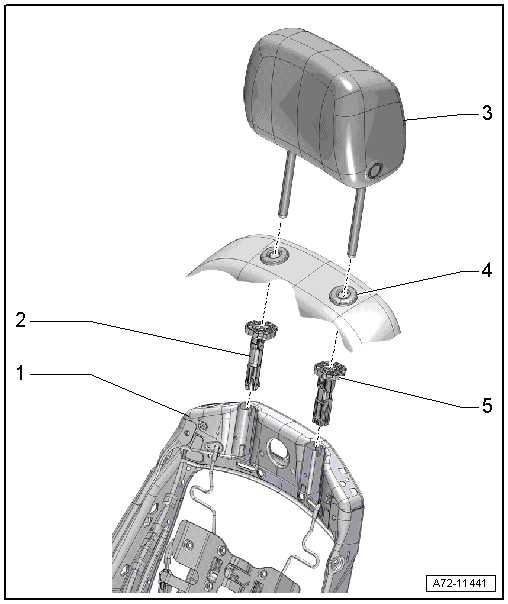
1 - Backrest Frame
2 - Right Headrest Guide
- With release button
- Can only be installed on one backrest side
- Removing and installing. Refer to → Chapter "Headrest Guide, Removing and Installing".
3 - Headrest
- Removing and installing. Refer to → Chapter "Headrest, Removing and Installing".
- Must be correctly locked in the headrest guides
4 - Cover
- Attached to the backrest cover
5 - Left Headrest Guide
- With release button
- Can only be installed on one backrest side
- Removing and installing. Refer to → Chapter "Headrest Guide, Removing and Installing".
Overview - Headrest, Super Sport Seat
 Note
Note
- The headrest is a fixed component of the backrest padding and can only be removed together with the backrest padding.
- It is not possible to separate the headrest from the backrest padding.
- The backrest cover is not shown.
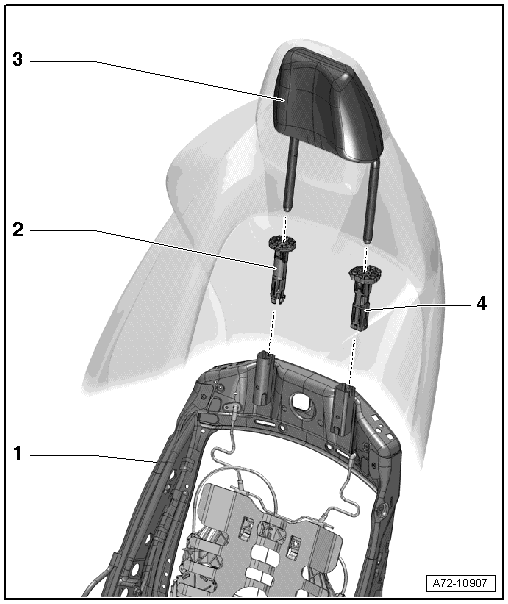
1 - Backrest Frame
2 - Headrest Guide
- With release button
- Removing and installing. Refer to → Chapter "Headrest Guide, Removing and Installing".
3 - Headrest
- With padding
- Headrest covered in padding
- Removing and installing. Refer to → Chapter "Backrest Cover and Cushion, Removing and Installing, Super Sport Seat".
4 - Headrest Guide
- With release button
- Removing and installing. Refer to → Chapter "Headrest Guide, Removing and Installing".
