Audi A6 Typ 4G (2011–2018) Workshop Manual / Body / Body Exterior / Exterior Equipment / Overview - Front Wheel Housing Liner
Audi A6 Typ 4G: Overview - Front Wheel Housing Liner
Overview - Wheel Housing Liner
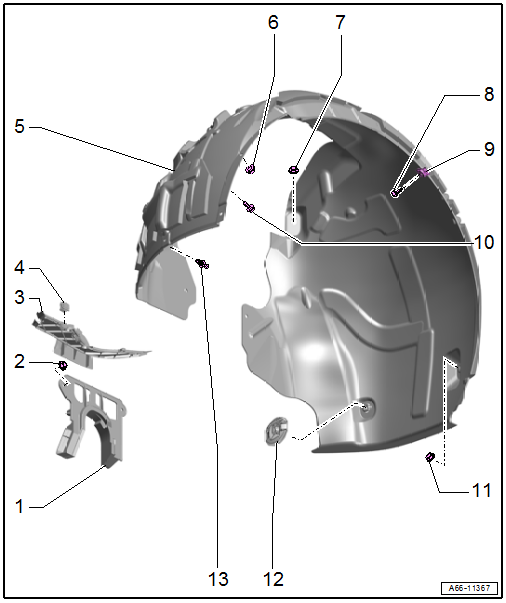
1 - Driveshaft Cover
- Removing and installing. Refer to → Chapter "Driveshaft Cover, Removing and Installing".
2 - Nut
- Quantity: 2
- 2 Nm
3 - Longitudinal Member Cover
- There are different versions. Refer to the Parts Catalog.
- Removing and installing. Refer to → Chapter "Cover, Removing and Installing, Longitudinal Member".
4 - Clamp
5 - Front Wheel Housing Liner
- There are different versions. Refer to the Parts Catalog.
- Removing and installing. Refer to → Chapter "Front Wheel Housing Liner, Removing and Installing".
6 - Nut
- 2 Nm
7 - Nut
- 2 Nm
8 - Bolt
- 2.1 Nm
9 - Bolt
- 2.1 Nm
- Quantity: 5
10 - Bracket
- For the wheel housing liner to the fender
11 - Nut
- 2 Nm
- For vehicles from MY 2015
12 - Retaining Clip
- Quantity: 2
13 - Expanding Rivet
- Quantity: 2
Overview - Wheel Spoiler
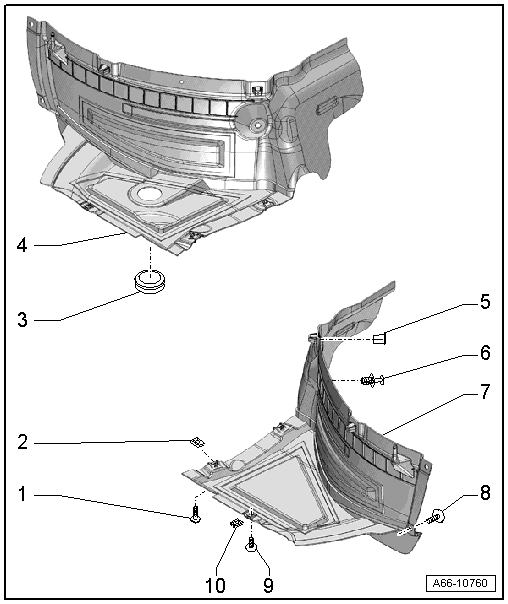
1 - Quick Release
- Quantity: 2
2 - Spring Nut
- Quantity: 2
- For the quick release
3 - Grommet
- For the exhaust pipe for the auxiliary heater
- Equipment levels
4 - Right Front Wheel Spoiler
- Removing and installing. Refer to → Chapter "Front Wheel Spoiler, Removing and Installing".
5 - Clip
- Quantity: 2
6 - Expanding Rivet
7 - Left Front Wheel Spoiler
- Removing and installing. Refer to → Chapter "Front Wheel Spoiler, Removing and Installing".
8 - Bolt
- 2 Nm
9 - Bolt
- 2 Nm
10 - Spring Nut
Overview - Wheel Spoiler, Audi RS 6
1 - Front Wheel Spoiler
- Removing and installing. Refer to → Chapter "Front Wheel Spoiler, Removing and Installing, Audi RS 6".
2 - Bolt
- 2.1 Nm
- Quantity: 2
3 - Bolt
- 2.1 Nm
- Quantity: 5
4 - Spoiler Lip
- Removing and installing. Refer to → Chapter "Spoiler Lip, Removing and Installing, Audi RS 6".
5 - Bolt
- 2.1 Nm
- Quantity: 2
Overview - Rear Wheel Housing Liner
1 - Retaining Clip
- Quantity: 9
2 - Rear Wheel Housing Liner
- There are different versions. Refer to the Parts Catalog.
- Removing and installing. Refer to → Chapter "Rear Wheel Housing Liner, Removing and Installing".
3 - Bolt
- 2 Nm
- Quantity: 3
