Audi A6 Typ 4G (2011–2018) Workshop Manual / Body / Body Interior / Interior Trim / Overview - Instrument Panel Central Tube
Audi A6 Typ 4G: Overview - Instrument Panel Central Tube
Overview - Instrument Panel Central Tube
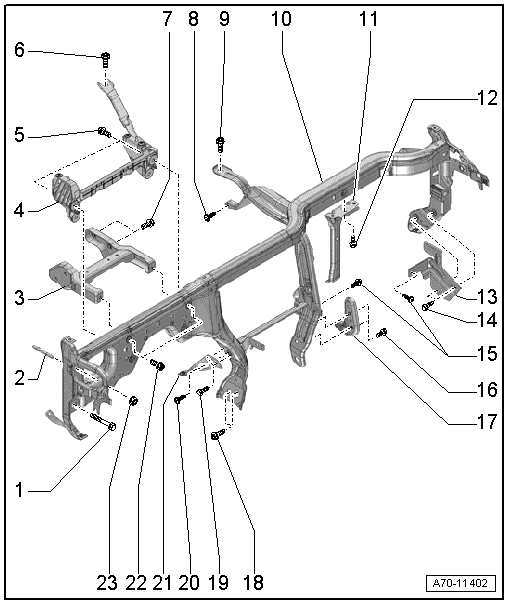
1 - Bolt
- 20 Nm
- Quantity: 2
2 - Threaded Pin
- 20 Nm
- Quantity: 2
3 - Mounting Bracket
- Removing and installing. Refer to → Chapter "Mounting Bracket, Removing and Installing".
4 - Bracket
- For Windshield Projection Head Up Display Control Module -J898-
- Equipment levels
5 - Bolt
- 9 Nm
- Quantity: 4
6 - Bolt
- 20 Nm
7 - Bolt
- 20 Nm
- Quantity: 4
8 - Bolt
- 3.6 Nm
9 - Bolt
- 20 Nm
10 - Central Tube
- For the instrument panel
- Removing and installing. Refer to → Chapter "Instrument Panel Central Tube, Removing and Installing".
11 - Bracket
- For glove compartment/knee airbag
- Equipment levels
- Removing and installing. Refer to → Chapter "Glove Compartment Bracket, Removing and Installing, Knee Airbag".
12 - Bolt
- 9 Nm
13 - Bracket
- For Air Conditioning (A/C) unit
- Removing and installing. Refer to → Chapter "A/C Unit Bracket, Removing and Installing".
14 - Bolt
- 9 Nm
- Quantity: 2
15 - Screws
- 3.6 Nm
16 - Bolt
- 9 Nm
- Quantity: 2
17 - Bracket
- For the glove compartment
- Removing and installing. Refer to → Chapter "Glove Compartment Bracket, Removing and Installing".
18 - Bolt
- 25 Nm
- Quantity: 3
19 - Bolt
- 9 Nm
20 - Bolt
- 3.6 Nm
21 - Bracket
- For the instrument panel cover
- Removing and installing. Refer to → Chapter "Instrument Panel Cover Bracket, Removing and Installing".
22 - Bolt
- 20 Nm
- Quantity: 2
23 - Nut
- 20 Nm
- Quantity: 2
- Always replace if removed
Overview - Instrument Panel Central Tube, Knee Airbag
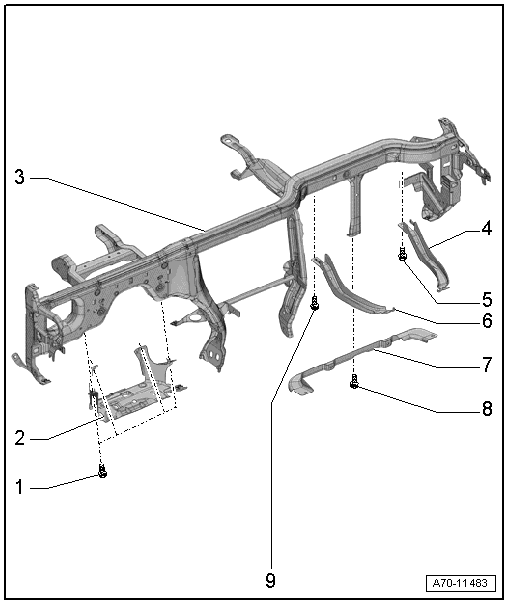
1 - Bolt
- Quantity: 4
- Tightening specification. Refer to → Chapter "Overview - Knee Airbag, Driver Side".
2 - Bracket
- For the driver knee airbag
- Removing and installing. Refer to → Chapter "Driver Side Knee Airbag with Igniter, Removing and Installing".
3 - Central Tube
- For the instrument panel
- Removing and installing. Refer to → Chapter "Instrument Panel Central Tube, Removing and Installing".
4 - Right Bracket
- For knee airbag
- Removing and installing. Refer to → Chapter "Knee Airbag Bracket, Removing and Installing".
- Install the bracket and rubber grommet into the mount
5 - Bolt
- 9 Nm
6 - Left Bracket
- For knee airbag
- Removing and installing. Refer to → Chapter "Knee Airbag Bracket, Removing and Installing".
- Install the bracket and rubber grommet into the mount
7 - Support
- For knee airbag
- Removing and installing. Refer to → Chapter "Passenger Side Knee Airbag with Igniter, Removing and Installing".
8 - Bolt
- Tightening specification. Refer to → Chapter "Overview - Glove Compartment".
9 - Bolt
- 9 Nm
