Audi A6 Typ 4G: Overview - Keyless Access Authorization System
Overview - Front Keyless Access Authorization System, Sedan
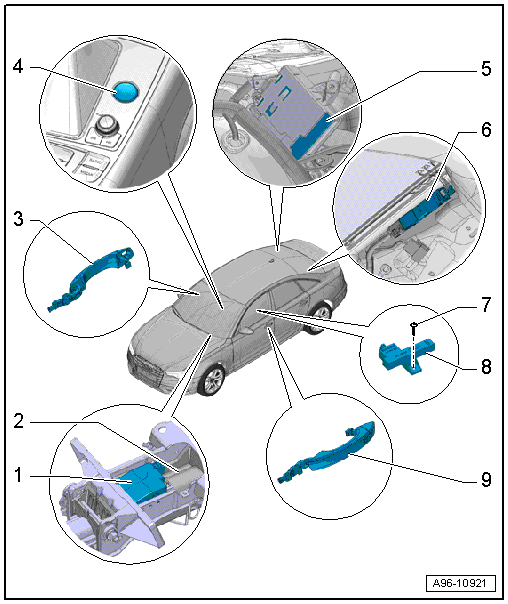
1 - Electronic Steering Column Lock Control Module -J764-
- Removing and installing. Refer to → Suspension, Wheels, Steering; Rep. Gr.48; Steering Column; Electronic Steering Column Lock Control Module J764, Removing and Installing
2 - Steering Column
3 - Front Passenger Exterior Door Handle
- With the Right Front Exterior Door Handle Touch Sensor -G606-
- Overview. Refer to → Chapter "Overview - Exterior Door Handle for Keyless Access Authorization System".
4 - Access/Start Authorization Button -E408-
- Removing and installing. Refer to → Chapter "Access/Start Authorization Button -E408-, Removing and Installing".
5 - Comfort System Central Control Module -J393-
- Overview. Refer to → Chapter "Overview - Relay Panel, Fuse Panel, E-Boxes, Luggage Compartment, Sedan".
6 - Antenna Amplifier 2 -R111-
- With Central Locking and Anti-Theft Alarm System Antenna -R47-
- Removing and installing. Refer to → Communication; Rep. Gr.91; Antenna Systems; Antenna Amplifier, Removing and Installing.
7 - Screw
- 2 Nm
8 - Access/Start System Antenna 1 in Vehicle Interior -R138-
- Removing and installing. Refer to → Chapter "Access/Start System Antenna 1 in Vehicle Interior -R138-, Removing and Installing".
9 - Driver Side Exterior Door Handle
- With the Left Front Exterior Door Handle Touch Sensor -G605-
- Overview. Refer to → Chapter "Overview - Exterior Door Handle for Keyless Access Authorization System".
Overview - Rear Keyless Access Authorization System, Sedan

1 - Antenna Amplifier 2 -R111-
- With Central Locking and Anti-Theft Alarm System Antenna -R47-
- Removing and installing. Refer to → Communication; Rep. Gr.91; Antenna Systems; Antenna Amplifier, Removing and Installing.
2 - Rear Driver Side Exterior Door Handle
- With the Left Rear Exterior Door Handle Touch Sensor -G417-
- Overview. Refer to → Chapter "Overview - Exterior Door Handle for Keyless Access Authorization System".
3 - Left Access/Start Authorization Antenna -R200-
- Removing and installing. Refer to → Chapter "Left and Right Access/Start Authorization Antenna -R200-/-R201-, Removing and Installing".
4 - Screw
- 1 Nm
- Quantity: 2
5 - Screw
- 1 Nm
- Quantity: 2
6 - Right Access/Start Authorization Antenna -R201-
- Removing and installing. Refer to → Chapter "Left and Right Access/Start Authorization Antenna -R200-/-R201-, Removing and Installing".
7 - Rear Passenger Side Exterior Door Handle
- With the Right Rear Exterior Door Handle Touch Sensor -G418-
- Overview. Refer to → Chapter "Overview - Exterior Door Handle for Keyless Access Authorization System".
8 - Comfort System Central Control Module -J393-
- Overview. Refer to → Chapter "Overview - Relay Panel, Fuse Panel, E-Boxes, Luggage Compartment, Sedan".
9 - Nut
- 2 Nm
- Quantity: 2
10 - Access/Start System Antenna In Luggage Compartment -R137-
- Removing and installing. Refer to → Chapter "Access/Start System Antenna in Luggage Compartment -R137-, Removing and Installing".
Overview - Front Keyless Access Authorization System, Avant
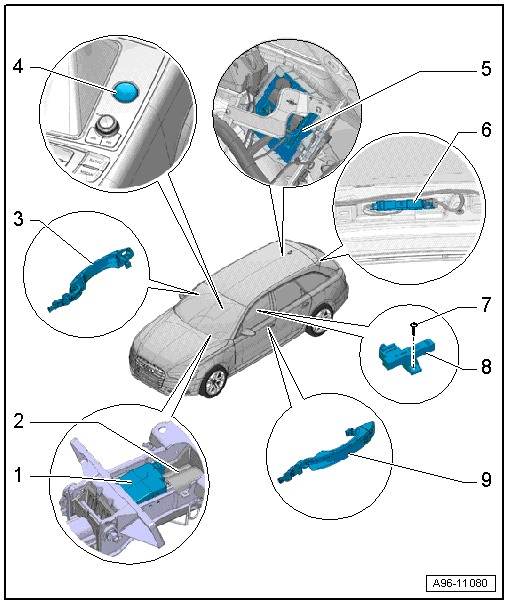
1 - Electronic Steering Column Lock Control Module -J764-
- Removing and installing. Refer to → Suspension, Wheels, Steering; Rep. Gr.48; Steering Column; Electronic Steering Column Lock Control Module J764, Removing and Installing
2 - Steering Column
3 - Front Passenger Exterior Door Handle
- With the Right Front Exterior Door Handle Touch Sensor -G606-
- Overview. Refer to → Chapter "Overview - Exterior Door Handle for Keyless Access Authorization System".
4 - Access/Start Authorization Button -E408-
- Removing and installing. Refer to → Chapter "Access/Start Authorization Button -E408-, Removing and Installing".
5 - Comfort System Central Control Module -J393-
- Overview. Refer to → Chapter "Overview - Relay Panel, Fuse Panel, E-Boxes, Luggage Compartment, Sedan".
6 - Antenna Amplifier 2 -R111-
- With Central Locking and Anti-Theft Alarm System Antenna -R47-
- Removing and installing. Refer to → Communication; Rep. Gr.91; Antenna Systems; Antenna Amplifier, Removing and Installing.
7 - Screw
- 2 Nm
8 - Access/Start System Antenna 1 in Vehicle Interior -R138-
- Removing and installing. Refer to → Chapter "Access/Start System Antenna 1 in Vehicle Interior -R138-, Removing and Installing".
9 - Driver Side Exterior Door Handle
- With the Left Front Exterior Door Handle Touch Sensor -G605-
- Overview. Refer to → Chapter "Overview - Exterior Door Handle for Keyless Access Authorization System".
Overview - Rear Keyless Access Authorization System, Avant
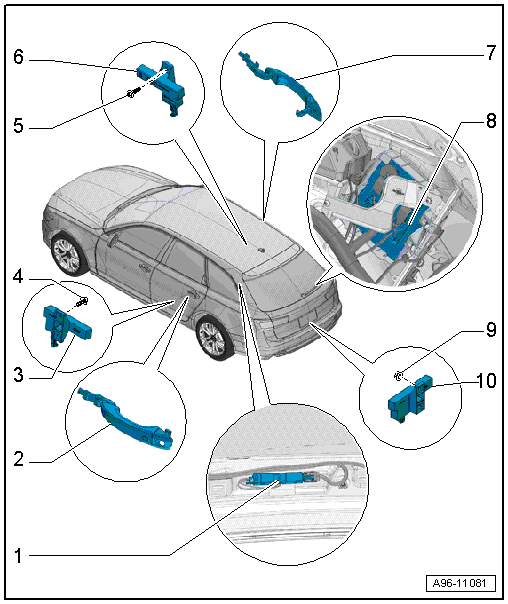
1 - Antenna Amplifier 2 -R111-
- With Central Locking and Anti-Theft Alarm System Antenna -R47-
- Removing and installing. Refer to → Communication; Rep. Gr.91; Antenna Systems; Antenna Amplifier, Removing and Installing.
2 - Rear Driver Side Exterior Door Handle
- With the Left Rear Exterior Door Handle Touch Sensor -G417-
- Overview. Refer to → Chapter "Overview - Exterior Door Handle for Keyless Access Authorization System".
3 - Left Access/Start Authorization Antenna -R200-
- Removing and installing. Refer to → Chapter "Left and Right Access/Start Authorization Antenna -R200-/-R201-, Removing and Installing".
4 - Screw
- 1 Nm
- Quantity: 2
5 - Screw
- 1 Nm
- Quantity: 2
6 - Right Access/Start Authorization Antenna -R201-
- Removing and installing. Refer to → Chapter "Left and Right Access/Start Authorization Antenna -R200-/-R201-, Removing and Installing".
7 - Rear Passenger Side Exterior Door Handle
- With the Right Rear Exterior Door Handle Touch Sensor -G418-
- Overview. Refer to → Chapter "Overview - Exterior Door Handle for Keyless Access Authorization System".
8 - Comfort System Central Control Module -J393-
- Overview. Refer to → Chapter "Overview - Relay Panel, Fuse Panel, E-Boxes, Luggage Compartment, Sedan".
9 - Nut
- 2 Nm
- Quantity: 2
10 - Access/Start System Antenna In Luggage Compartment -R137-
- Removing and installing. Refer to → Chapter "Access/Start System Antenna in Luggage Compartment -R137-, Removing and Installing".
Overview - Exterior Door Handle for Keyless Access Authorization System
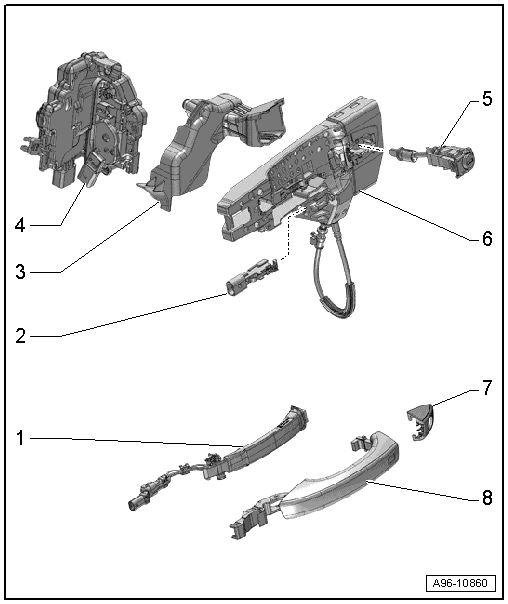
1 - Exterior Door Handle Touch Sensor
- In the outside door handle
Front door:
- Left Front Exterior Door Handle Touch Sensor -G605-, Right Front Exterior Door Handle Touch Sensor -G606-
- Removing and installing. Refer to → Chapter "Front Exterior Door Handle Switch, Removing and Installing".
Rear door:
- Left Rear Outside Door Handle Touch Sensor -G417-, Right Rear Outside Door handle Touch Sensor -G418-
- Removing and installing. Refer to → Chapter "Rear Exterior Door Handle Switch, Removing and Installing".
2 - Not Installed
3 - Anti-Theft Cover
- For the door lock
4 - Door Lock
5 - Lock Cylinder
- Only driver's side
6 - Bracket
7 - Cap
- Driver side for the lock cylinder
- Passenger side, closed version
8 - Exterior Door Handle
Overview - Power Rear Lid Opener Sensor

1 - Clamp
- Quantity: 7
2 - Power Rear Lid Opener Sensor -G750-
- Removing and installing. Refer to → Chapter "Power Rear Lid Opener Sensor -G750-/Rear Lid Opener Sensor 2 -G760-, Removing and Installing".
3 - Rear Lid Opener Control Module -J938-
- Removing and installing. Refer to → Chapter "Rear Lid Opener Control Module -J938-, Removing and Installing".
4 - Screw
- 2.1 Nm
5 - Bracket
6 - Rear Lid Opener Sensor 2 -G760-
- Removing and installing. Refer to → Chapter "Power Rear Lid Opener Sensor -G750-/Rear Lid Opener Sensor 2 -G760-, Removing and Installing, without Trailer Hitch".
7 - Clamp
- Quantity: 5
