Audi A6 Typ 4G: Screen Separator, Removing and Installing
Removing
- Fold both rear seat backrests forward.
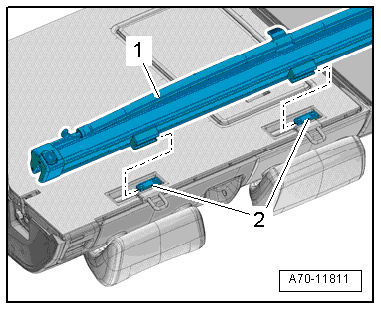
- Remove the screen separator -1- to the right from out of the mounts -2- on the right 2/3 of the rear seat backrest.
Installing
Install in reverse order of removal. Note the following:
- Position the screen separator -1- and the mounts in the guides on the right 2/3 of the rear seat backrest.
- Press the screen separator toward the left in the mounts -2- on the right 2/3 of the rear seat backrest all the way in.
Installation notes, for example tightening specifications, replacing components. Refer to → Chapter "Overview - Screen Separator".
Screen Separator Mount, Removing and Installing
Screen Separator Mount, Removing and Installing
Removing
- Fold the right 2/3 rear seat backrest toward the front.
- Remove the screen separator. Refer to → Chapter "Screen Separator, Removing and Installing".
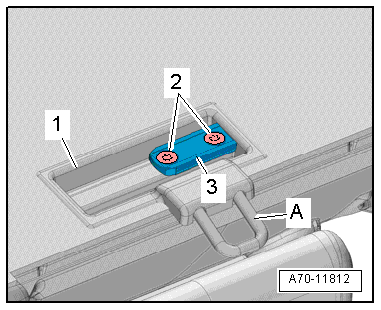
- Remove the bolts -2-.
- Remove the mount -3- and guide -1- for the screen separator.
- Vehicles with child seat anchor: remove the child seat anchor -A-.
Installing
Install in reverse order of removal.
Installation notes, for example tightening specifications, replacing components. Refer to → Chapter "Overview - Screen Separator".
Screen Separator Mount, Removing and Installing
Special tools and workshop equipment required
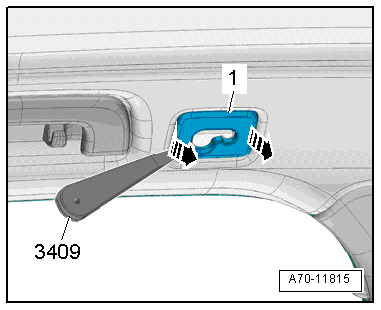
- Trim Removal Wedge -3409-
Removing
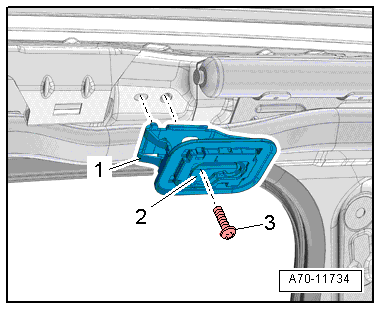
- Remove the cover -1- for the rear lifting eye on the corners with the Trim Removal Wedge -3409- from the lifting eye -arrows-.
- Unhook the front lifting eye cover at the mount and remove it.
- Remove the headliner and lay it on the seats. It is not necessary to remove it from the vehicle. Refer to → Chapter "Headliner, Removing and Installing, Avant".
- Press the cap -2- toward the rear and remove the bolt -3- that is situated behind it. Then remove the screen separator mount -1-.
Installing
 WARNING
- Follow all Safety Precautions when working with pyrotechnic components. Refer to → Chapter "Pyrotechnic Components Safety Precautions".
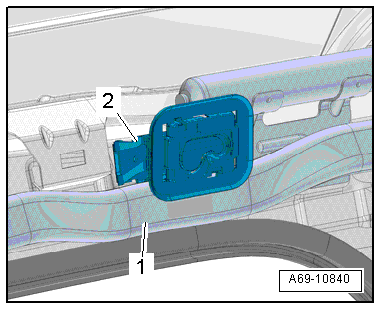
- When installing the front lifting eye -2-, do not pinch the head curtain airbag -1-.
Install in reverse order of removal. Note the following:
- Press the head curtain airbag -1- under the screen separator mount -2- as shown in the illustration.
Installation notes, for example tightening specifications, replacing components. Refer to → Chapter "Overview - Screen Separator".
Screen Separator Bracket, Removing and Installing
Removing
- Remove the luggage compartment side trim. Refer to → Chapter "Luggage Compartment Side Trim Panel, Removing and Installing, Avant".
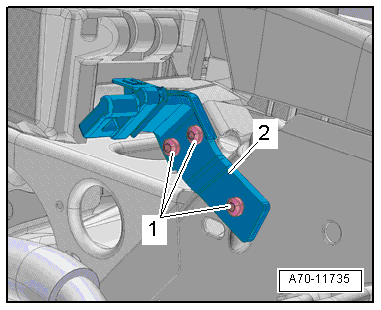
- Remove the bolts -1-.
- Remove the bracket -2- for the screen separator.
Installing
Install in reverse order of removal. Note the following:
Installation notes, for example tightening specifications, replacing components. Refer to → Chapter "Overview - Screen Separator".