Audi A6 Typ 4G: Parking Aid
Overview - Parking Aid
Overview - Front Parking Aid
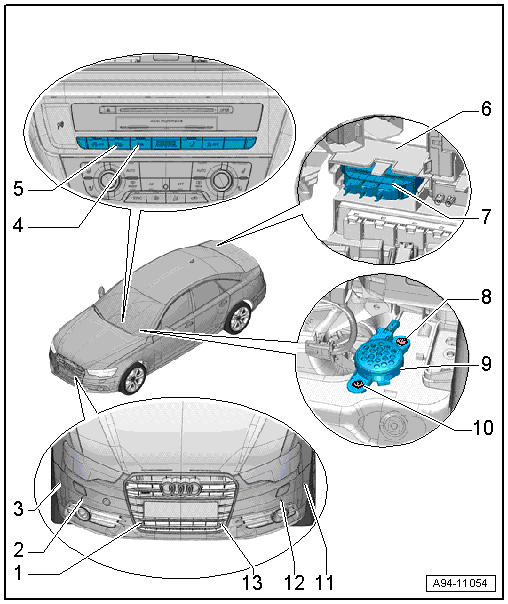
1 - Right Front Center Parking Aid Sensor -G253-
- Removing and installing. Refer to → Chapter "Front Parking Aid Sensor, Removing and Installing".
2 - Right Front Parking Aid Sensor -G252-
- Removing and installing. Refer to → Chapter "Front Parking Aid Sensor, Removing and Installing".
3 - Right Front Parallel Parking Assistance Sensor -G569-
- Overview. Refer to → Chapter "Overview - Parallel Parking Assist".
4 - Parking Aid Button -E266-
- Only for 8-channel parking aid
- Removing and installing. Refer to → Chapter "Instrument Panel Button, Removing and Installing".
5 - Parallel Parking Assistance Button -E581-
- Overview. Refer to → Chapter "Overview - Parallel Parking Assist".
6 - Lower Frame
- For the control modules
7 - Parking Aid Control Module -J446-
- Removing and installing. Refer to → Chapter "Parking Aid Control Module -J446-, Removing and Installing".
8 - Expanding Clip
9 - Front Parking Aid Warning Buzzer -H22-
- Only for 8-channel parking aid
- Removing and installing. Refer to → Chapter "Front Parking Aid Warning Buzzer -H22-, Removing and Installing".
10 - Expanding Clip
11 - Left Front Parallel Parking Assistance Sensor -G568-
- Overview. Refer to → Chapter "Overview - Parallel Parking Assist".
12 - Left Front Parking Aid Sensor -G255-
- Removing and installing. Refer to → Chapter "Front Parking Aid Sensor, Removing and Installing".
13 - Left Front Center Parking Aid Sensor -G254-
- Removing and installing. Refer to → Chapter "Front Parking Aid Sensor, Removing and Installing".
Overview - Rear Parking Aid
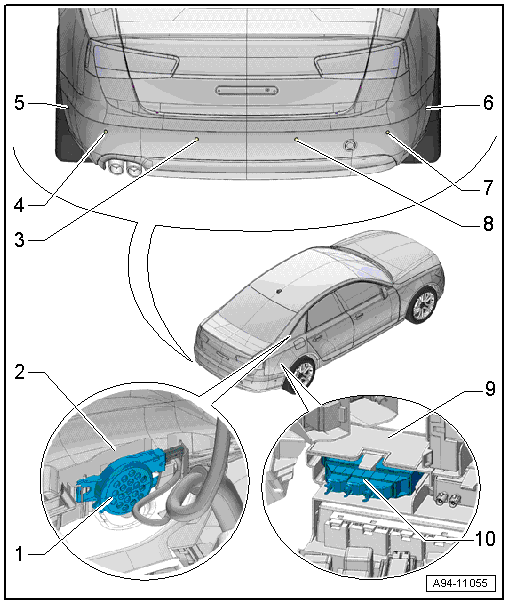
1 - Rear Parking Aid Warning Buzzer -H15-
- Removing and installing. Refer to → Chapter "Rear Parking Aid Warning Buzzer -H15-, Removing and Installing".
2 - Rear Seat Belt Guide
- With mount for the Rear Parking Aid Warning Buzzer -H15-
3 - Left Rear Center Parking Aid Sensor -G204-
- Removing and installing. Refer to → Chapter "Rear Parking Aid Sensor, Removing and Installing".
4 - Left Rear Parking Aid Sensor -G203-
- Removing and installing. Refer to → Chapter "Rear Parking Aid Sensor, Removing and Installing".
5 - Left Rear Parallel Parking Assistance Sensor -G716-
- Overview. Refer to → Chapter "Overview - Parallel Parking Assist".
6 - Right Rear Parallel Parking Assistance Sensor -G717-
- Overview. Refer to → Chapter "Overview - Parallel Parking Assist".
7 - Right Rear Parking Aid Sensor -G206-
- Removing and installing. Refer to → Chapter "Rear Parking Aid Sensor, Removing and Installing".
8 - Right Rear Center Parking Aid Sensor -G205-
- Removing and installing. Refer to → Chapter "Rear Parking Aid Sensor, Removing and Installing".
9 - Lower Frame
- For the control modules
10 - Parking Aid Control Module -J446-
- Removing and installing. Refer to → Chapter "Parking Aid Control Module -J446-, Removing and Installing".
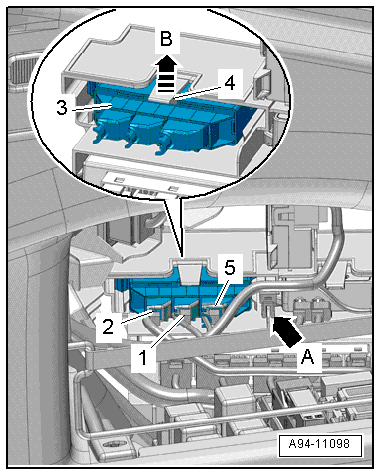
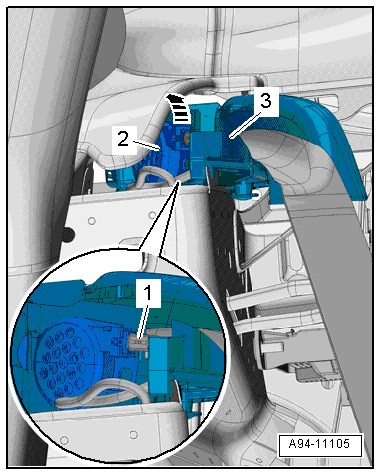
Parking Aid Control Module -J446-, Removing and Installing
- If the control module was replaced, select the "Replace" function for the respective control module in "Guided Fault Finding" or "Guided Functions" using the Vehicle Diagnostic Tester.
Removing
- Remove the luggage compartment right side trim panel cover.
- Free up the electric wiring harness on the lower frame -arrow A-.
- Disconnect the connectors -1, 2 and 5-.
- Release the spring -4- in direction of -arrow B- and remove the control module -3- from the frame.
Installing
Install in reverse order of removal.
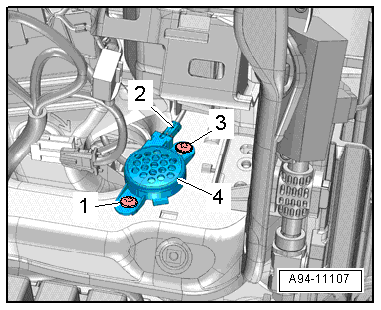
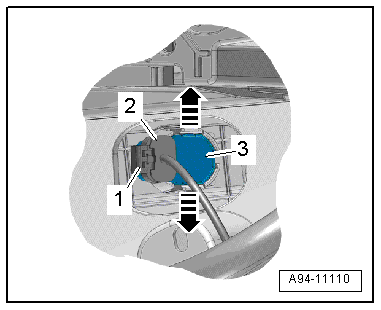
Front Parking Aid Warning Buzzer -H22-, Removing and Installing
Removing
- Remove the driver side instrument panel cover. Refer to → Body Interior; Rep. Gr.68; Storage Compartments and Covers; Driver Side Instrument Panel Cover, Removing and Installing.
- Remove the expanding pins -1 and 3-.
- Remove the front parking aid warning buzzer -4-.
- Disconnect the connector -2-.
Installing
Install in reverse order of removal.
Rear Parking Aid Warning Buzzer -H15-, Removing and Installing
Removing
- Remove the right luggage compartment side trim panel. Refer to → Body Interior; Rep. Gr.70; Luggage Compartment Trim Panels; Luggage Compartment Side Trim Panel, Removing and Installing.
- Loosen the rear seat belt guide from the body. Refer to → Body Interior; Rep. Gr.69; Seat Belts; Rear Seat Belt Guide, Removing and Installing.
- Remove the rear parking aid warning buzzer -2- from the mount inside the seat belt guide -3--arrow-.
- Disconnect the connector -1-.
Installing
Install in reverse order of removal.
Front Parking Aid Sensor, Removing and Installing
Removing
- Audi allroad: Remove the front bumper cover end plate. Refer to → Body Exterior; Rep. Gr.63; Front Bumper; Attachments, Removing and Installing.
Outer Sensors:
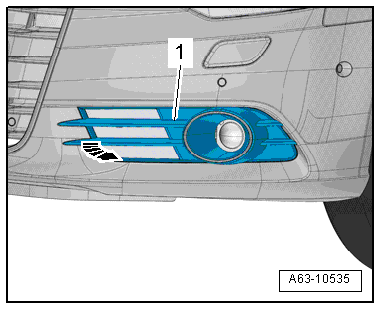
- Remove the air intake grille -1- from the bumper cover in direction of -arrow-.
- For vehicles with left/right auxiliary cooler and/or parking heater: Remove the front bumper cover. Refer to → Body Exterior; Rep. Gr.63; Front Bumper; Bumper Cover, Removing and Installing.
- Press both tabs in direction of -arrows- to the side and press the sensor -3- inward from the outside.
- Disconnect the connector -2- by sliding the retainer -1- back and pressing the release down.
Inner Sensor:
- Remove the bumper cover end plate. Refer to → Body Exterior; Rep. Gr.63; Front Bumper; Attachments, Removing and Installing.
- Audi RS 6: remove the lower radiator air guide from the radiator.
- Press both tabs -arrows- to the side and press the sensor -3- inward from the outside.
- Disconnect the connector -2- by sliding the retainer -1- back and pressing the release down.
 Note
Note
If the sensor cannot be removed as described, remove the mount for the front parking aid sensor. Remove the front parking aid sensor mount. Refer to → Body Exterior; Rep. Gr.66; Radiator Grille/Front Trim; Overview - Radiator Grille.
Installing
Install in reverse order of removal.
Rear Parking Aid Sensor, Removing and Installing
Rear Parking Aid Sensor, Removing and Installing, through MY 2014
Removing
- Audi RS6: Remove the rear bumper cover. Refer to → Body Exterior; Rep. Gr.63; Rear Bumper; Bumper Cover, Removing and Installing.
Outer Sensors:
- Reach behind the opening in the bumper cover and expand both tabs -arrows- while pushing the sensor -3- from the outside toward the inside at the same time.
- Disconnect the connector -2- by sliding the retainer -1- back and pressing the release down.
Inner Sensor:
- Remove the rear bumper cover. Refer to → Body Exterior; Rep. Gr.63; Rear Bumper; Bumper Cover, Removing and Installing.
- Press both tabs -arrows- to the side and press the sensor -3- inward from the outside.
- Disconnect the connector -2- by sliding the retainer -1- back and pressing the release down.
Installing
Install in reverse order of removal. Note the following:
If the bumper cover was removed, the Lane Change Assistance Control Module -J769-/Lane Change Assistance Control Module 2 -J770- must be calibrated again. Refer to → Chapter "Lane Change Assistance, Calibrating".
Rear Parking Aid Sensor, Removing and Installing, from MY 2015
Removing
Outer Sensors:
- Remove the rear bumper cover. Refer to → Body Exterior; Rep. Gr.63; Rear Bumper; Bumper Cover, Removing and Installing.
- Press both tabs in direction of -arrows- to the side and press the sensor -3- inward from the outside.
- Disconnect the connector -2- by sliding the retainer -1- back and pressing the release down.
Inner Sensor:
- Remove the bolts -arrows- on the bottom side of the bumper cover.
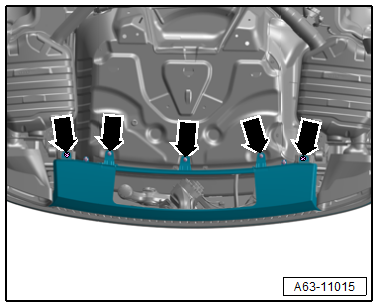
- Reach behind the opening in the bumper cover and expand both tabs in direction of -arrows- while pushing the sensor -3- from the outside toward the inside at the same time.
Note
On vehicles with a trailer hitch: Reach through the opening and push both retainers to the side and, at the same time, push the sensor from the outside through to the inside.
- Disconnect the connector -2- by sliding the retainer -1- back and pressing the release down.
Installing
Install in reverse order of removal. Note the following:
If the bumper cover was removed, the Lane Change Assistance Control Module -J769-/Lane Change Assistance Control Module 2 -J770- must be calibrated again. Refer to → Chapter "Lane Change Assistance, Calibrating".
