Audi A6 Typ 4G: Rear Lid Remote Release Button -E233-, Removing and Installing
Removing
- Remove the front door trim panel. Refer to → Body Interior; Rep. Gr.70; Front Door Trim Panels; Front Door Trim Panel, Removing and Installing.
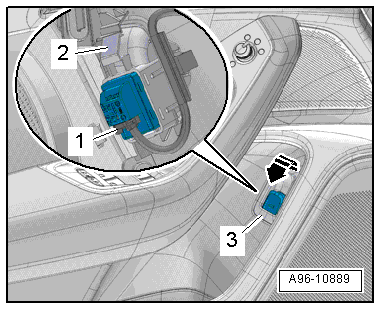
- Disconnect the connector -1-.
- Open the clip -2- and remove the trim -3- with the switch from the door trim panel -arrow-.
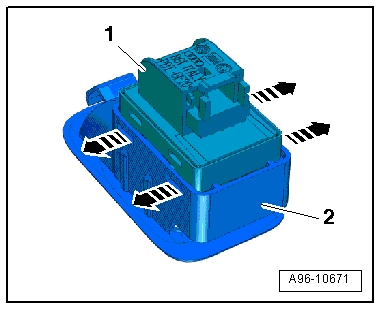
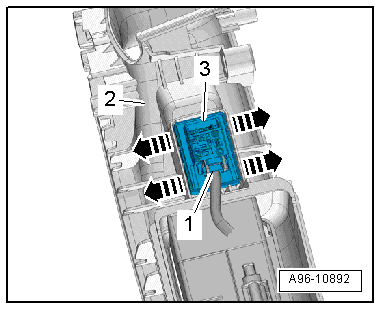
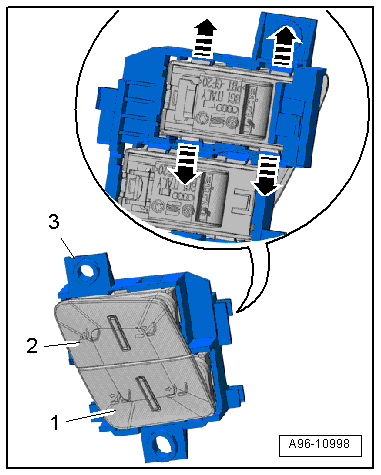
- Release the hooks in direction of -arrows- carefully with a small screwdriver.
- Remove the switch -1- toward the rear from the trim -2-.
Installing
Install in reverse order of removal. Note the following:
- Install the trim and the switch until the hooks engage in the mount.
Alarm System Deactivation Switch -E217-, Removing and Installing
Removing
- Remove the front door trim panel. Refer to → Body Interior; Rep. Gr.70; Front Door Trim Panels; Front Door Trim Panel, Removing and Installing.
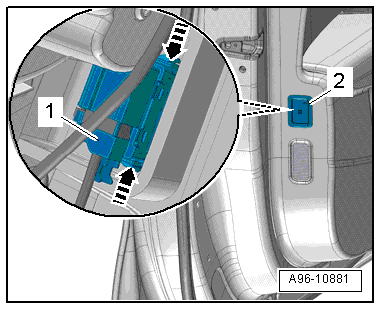
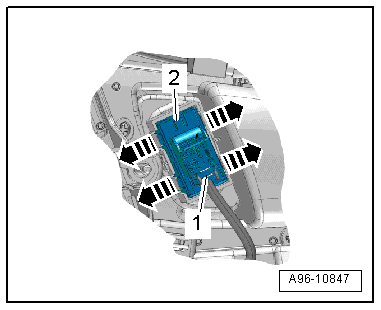
- Disconnect the connector -1-.
- Release the retaining springs -arrows- and remove the switch -2- from the door trim panel.
Installing
Install in reverse order of removal.
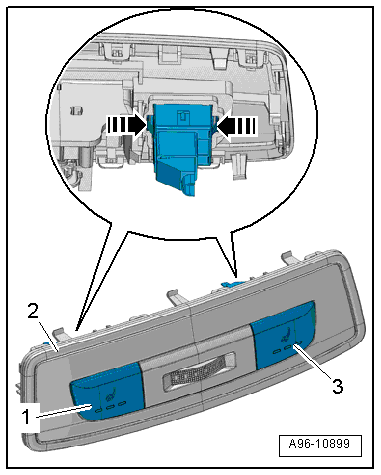
Rear Window Regulator Button in Rear Door, Removing and Installing
Left/Right Rear Power Window Button in Right Rear Door -E700-/-E705-, Removing and Installing
Removing
- Remove the pull handle/rear armrest. Refer to → Body Interior; Rep. Gr.70; Rear Door Trim Panels; Overview - Rear Door Trim Panel.
- Carefully release the hooks in direction of -arrows- with a small screwdriver.
- Remove the power window button -3- from the switch mount -2-.
- Disconnect the connector -1-.
Installing
Install in reverse order of removal.
Rear Window Regulator Button in Rear Door, Removing and Installing, Market-Specific
 Note
Note
The following buttons -E699-/-E700-/-E701-/-E702-/-E703-/-E704-/-E705-/-E706-/-E707-/-E708- are consolidated in one control head.
Removing
- Remove the rear door trim panel and move the noise insulation to the side. Refer to → Body Interior; Rep. Gr.70; Rear Door Trim Panels; Rear Door Trim Panel, Removing and Installing.
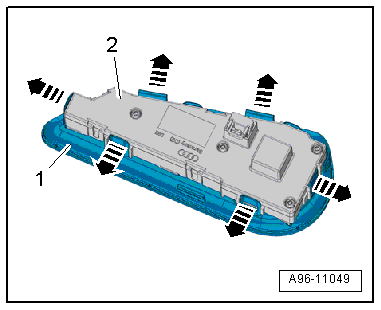
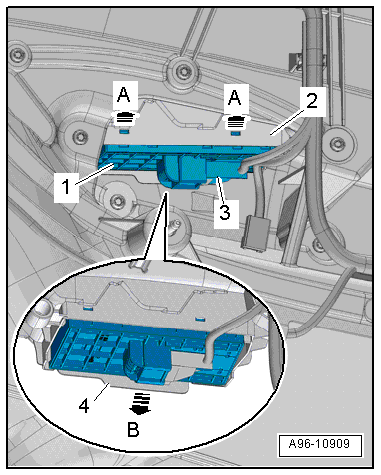
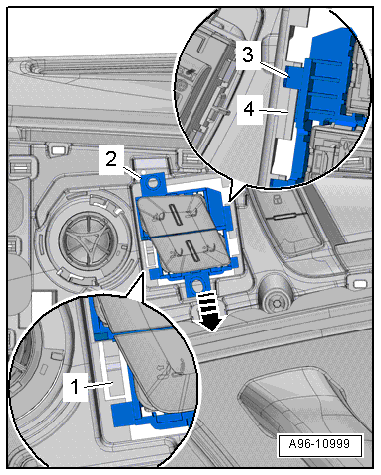
- Carefully release the hooks in direction of -arrows A- with a small screwdriver.
- Release the unlock button -4- in direction of -arrow B-.
- Remove the window regulator button -1- from the switch mount -2-.
- Disconnect the connector -3-.
Installing
Install in reverse order of removal.
Left/Right Rear Interior Locking Switch -E273-/-E274-, Removing and Installing
Removing
- Remove the rear door trim panel. Refer to → Body Interior; Rep. Gr.70; Rear Door Trim Panels; Rear Door Trim Panel, Removing and Installing.
- Disconnect the connector -1-.
- Open the clips -arrows- and remove the interior locking switch -2- outward.
Installing
Install in reverse order of removal.
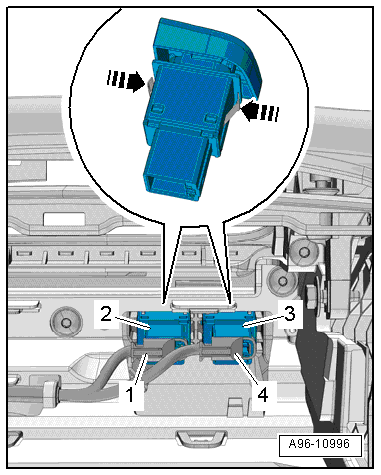
Backrest Adjustment Button -E425-/Front Passenger Seat Forward/Back Adjustment Button -E603-, Removing and Installing
Removing
- Remove the interior door mechanism trim. Refer to → Body Interior; Rep. Gr.70; Rear Door Trim Panels; Overview - Rear Door Trim Panel.
- Push the tab -1- slightly to the rear and remove the mount -2- from the door trim panel at the same time in the direction of the -arrow-.
- Disconnect the connectors -3 and 4-.
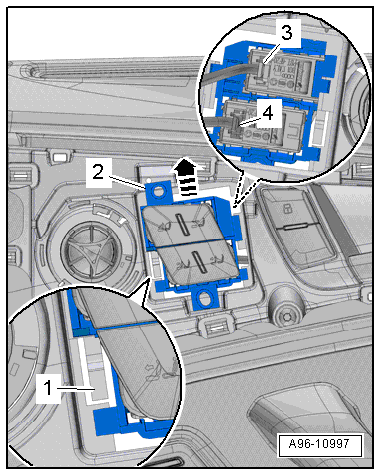
- Open the clips in direction of -arrows- and remove the buttons -1 and 2- from the mount -3-.
Installing
Install in reverse order of removal. Note the following:
- Connect the connectors.
- Attach the mount -2- to the door trim panel and push down in direction of -arrow- on the securing tabs -1- until they audibly engage.
- The guide -3- must slide downward behind the guide rail -4-.
Air Ionization System Button -E677-, Removing and Installing
Removing
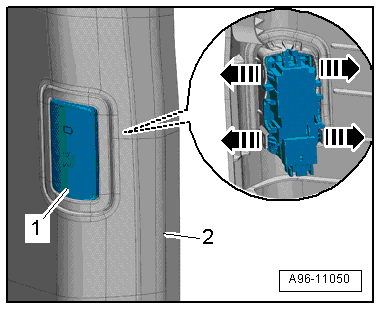
- Remove the lower B-pillar lower trim panel. Refer to → Body Interior; Rep. Gr.70; Passenger Compartment Trim; B-Pillar Trim Panel, Removing and Installing.
- Open the clips in direction of -arrows- and push the air ionization system button -1- out of the B-pillar trim panel -2-.
Installing
Install in reverse order of removal.
Electromechanical Parking Brake Button -E538-/ -AUTO HOLD- Button -E540-, Removing and Installing
Removing
- Remove the multimedia system control head. Refer to → Communication; Rep. Gr.91; Infotainment System; Multimedia System Control Head E380, Removing and Installing.
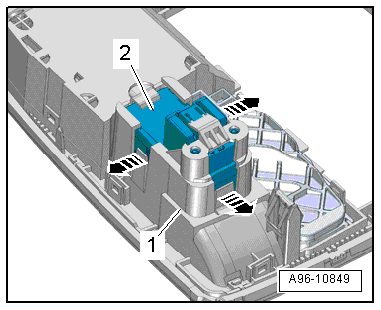
- Open the retaining clips in direction of -arrows- and remove the button -2- from the control head -1-.
Installing
Install in reverse order of removal.
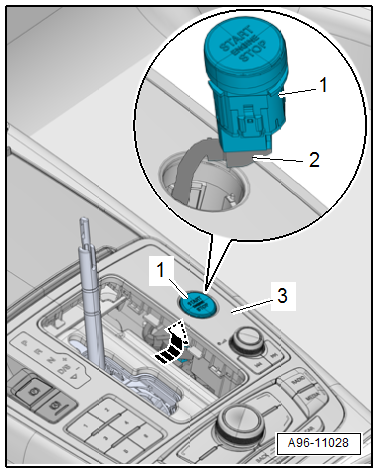
Access/Start Authorization Button -E408-, Removing and Installing
Removing
- Remove the selector lever boot and fold it upward. Refer to → Rep. Gr.34; Selector Mechanism; Selector Lever Handle, Removing and Installing or → Rep. Gr.37; Selector Mechanism; Selector Lever Handle, Removing and Installing.
- Reach through the opening and remove the access/start authorization button -1- from the control head -3-.
- Disconnect the connector -2-.
Note
If the button cannot be removed as described, then the multimedia system control head must be removed. Refer to → Communication; Rep. Gr.91; Infotainment System; Multimedia System Control Head E380, Removing and Installing.
Installing
Install in reverse order of removal.
Left/Right Rear Heated Seat Regulating Switch -E128-/-E129-, Removing and Installing
Left and Right Rear Heated Seat Regulating Switch -E128-/-E129- Removing and Installing, with "Base" A/C System
Removing
- Remove the cover for the switches for controlling the heated rear seat. Refer to → Body Interior; Rep. Gr.68; Center Console; Overview - Center Console.
- Release the retaining tabs in direction of -arrows-.
- Remove the switches -1 and 3- from the cover -2-.
Installing
Install in reverse order of removal.
Left and Right Rear Heated Seat Regulating Switch -E128-/-E129- Removing and Installing, with "Convenience" A/C System
The switches are integrated in the Rear A/C Display Control Head -E265-. They cannot be replaced separately.
- Replacing the Rear A/C Display Control Head -E265-. Refer to → Heating, Ventilation, and Air Conditioning; Rep. Gr.87; Display and Control Head; Display and Control Head, Removing and Installing
Cupholder Cooling Element Button -E674-/Cupholder Heating Element Button -E675-, Removing and Installing
Removing
- Remove the center console rear cover. Refer to → Body Interior; Rep. Gr.68; Center Console; Overview - Center Console.
- Disconnect the connectors -1 and 4-.
- Release the retaining tabs -arrows-.
- Remove the cupholder cooling element button -item 3- or the cupholder heating element button -item 2- from the cupholder.
Installing
Install in reverse order of removal.
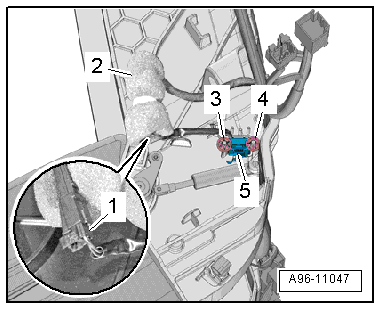
Rear Center Console Ambient Lighting Contact Switch -F501-, Removing and Installing
Removing
- Remove the rear center armrest. Refer to → Body Interior; Rep. Gr.72; Rear Seats; Overview - Center Armrest.
- Remove the center armrest trim panel. Refer to → Body Interior; Rep. Gr.72; Rear Seats; Overview - Center Armrest.
- Pull the protective sleeve -2- to the side and disconnect the connector -1-.
- Remove the lock washers -3 and 4-.
- Remove the contact switch -5- from the mount.
Installing
Install in reverse order of removal.
Left/Right Rear Seat Massage Button -E409-/-E410-, Removing and Installing
Special tools and workshop equipment required
- Wedge Set -T10383-
Removing
- Open the center armrest.
- Unclip the massage button in the rear seat from the rear center armrest using the Wedge Set -T10383-.
- Disconnect the connector.
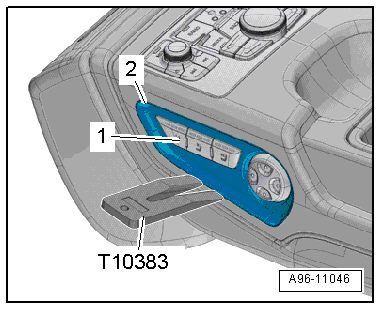
- If the button -2- is replaced: Open the tabs in direction of -arrows- and remove the trim -1-.
Installing
Install in reverse order of removal.