Audi A6 Typ 4G: Seat Belt Height Adjuster, Removing and Installing
Removing
- Press button for seat belt height adjuster and move the slide for seat belt height adjustment into the lowest position.
- Remove the upper B-pillar trim panel. Refer to → Chapter "Upper B-Pillar Trim, Removing and Installing".
- Set aside the upper B-pillar trim with the seat belt still threaded through it.
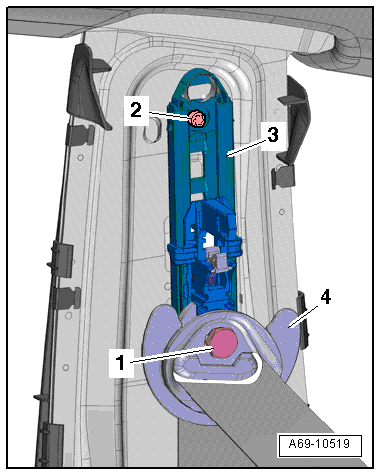
- Remove the bolt -1-.
- Remove the seat belt relay -4- and seat belt.
- Remove the bolt -2-.
- Remove the seat belt height adjuster -3- at the top of the B-pillar.
Installing
Install in reverse order of removal. Note the following:
- If parts of the seat belt system are removed due to an accident, replace the belt system bolts.
 Note
Note
- Replacement seat belt height adjusters are delivered with the slide in the lowest position (installation position).
- If removed seat belt height adjusters are reinstalled, these should be placed in the lowest position (installation position).
- Hook seat belt height adjuster -3- into the B-pillar.
- Tighten the bolt -2-.
- Install the seat belt relay -4- and tighten the bolt -1-.
 Note
Note
The belt height adjuster button must not be pressed when installing the upper B-pillar trim with slide.

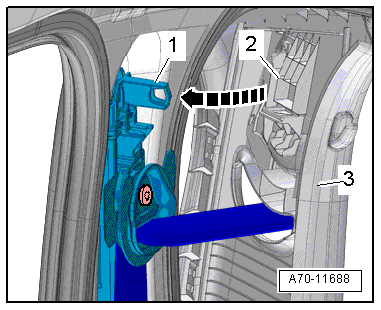
- First, insert the B-pillar trim panel -3- upward into the mount on the roof.
- The mount -2- for the sliding piece of the upper B-pillar trim panel must engage in the retaining pin -1- on the seat belt height adjuster in direction of -arrow-.
Seat Belt Height Adjuster Replacement Part
- After installing the upper B-pillar trim, push the slide all the way up.
- This unlocks the seat belt height adjuster assembly anchorage.
Procedure for All Seat Belt Height Adjusters
- When checking function, the following conditions must be fulfilled:
- The seat belt height adjuster must audibly engage in each of the three possible positions (and also in the highest position).
- Belt height adjuster button must return to upper position by itself after being pressed.
- Belt relay must swing into vertical position or carrier direction by itself after tightening screw.
If any functions did not work, the seat belt height adjuster assembly must be checked; the height adjuster may need to be replaced.
Installation notes, for example tightening specifications, replacing components. Refer to → Chapter "Overview - Front Three-Point Seat Belt".
Front Seat Belt Latch, Removing and Installing
Front Seat Belt Latch, Removing and Installing, Standard Seat/Sport Seat/Super Sport Seat
Removing
- Remove the front seat. Refer to → Chapter "Front Seat, Removing and Installing".
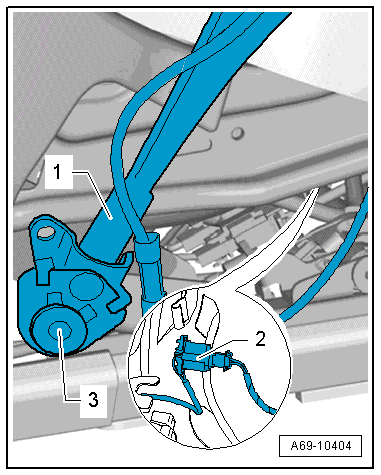
- Disconnect the connector -2- and free up the wire.
- Remove the bolt -3- and then remove the seat belt latch -1-.
Installing
Install in reverse order of removal. Note the following:
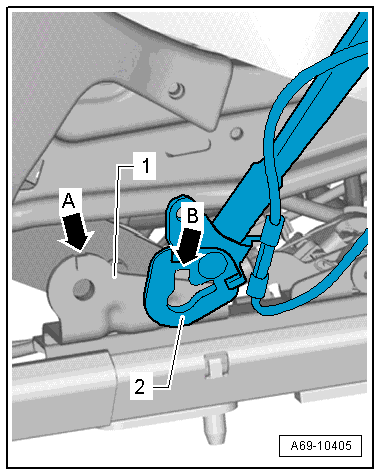
- Position the seat belt latch -2- so that the cut-out -arrow B- lines up with the hole -arrow A- on the lower seat frame -1-.
Deactivating the Front Passenger Airbag on Vehicles with Passenger Occupant Detection System
- If the seat belt latch of the passenger occupant detection system for front passenger airbag deactivation is replaced, fill out the system registration sheet with the serial number and bar code label from the new seat belt latch and send it to the importer.
Continuation for All Vehicles
 WARNING
- Follow all Safety Precautions when working with pyrotechnic components. Refer to → Chapter "Pyrotechnic Components Safety Precautions".
- Before handling pyrotechnic components (for example, connecting the connector), the person handling it must "discharge static electricity". This can be done by touching the door striker, for example.
- Observe all measures when installing the front seat. Refer to → Chapter "Front Seat, Removing and Installing".
Installation notes, for example tightening specifications, replacing components. Refer to → Chapter "Overview - Front Seat Belt Latch".
Front Seat Belt Latch, Removing and Installing, Multi-contour Seat
Removing
 WARNING
Deactivating the front passenger airbag on vehicles with passenger occupant detection system:
Replace the passenger occupant detection system seat belt latch each time the passenger belt tensioner deploys.
- Remove the front seat. Refer to → Chapter "Front Seat, Removing and Installing".
- Remove the trim on the tunnel side. Refer to → Chapter "Seat Side Trim on the Tunnel Side, Removing and Installing".
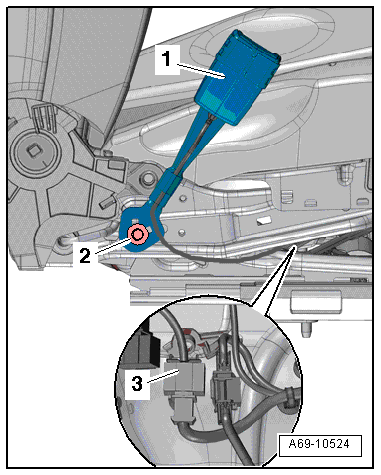
- Disconnect the connector -3- and free up the wire.
- Remove the bolt -2- and then remove the seat belt latch -1-.
Installing
Install in reverse order of removal. Note the following:
- Always clean the threaded holes for the self-locking bolts, for example, using a thread tap.
- Replace the bolt for the seat belt latch.
Deactivating the Front Passenger Airbag on Vehicles with Passenger Occupant Detection System
- If the seat belt latch of the passenger occupant detection system for front passenger airbag deactivation is replaced, fill out the system registration sheet with the serial number and bar code label from the new seat belt latch and send it to the importer.
Continuation for All Vehicles
 WARNING
- Follow all Safety Precautions when working with pyrotechnic components. Refer to → Chapter "Pyrotechnic Components Safety Precautions".
- Before handling pyrotechnic components (for example, connecting the connector), the person handling it must "discharge static electricity". This can be done by touching the door striker, for example.
- Observe all measures when installing the front seat. Refer to → Chapter "Front Seat, Removing and Installing".
Installation notes, for example tightening specifications, replacing components. Refer to → Chapter "Overview - Front Seat Belt Latch".
Rear Seat Belt Latch, Removing and Installing
Removing
- Remove the rear bench seat. Refer to → Chapter "Seat Bench/Single Seat, Removing and Installing".
Right Rear Seat Belt Latch with Rear Center Belt End Fitting
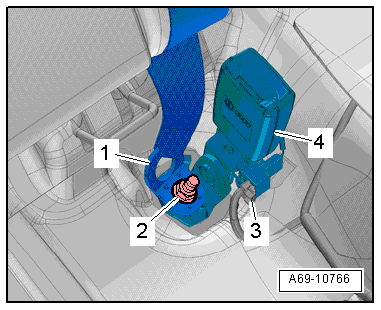
- Vehicles with a seat belt switch: disconnect the connector -3- from the seat belt switch.
- Remove the nut -2-.
- Remove the center rear belt end fitting -1-.
- Remove the seat belt latch -4-.
Left Rear Seat Belt Latch, 3-Person Rear Seat
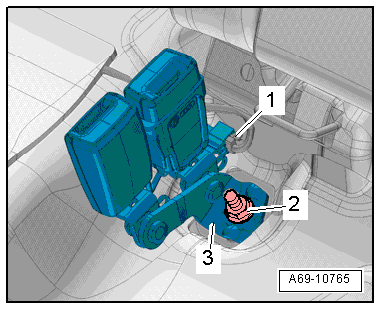
- Vehicles with a seat belt switch: disconnect the connector -1- from the seat belt switch.
- Remove the nut -2-.
- Remove the seat belt latch -3-.
Left Rear Seat Belt Latch, 2-Person Rear Seat
- Vehicles with a seat belt switch: disconnect the connector -1- from the seat belt switch.
- Remove the nut -2-.
- Remove the seat belt latch -3-.
Installing
Install in reverse order of removal. Note the following:
Installation notes, for example tightening specifications, replacing components. Refer to → Chapter "Overview - Rear Seat Belt Latch".
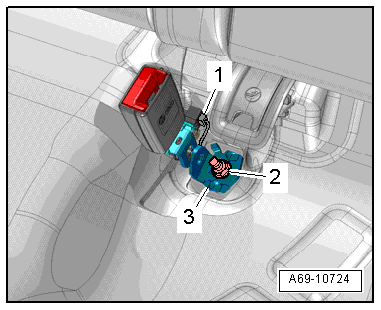
Rear Seat Belt Latch, Removing and Installing, Market-Specific
Removing
- Remove the rear bench seat. Refer to → Chapter "Seat Bench/Single Seat, Removing and Installing".
Right Rear Seat Belt Latch with Rear Center Belt End Fitting
- Remove the nut -1-.
- Remove the seat belt latch -3-.
- Remove the center rear belt end fitting -2-.
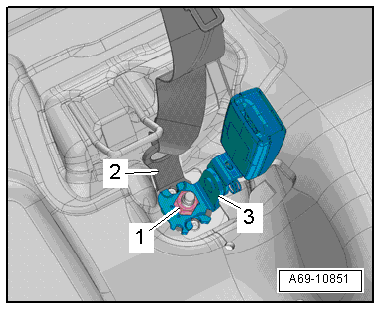
Rear Left Seat Belt Latch/Rear Center Seat Belt Latch
- Remove the nut -3-.
- Remove the left seat belt latch -2-.
- Remove the center seat belt latch -1-.
Installing
Install in reverse order of removal. Note the following:
Installation notes, for example tightening specifications, replacing components. Refer to → Chapter "Overview - Rear Seat Belt Latch".
