Audi A6 Typ 4G: Rear Window
Overview - Rear Window
Overview - Rear Window, Sedan
 Note
Note
- Certain connections are included with the replacement rear window that are meant to be used only for certain optional equipment.
- Remove any unnecessary cable ends directly at the connection on the rear window.
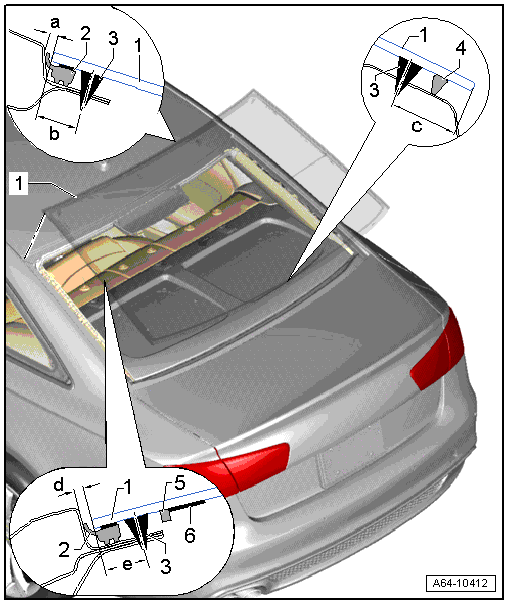
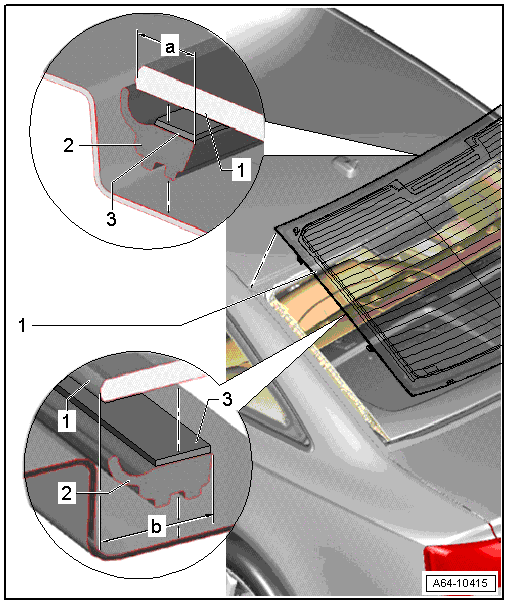
1 - Rear Window
- Distance -a- to the brake lamp = 3 mm mm
- Distance -e- to the side wall frame = 3 mm.
- Before removing, disconnect all electrical connectors and secure the terminals to the middle of the window on the inside using adhesive tape.
2 - Gap Cover
- Replacing. Refer to → Chapter "Gap Cover, Replacing, Sedan".
3 - Adhesive Bead
- Bead width = 8 mm +- 2 mm
- Bead height = 12 mm + 2 mm
- Distances measured from the window edge to the center of the bead of adhesive:
- Dimension -b- = 14 mm
- Dimension -c- = 17 mm
- Dimension -d- = 10 mm
- Dimension -f- = 24 mm
4 - Spacer
- Included in the delivery of the rear window
5 - Adhesive Stop Profile
- On the side, the adhesive end profile directly next to the rail for the window defroster to the edge of the glass
6 - Rail
- For rear window defogger
- Must not come in contact with the window adhesive
 Caution
- Window adhesive must not come into contact with the rear window defroster distributing wire.
- The window must be installed within 15 minutes or the adhesive sealing material will not adhere properly.
- Center window along sides.
- Note the distance to the brake lamp = 3 mm.
- Observe the minimum curing time. Refer to → Chapter "Minimum Curing Time for Bonded Windows".
Overview - Rear Window, Avant
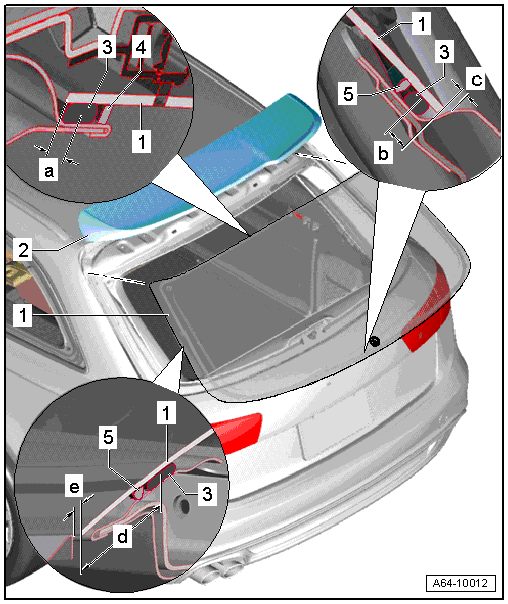
1 - Rear Window
- Dimension -e- = 3.5 mm, centered with the D-pillars.
- Dimension -c- = 2.5 mm, the rear window must be centered with the rear window wiper axle.
2 - Spoiler on Roof Edge
- Removed. Refer to → Chapter "Roof Edge Spoiler, Removing and Installing".
3 - Adhesive Bead
Note
Different distances to window edge.
- Dimension -a- = 8 mm
- Dimension -b- = 12 mm
- Dimension -d- = 44 mm
4 - Adhesive stopper profile
- Apply 17 mm from the edge of the window glass to the outer edge
5 - High-Mounted Brake Lamp
- Removed. Refer to → Electrical Equipment; Rep. Gr.94; High-Mounted Brake Lamp; High-Mounted Brake Lamp Bulb, Removing and Installing
Rear Window, Removing and Installing
Undamaged Rear Window, Removing, Sedan
Procedure
- Disconnect rear window defroster and window antenna connectors and secure to center of window with adhesive tape.
 WARNING
When removing a window, always wear protective eyewear and leather gloves.
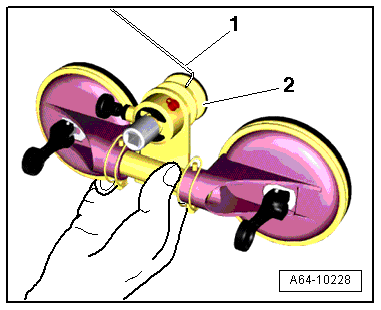
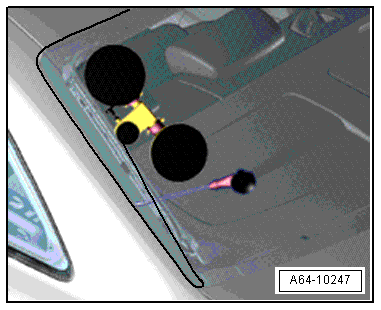
- Unroll with the Cutting Tool for Bonded Windows - Wire Reel -VAS 6452/1- approximately 6.5 meters of cutting wire (approximately six turns) and cut it.
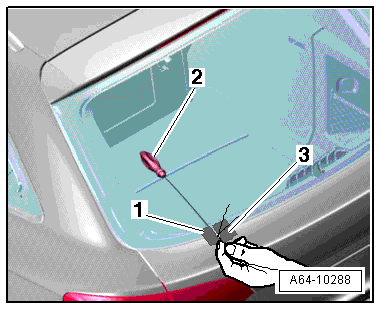
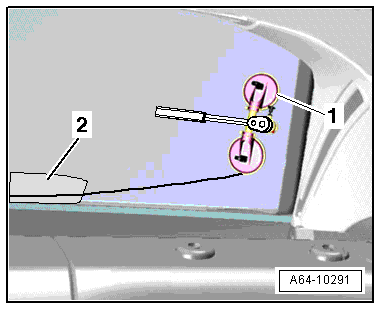
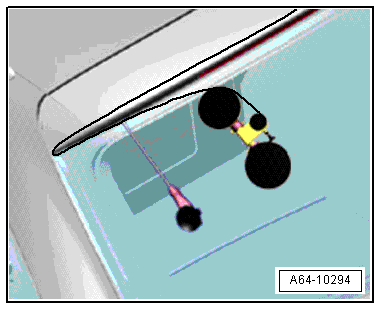
- Cover the awl outlet under the body flange with tape -1- to prevent damaging it.
- Feed both cutting wire ends -3- into the awl -2- and pull it in.

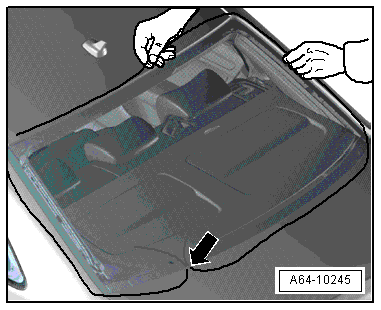
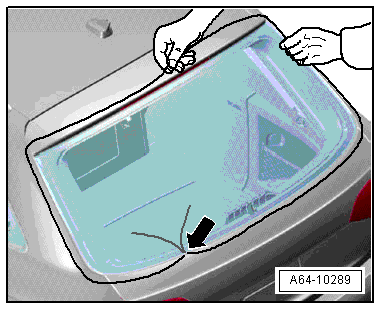
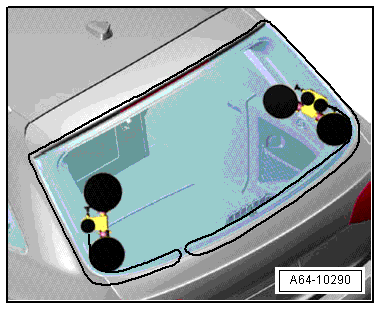
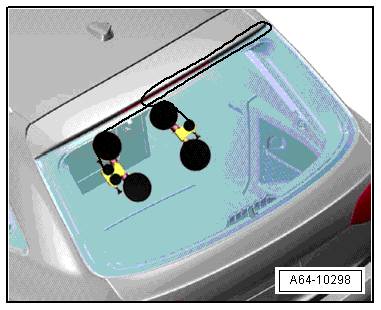
- Place the cutting wire all the way around under the windshield as illustrated.
- Route cutting wire around rear window under the glass as shown in the illustration.
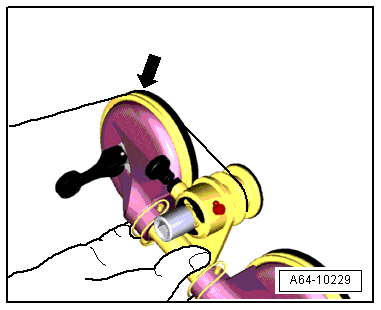
Caution
The ends of the wire must not be twisted when cutting through the adhesive -arrow-.
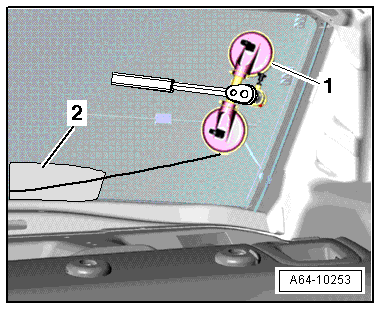
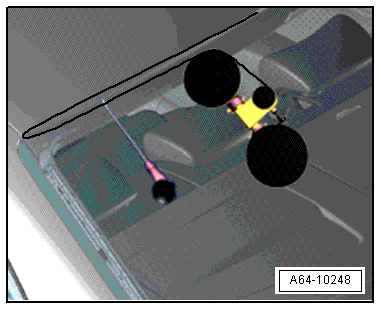
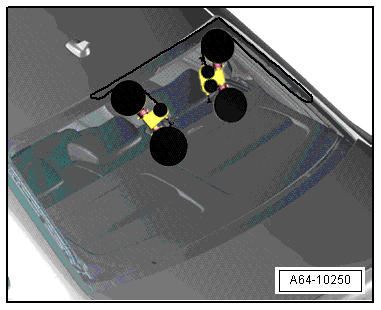
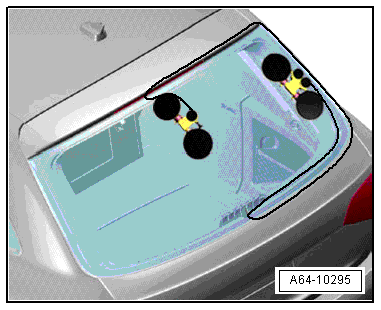
- Mount both reel devices on the inside of the windshield as illustrated.
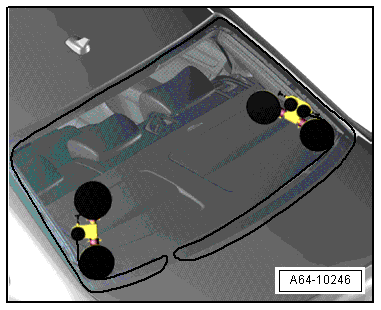
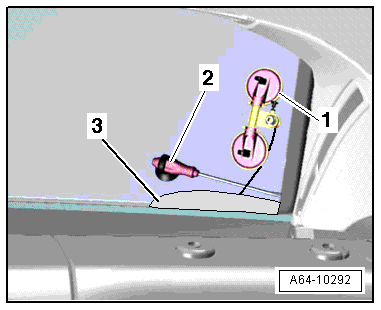
- Insert the ends of the cutting wire -1- into the reel device -2-
- Tension the cutting wire using the reel device -1- and insert the plastic film -2- taken from the Cutting Tool for Bonded Windows -VAS 6452- to protect between the wire and the rear shelf.
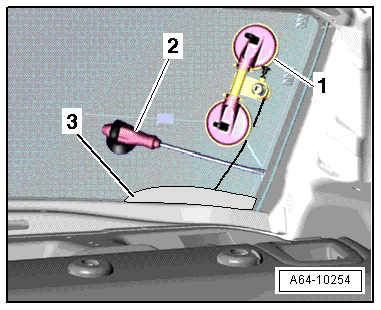
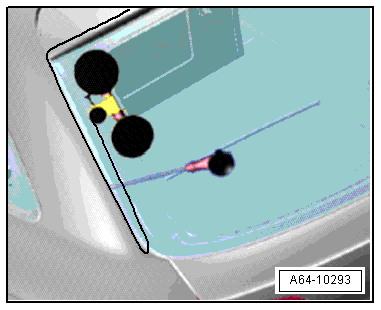
- Cut the first section open, while doing this, the wire is guided into the integrated roller -arrow- on the reel device.
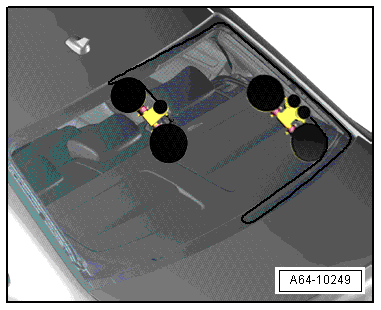
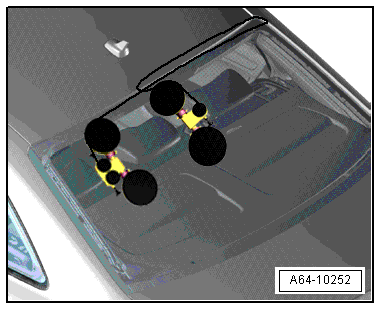
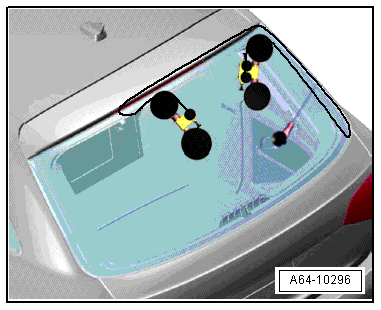
- Insert an additional guide awl -2- into the adhesive and secure it to the windshield with the suction cup as illustrated to make sure that the wire runs as close to the windshield as possible.
- Move the reel device and the guide awl as illustrated and cut free the section along the "D-pillar".
- Move the reel device and guide awl as illustrated.
- Cut free the windshield further up to about the center.
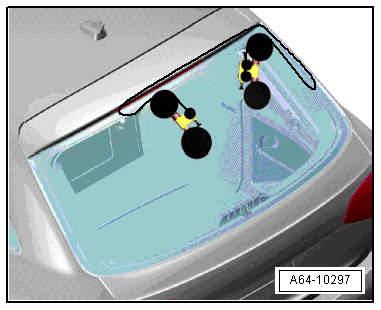
- Cut free the bottom of the windshield with the second reel device.
- Move the reel device upward and insert the guide awl as illustrated.
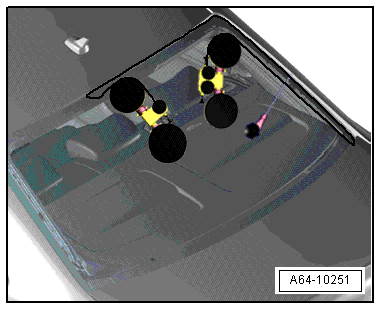
- Cut the window free moving upward along the "D-pillar".
- Move the reel device over the center of the windshield and over the first reel device as illustrated and cut free the rest of the windshield along the top.
- Remove the window with suction cups.
Undamaged Rear Window, Removing, Avant
Procedure
- Remove the rear lid trim panel. Refer to → Body Interior; Rep. Gr.70; Luggage Compartment Trim Panels; Upper Rear Lid Trim Panel, Removing and Installing
- Remove the roof edge spoiler. Refer to → Chapter "Roof Edge Spoiler, Removing and Installing".
- Remove the rear window wiper motor. Refer to → Electrical Equipment; Rep. Gr.92; Rear Window Wiper System; Rear Window Wiper Motor V12, Removing and Installing.
- Disconnect rear window defroster and window antenna connectors and secure to center of window with adhesive tape.
WARNING
When removing a window, always wear protective eyewear and leather gloves.
- Unroll with the Cutting Tool for Bonded Windows - Wire Reel -VAS 6452/1- approximately 6.5 meters of cutting wire (approximately six turns) and cut it.
- Cover the awl outlet under the body flange with tape -1- to prevent damaging it.
- Feed both cutting wire ends -3- into the awl -2- and pull it in.
- Place the cutting wire all the way around under the windshield as illustrated.
- Route cutting wire around rear window under the glass as shown in the illustration.
Caution
The ends of the wire must not be twisted when cutting through the adhesive -arrow-.
- Mount both reel devices on the inside of the windshield as illustrated.
- Insert the ends of the cutting wire -1- into the reel device -2-
- Tension the cutting wire using the reel device -1- and insert the plastic film -2- taken from the Cutting Tool for Bonded Windows -VAS 6452- to protect between the wire and the window glass.
- Cut the first section open, while doing this, the wire is guided into the integrated roller -arrow- on the reel device.
- Insert an additional guide awl -2- into the adhesive and secure it to the windshield with the suction cup as illustrated to make sure that the wire runs as close to the windshield as possible.
- Move the reel device and the guide awl as illustrated and cut free the section along the "D-pillar".
- Cut free the windshield further up to about the center.
- Cut free the bottom of the windshield with the second reel device.
- Move the reel device upward and insert the guide awl as illustrated.
- Cut the window free moving upward along the "D-pillar".
- Move the reel device over the center of the windshield and over the first reel device as illustrated and cut free the rest of the windshield along the top.
- Remove the window glass with suction lifter.
Damaged Rear Window, Removing
Procedure
WARNING
When removing a window, always wear protective eyewear and leather gloves.
- Protect body and interior from glass splinters.
- Remove glass pieces from adhesive material.
- Disconnect rear window defroster and window antenna connectors.
- Bond flange all around with fabric reinforced adhesive tape.
- Cut through the adhesive sealing material (with glass residue) in the from window opening using Window Cutter - VAG1561A- and Cutting Blade, Bent at Right Angle - VAG1561/10-
Rear Window, Installing
Procedure
- Installing. Refer to → Chapter "Bonded Window Glass Installation Instructions".
- Prepare the undamaged window for installing. Refer to → Chapter "Undamaged Window Glass, Preparing for Installation".
- Prepare the new window for installation. Refer to → Chapter "New Window Glass, Preparing for Installation".
- Prepare the body flange for installation. Refer to → Chapter "Body Flange, Preparing for Installation".
- Insert the rear window into window cut-out using suction cups.
Caution
The window must be installed within 15 minutes or the adhesive sealing material will not adhere properly.
- Center window along sides.
- Observe the minimum curing time. Refer to → Chapter "Minimum Curing Time for Bonded Windows".
Gap Cover, Replacing, Sedan
1 - Rear Window
- Removed
2 - Gap Cover
- Remove all around the gap cover.
- Remove any remaining adhesive with a glass scraper.
- Clean the adhesive surface using Cleaning Solution -D 009 401 04-.
- Apply Glass/Paint Primer -D 009 200 02- to the adhesive surface and let it dry for 10 minutes.
- Press the gap cover at the corners starting at the top.
- Peel off the backing from the gap cover little by little and then press the cover onto the sides of the window -a- top, or -b-.
- Press the gap cover using Roller -3356-.
