Audi A6 Typ 4G: Roof End Strip, Removing and Installing
Special tools and workshop equipment required
- Pry Lever -80-200-
- Omega Clip Tool -T40280-
Removing
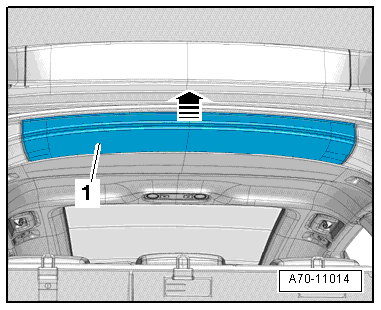
- Carefully unclip the rear roof panel trim -1- in the center off the roof frame using the Pry Lever -80-200--arrow-.
Installing
Install in reverse order of removal. Note the following:
- Mount the rear roof panel trim -1- so that the hooks touch the D-pillar trim.
- Position the rear roof panel trim on the pins, then press on it until the clips audibly engage.
Headliner, Removing and Installing
Headliner, Removing and Installing, Sedan
Special tools and workshop equipment required
- Pry Lever -80-200-
- Removal Wedge -T40233-
- Omega Clip Tool -T40280-
Removing
 WARNING
Follow all Safety Precautions when working with pyrotechnic components. Refer to → Chapter "Pyrotechnic Components Safety Precautions".
- Tilt backrests forward 45º.
- Remove the upper A-pillar trim panels. Refer to → Chapter "A-Pillar Trim Panel, Removing and Installing".
- Remove the upper B-pillar trim panels. Refer to → Chapter "Upper B-Pillar Trim, Removing and Installing".
- Remove the D-pillar trim panel. Refer to → Chapter "D-Pillar Trim, Removing and Installing, Sedan".
- Remove the sun visors. Refer to → Chapter "Sun Visor, Removing and Installing".
- Remove the sun visor center support. Refer to → Chapter "Sun Visor Center Support, Removing and Installing".
- Remove the front interior lamp/reading lamp. Refer to → Electrical Equipment; Rep. Gr.96; Controls; Front Interior Lamp/Reading Lamp, Removing and Installing.
- Remove the vanity mirror lighting. Refer to → Electrical Equipment; Rep. Gr.96; Lamps; Driver/Front Passenger Vanity Mirror Lamp W20/W14, Removing and Installing.
- Remove the windshield. Refer to → Body Exterior; Rep. Gr.64; Windshield; Windshield, Removing and Installing.
- Remove the roof grab handle. Refer to → Chapter "Roof Grab Handle, Removing and Installing".
Vehicles with Sunroof or Panorama Sunroof
- Open the sunroof -1- all the way.
- Open the sun shade -2- about 2/3.
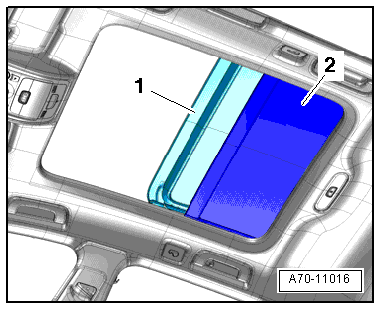
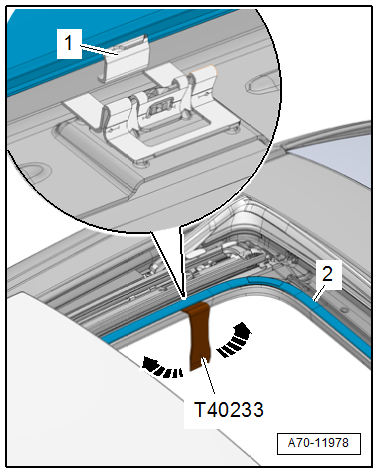
- To prevent dirtying the headliner, clean the Removal Wedge -T40233-.
- Push the Removal Wedge -T40233- between the cover frame -2- for the sunroof opening and the headliner.
- Release the cover frames using the Removal Wedge -T40233- one after each other from the brackets -1--arrows-, as shown in the illustration.
Continuation for All Vehicles
 Caution
- The headliner bends easily.
- Replace the headliner if it is bent.
- Lift the headliner carefully over the C-pillar trim panel.
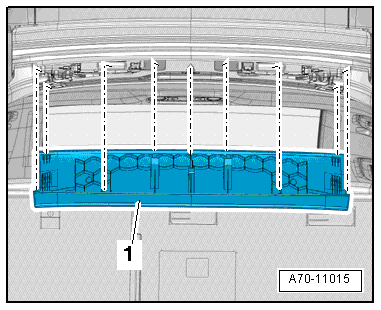
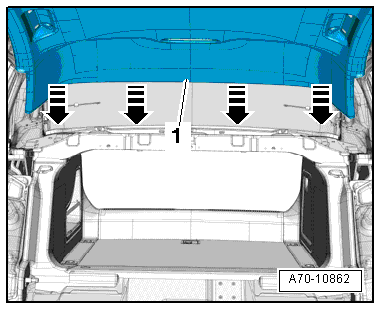
- Unclip the headliner -1- at the rear from the body using the Pry Lever -80-200--arrows-.
- Open the tabs with a screwdriver and unclip the rear section of the headliner from the body at the centering pin.
 Note
Note
Two technicians are needed to loosen the last connections and to remove the headliner.
- Remove the headliner through the opening for the windshield.
Installing
- Align headliner, press in retaining clip at the back of the headliner until it engages audibly in the mounting point of the body.
- Install the center support for the sun visor. Refer to → Chapter "Sun Visor Center Support, Removing and Installing".
- Lift the headliner carefully over the C-pillar trim panel.
- Press the rear clips on the headliner into the body until they audibly engage.
Installation is performed in reverse order of removal, while noting the following:
WARNING
Follow all Safety Precautions when working with pyrotechnic components. Refer to → Chapter "Pyrotechnic Components Safety Precautions".
Installation notes, for example tightening specifications, replacing components. Refer to → Chapter "Overview - Headliner, Sedan".
Headliner, Removing and Installing, Avant
Special tools and workshop equipment required
- Removal Wedge -T40233-
- Omega Clip Tool -T40280-
Removing
WARNING
Follow all Safety Precautions when working with pyrotechnic components. Refer to → Chapter "Pyrotechnic Components Safety Precautions".
- Fold the rear seat backrests forward.
- Remove front headrests. Refer to → Chapter "Headrest, Removing and Installing".
- Move the front seats into the deepest and most forward position and position the backrest as far toward the rear as it will go.
- Remove the upper A-pillar trim panels. Refer to → Chapter "A-Pillar Trim Panel, Removing and Installing".
- Remove the upper B-pillar trim panels. Refer to → Chapter "Upper B-Pillar Trim, Removing and Installing".
- Remove the C-pillar trim panels. Refer to → Chapter "C-Pillar Trim Panel, Removing and Installing, Avant".
- Remove the rear roof panel trim. Refer to → Chapter "Roof End Strip, Removing and Installing".
- Remove the D-pillar trim panel. Refer to → Chapter "D-Pillar Trim Panel, Removing and Installing, Avant".
- Remove the front interior lamp/reading lamp. Refer to → Electrical Equipment; Rep. Gr.96; Controls; Front Interior Lamp/Reading Lamp, Removing and Installing.
- Remove the roof grab handle. Refer to → Chapter "Roof Grab Handle, Removing and Installing".
- Remove the screen separator mount cover. Refer to → Chapter "Screen Separator Mount, Removing and Installing".
- Remove the sun visors. Refer to → Chapter "Sun Visor, Removing and Installing".
- Remove the sun visor center support. Refer to → Chapter "Sun Visor Center Support, Removing and Installing".
Versions Equipped with a Sunroof
- Open the sunroof -1- all the way.
- Open the sun shade -2- about 2/3.
- To prevent dirtying the headliner, clean the Removal Wedge -T40233-.
- Push the Removal Wedge -T40233- between the cover frame -2- for the sunroof opening and the headliner.
- Release the cover frames using the Removal Wedge -T40233- one after each other from the brackets -1-in direction of -arrows-, as shown in the illustration.
Continuation for All Vehicles
Caution
- The headliner bends easily.
- Replace the headliner if it is bent.
Note
Two technicians are needed to loosen the last connections and to remove the headliner.
- Release the tabs on the centering clip with a small screwdriver -arrows-.

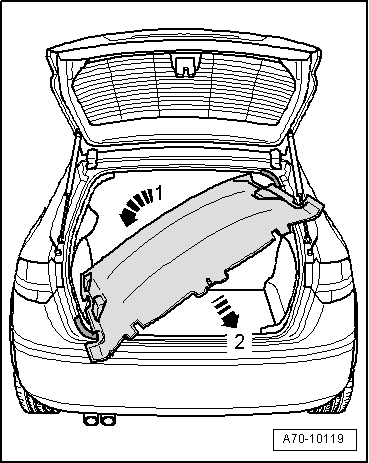
- Lower the headliner on the left side of the vehicle in direction of -arrow 1-.
- Carefully remove the headliner through the opening for the rear lid in direction of -arrow 2-.
Installing
- Align headliner, press in centering clip at the back of the headliner until it engages audibly in the mounting point of the body.
- Install the center support for the sun visor. Refer to → Chapter "Sun Visor Center Support, Removing and Installing".
- Align the headliner and press on the clips on the cover frame for the sunroof opening until they engage audibly.
WARNING
Follow all Safety Precautions when working with pyrotechnic components. Refer to → Chapter "Pyrotechnic Components Safety Precautions".
Install in reverse order of removal. Note the following:
Installation notes, for example tightening specifications, replacing components. Refer to → Chapter "Overview - Headliner, Avant".