Audi A6 Typ 4G: Roof Grab Handle, Removing and Installing
Special tools and workshop equipment required
- Angled Screwdriver -VAS6543-
Removing
 Caution
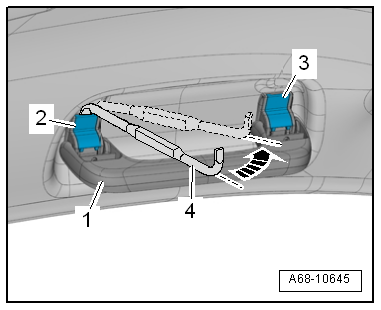
Unclip the expanding caps -2 and 3- but only up to their lock position (do not pull them out all the way otherwise the silicone brake and spring and fall out and then the handle has to be replaced).
- Place the angled screwdriver -4- in the gap behind the clips -2-.
- Pivot the angled screwdriver -arrow-, until the clips slides audibly into the rest position.
- Repeat the procedure on the two clips -3-.
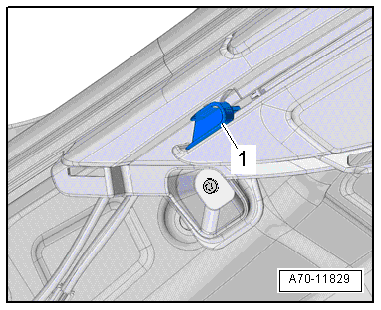
- Remove the roof grab handle -1- from the body opening.
- Leave the expanding caps in the rest position in the roof grab handle.
Installing
Install in reverse order of removal. Note the following:
- Insert the grab handle in the body cut-out.
- No clips should be between the handle and the roof trim.
- Push in the clips.
Installation notes, for example tightening specifications, replacing components. Refer to → Chapter "Overview - Sun Visors".
Luggage Compartment Roll Cover, Removing and Installing
Luggage Compartment Roll Cover, Removing and Installing
Removing
- Remove the luggage compartment floor trim. Refer to → Chapter "Spare Wheel Well Trim, Removing and Installing, Avant".
- Remove the break-down kit and the spare wheel.
- Remove the D-pillar trim panel. Refer to → Chapter "D-Pillar Trim Panel, Removing and Installing, Avant".
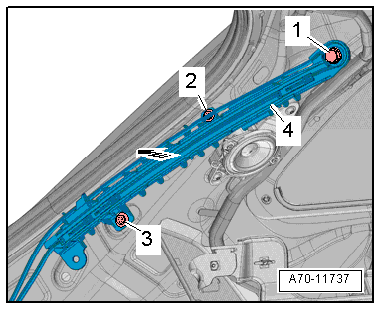
- Remove the left and right guide rail bolts -1, 2 and 3-.
- Unclip the guide rails -4- from the D-pillar -arrow-.
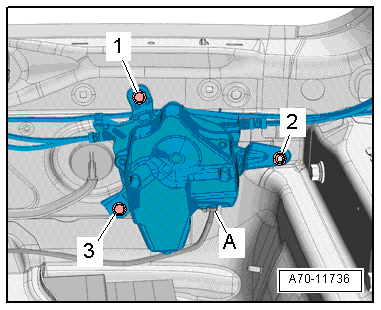
- Disconnect the connector -A-.
- Remove bolts -1, 3- and nut -2-.
- Unclip the release cable for the Luggage Compartment Cover Motor 1 -V473-/Luggage Compartment Cover Motor 2 -V474- from the bracket.
- Remove the Luggage Compartment Cover Motor 1 -V473-/Luggage Compartment Cover Motor 2 -V474-.
Installing
Install in reverse order of removal. Note the following:
- Secure the Luggage Compartment Cover Motor 1 -V473-/Luggage Compartment Cover Motor 2 -V474- with the bolts and nuts, but do not tighten.
- Remove the bolts and nuts from the Luggage Compartment Cover Motor 1 -V473-/Luggage Compartment Cover Motor 2 -V474- in the following sequence -1 to 3-.
- Connect the connector -A-.

- Tighten the bolts in the order -1 to 3- onto the right and left guide rails -4-.
- Clip the release cable for the Luggage Compartment Cover Motor 1 -V473-/Luggage Compartment Cover Motor 2 -V474- in the bracket.
- Adjust the release cable for the Luggage Compartment Cover Motor 1 -V473-/Luggage Compartment Cover Motor 2 -V474-. Refer to → Chapter "Release Cable for the Roll Cover, Adjusting".
Installation notes, for example tightening specifications, replacing components. Refer to → Chapter "Overview - Luggage Compartment Roll Cover".

Release Cable for the Roll Cover, Adjusting
Procedure
- Lift the luggage compartment floor covering at the handle and fold it forward.
- Remove the replacement part and the spare wheel well cover.
- Vehicles with a spare wheel: remove the spare wheel.
The following prerequisites must be met to adjust:
- The Luggage Compartment Cover Motor 1 -V473-/Luggage Compartment Cover Motor 2 -V474- is removed.
- Removed D-pillar trim and luggage compartment cover yoke.
- Adjusting release cable adjuster.
- When adjusting, turn the upper section -1- in direction of -arrow A- or -arrow B-.
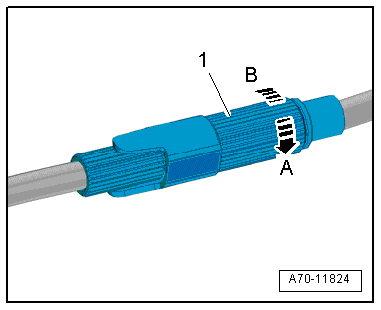
- Adjust the release cable so that both of the luggage compartment cover yokes -1- are parallel to each other.
- After adjusting the release cables, perform a functionality test for the Luggage Compartment Cover Motor 1 -V473-/Luggage Compartment Cover Motor 2 -V474-.
- Both of the luggage compartment cover yokes must be parallel to each other in both the upper and the lower sections at the guide stop for the D-pillar trim.
- If the yoke is not parallel, check the routing of the release cable and repeat the adjustment of the release cable.
