Audi A6 Typ 4G: Seals
Left Seal, Replacing
Special tools and workshop equipment required
- Used Oil Collection and Extraction Unit -SMN372500-
- Seal Installer - Flange Shaft -T40164-
- Grease. Refer to the Parts Catalog.
Procedure
- Secure the transmission on the Engine And Transmission Holder -VAS6095-. Refer to → Chapter "Securing on Engine and Transmission Holder".
- Place the Used Oil Collection and Extraction Unit -SMN372500- under the transmission.
- Remove the right flange shaft. Refer to → Chapter "Right Flange Shaft, Removing and Installing".
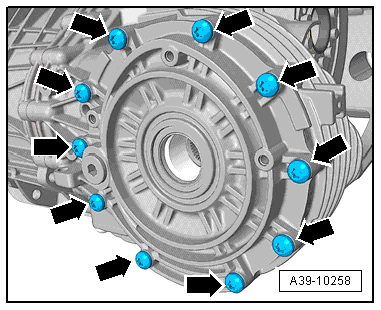
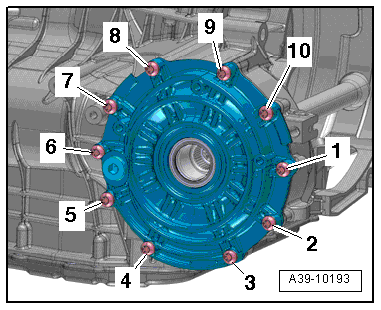
- Remove the bolts -arrows-.
- Carefully remove the front final drive cover; when doing this, the transmission fluid will drain out.
 Caution
Danger of causing damage to the differential.
- Slowly and carefully remove front final driver cover from transmission housing. Otherwise differential can fall out of transmission.
- A differential that has fallen out can no longer be installed. If differential falls out, transmission must be replaced.
- Make sure the differential bearing inner race and adjustment shims do not fall out of the transmission housing and front final drive cover.
- Bearing inner races and adjustments that have fallen out cannot be allocated with workshop equipment.
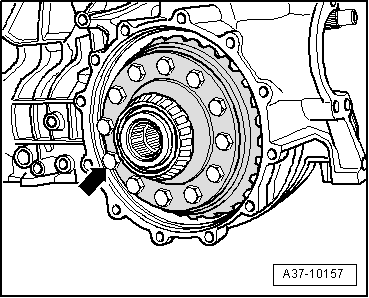
- Carefully remove the differential -arrow- and lay it on a soft support.
- Remove the left flange shaft. Refer to → Chapter "Left Flange Shaft, Removing and Installing".
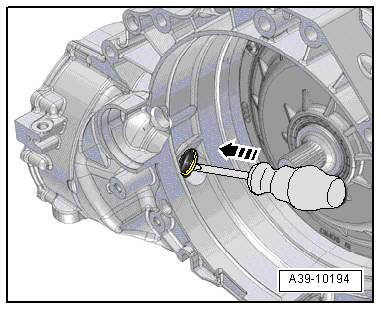
 Caution
Danger of damaging the seating surface in the transmission housing.
Position the screwdriver.
- Pry out the seal from the back.
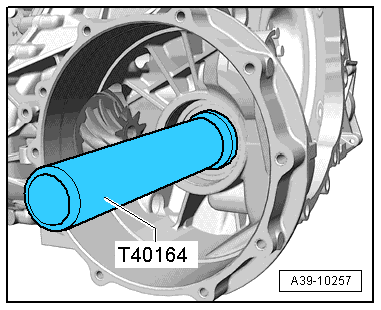
- Lightly coat the new seal on the outside with oil and install it using the Seal Installer - Flange Shaft -T40164-.
- The open side of the seal faces the Thrust Piece for Final Drive at Gearbox -T40164-.
- Install the shaft seal for the left flange shaft using the Seal Installer - Flange Shaft -T40164- all the way; when doing this, do not bend it.
- Fill the space between the sealing- and dust lip half way with sealing grease. Refer to the Parts Catalog.
- Install the differential.
- Install the front final drive cover with a new O-ring and tighten the bolts. Refer to → Fig. "Tightening Specification and Sequence, Front Final Drive Cover".
- Install the left flange shaft. Refer to → Chapter "Left Flange Shaft, Removing and Installing".
- Install the right flange shaft. Refer to → Chapter "Right Flange Shaft, Removing and Installing".
- Fill with transmission fluid (MTF). Refer to → S tronic Transmission; Rep. Gr.39; Transmission Fluid; Transmission Fluid, Draining and Filling.
Right Seal, Replacing
Special tools and workshop equipment required
- Seal Installer - Flange Shaft -T40163-
- Pry lever
- Grease. Refer to the Parts Catalog.
Procedure
- Remove the right flange shaft. Refer to → Chapter "Right Flange Shaft, Removing and Installing".
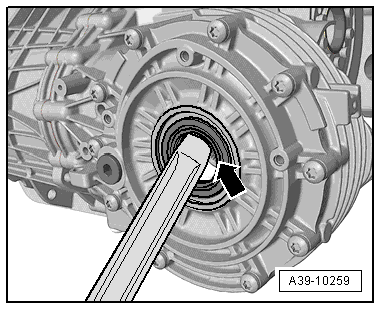
- Pry out the flange shaft sealing ring -arrow-.
- Lightly coat the outer circumference of the new shaft seal with oil.
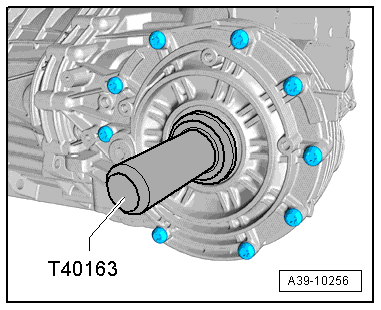
- Drive in the right flange shaft seal using the Seal Installer - Flange Shaft -T40163- until stop without tilting.
- Fill the space between the sealing- and dust lip half way with sealing grease. Refer to the Parts Catalog.
- Install the right flange shaft. Refer to → Chapter "Right Flange Shaft, Removing and Installing".
Selector Shaft Seal, Replacing
- The transmission is installed.
Description of the procedure. Refer to → S tronic Transmission; Rep. Gr.34; Selector Mechanism; Selector Shaft Seal, Replacing

