Audi A6 Typ 4G: Seat Adjustment Control Head, Removing and Installing
Special tools and workshop equipment required
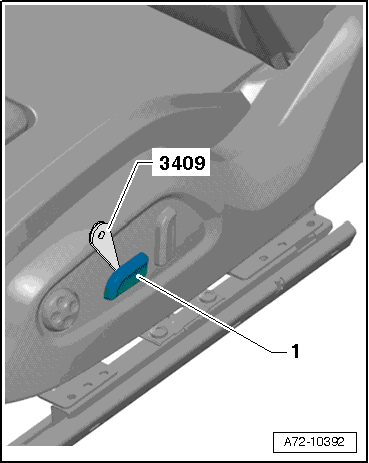
- Trim Removal Wedge -3409-
Removing
- Carefully pry the actuator -1- using the Trim Removal Wedge -3409- from the retainer.
- Repeat the process on the opposite side of the gap cover.
- Repeat the procedure for the second actuator.
- Remove the sill-side trim:
- Standard seat/Sport seat/Super Sport seat. Refer to → Chapter "Seat Side Trim on Sill Panel Side, Removing and Installing, Front Seat (Power)".
- For a Multi-contour seat. Refer to → Chapter "Seat Side Trim on Sill Panel Side/Front Seat Trim, Removing and Installing, Multi-contour Seat".
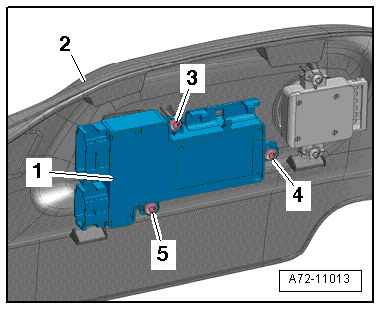
Standard Seat/Sport Seat/Super Sport Seat
- Remove the bolts -3 to 5-.
- Remove the control -1- from the trim -2- on the sill-side.
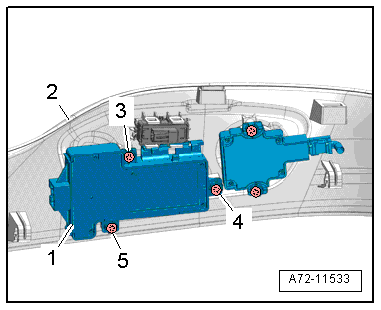
Multi-Contour Seat
- Remove the bolts -3 to 5-.
- Remove the switch module -1- from the trim -2- on the sill-side.
Installing
Install in reverse order of removal. Note the following:
Installation notes, for example tightening specifications, replacing components. Refer to → Chapter "Overview - Seat Pan, Seat Adjustment Actuator/Switch".
Seat Ventilation Control Module (Integrated in Seat Heating), Removing and Installing
Special tools and workshop equipment required
- Trim Removal Wedge -3409-
Removing
- Move the front seat all the way to the rear and then into its highest position.
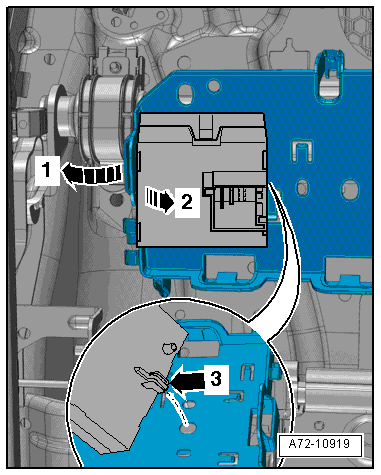
- Press the releases -arrow- disconnect the connector -2- from the seat ventilation control module -1-.
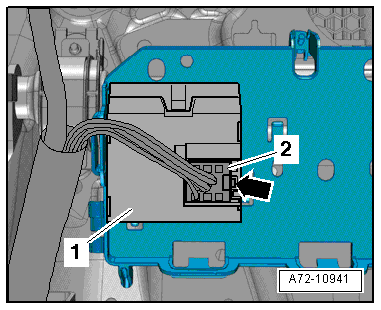
- Release the tab -arrow 1- with the Trim Removal Wedge -3409-.
- Swivel the seat ventilation control module downward -arrow 2-.
- Disengage and the hook -arrow 3- on the seat ventilation control module from the bracket and remove the module.
 Note
Note
Detach the front seat and tilt it to back if the seat ventilation control module is not accessible. Refer to → Chapter "Front Seat, Removing and Installing".
Installing
Install in reverse order of removal. Note the following:
- The seat ventilation control module must click into the bracket.
Installation notes, for example tightening specifications, replacing components. Refer to → Chapter "Overview - Seat Pan, Front Seat Control Module".
Seat/Steering Column Adjustment Control Module with Memory Function, Removing and Installing
Special tools and workshop equipment required
- Trim Removal Wedge -3409-
Removing
 WARNING
- Follow all Safety Precautions when working with pyrotechnic components. Refer to → Chapter "Pyrotechnic Components Safety Precautions".
- Before handling pyrotechnic components (for example, disconnecting the connector), the person handling it must "discharge static electricity". This can be done by touching the door striker, for example.
- Remove the front seat. Refer to → Chapter "Front Seat, Removing and Installing".
- Fasten the front seat on the Engine/Transmission Holder - Seat Repair Fixture -VAS6136-. Refer to → Chapter "Front Seat, Mounting on Fixture for Seat Repair".
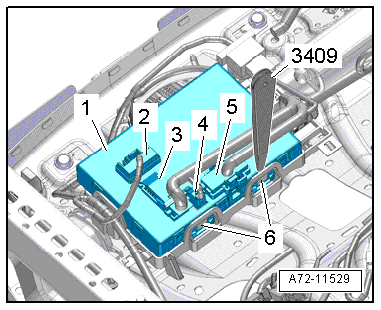
- Unclip the cover with the Trim Removal Wedge -3409- and remove it.
- Disconnect the connectors -2 through 5- from the control module -1-.
Note
The number of connectors may vary depending on equipment. The description shows the version with the most equipment possible.
- Unclip the retainers -6- using the Trim Removal Wedge -3409-.
- Carefully remove the control module -1- from the retainers -arrow-.
- Disengage the hooks -2 and 3- on the bracket -4- and remove the control module.
Installing
WARNING
- Follow all Safety Precautions when working with pyrotechnic components. Refer to → Chapter "Pyrotechnic Components Safety Precautions".
- Before handling pyrotechnic components (for example, connecting the connector), the person handling it must "discharge static electricity". This can be done by touching the door striker, for example.
- Observe all measures when installing the front seat. Refer to → Chapter "Front Seat, Removing and Installing".
Install in reverse order of removal. Note the following:
Note
Make sure the connectors are installed correctly and are secure.
- The memory seat/steering column adjustment control module must engage audibly in the brackets.
Installation notes, for example tightening specifications, replacing components. Refer to → Chapter "Overview - Seat Pan, Front Seat Control Module".

