Audi A6 Typ 4G: Overview - Seat Bench/Single Seat
Component Location Overview - Electric and Electronic Components
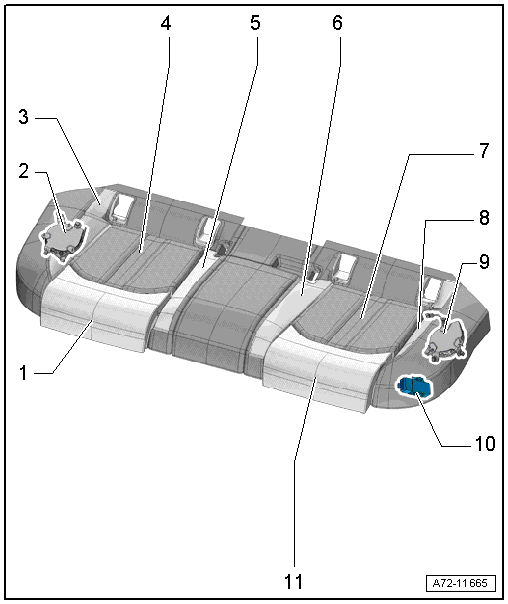
1 - Heating Element
- For leg rest
- With the seat cushion glued on
- Removing and installing. Refer to → Chapter "Seat Heating Element, Removing and Installing".
2 - Right Rear Seat Blower Fan -V270-
- Market-specific
- Allocation. Refer to the Parts Catalog
- Removing and installing. Refer to → Chapter "Left Rear Seat Blower Fan, Removing and Installing".
3 - Passenger Side Rear Seat Right Bolster Heating Element -Z89-
- With the seat cushion glued on
- Allocation. Refer to the Parts Catalog
- Removing and installing. Refer to → Chapter "Seat Heating Element, Removing and Installing".
4 - Right Rear Bench Seat Heating Element -Z12-
- Heating element sewn into seat cover; if faulty, replace the seat cover. Refer to → Chapter "Cover and Cushion, Separating".
- Allocation. Refer to the Parts Catalog.
5 - Passenger Side Rear Seat Left Bolster Heating Element -Z88-
- With the seat cushion glued on
- Allocation. Refer to the Parts Catalog.
- Removing and installing. Refer to → Chapter "Seat Heating Element, Removing and Installing".
6 - Driver Side Rear Seat Right Bolster Heating Element -Z85-
- With the seat cushion glued on
- Allocation. Refer to the Parts Catalog.
- Removing and installing. Refer to → Chapter "Seat Heating Element, Removing and Installing".
7 - Left Rear Bench Seat Heating Element -Z10-
- Heating element sewn into seat cover; if faulty, replace the seat cover. Refer to → Chapter "Cover and Cushion, Separating".
- Allocation. Refer to the Parts Catalog.
8 - Driver Side Rear Seat Left Bolster Heating Element -Z84-
- With the seat cushion glued on
- Allocation. Refer to the Parts Catalog.
- Removing and installing. Refer to → Chapter "Seat Heating Element, Removing and Installing".
9 - Left Rear Seat Blower Fan -V271-
- Equipment levels
- Allocation. Refer to the Parts Catalog.
- Removing and installing. Refer to → Chapter "Left Rear Seat Blower Fan, Removing and Installing".
10 - Seat Heating Control Module -J882-
- Allocation. Refer to the Parts Catalog.
- Removing and installing. Refer to → Chapter "Seat Heating Control Module -J882-, Removing and Installing".
11 - Heating Element
- For leg rest
- With the seat cushion glued on
- Removing and installing. Refer to → Chapter "Seat Heating Element, Removing and Installing".
Overview - Seat Bench/Single Seat
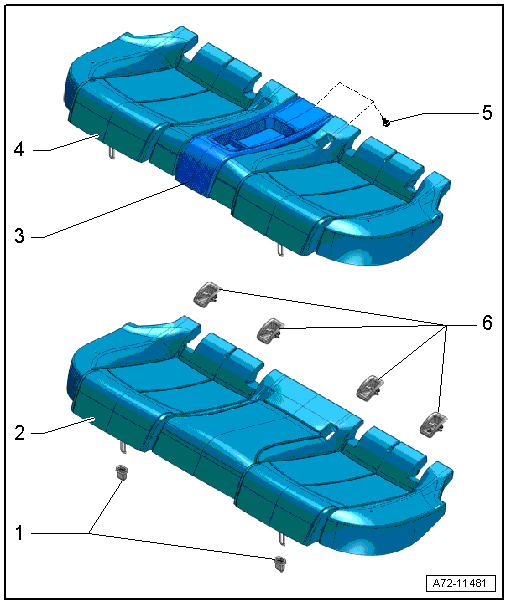
1 - Grommets
- Quantity: 2
- For fastening the rear seat bench
- Clipped into the vehicle floor
- Replace each time the rear seat bench is removed
 Note
Note
The floor panel, into which the mounting grommets are inserted, and the wire frame of the bench seat must be checked after every disassembly of the rear bench seat and be readjusted in the case of deformation.
- Check and readjust the wire frame. Refer to → Chapter "Floor Panel for Rear Bench Seat Mounting Grommets and Wire Frame, Checking and Aligning".
2 - Rear Bench Seat
- 3-person rear seat bench (without storage compartment)
- Allocation. Refer to the Parts Catalog.
- Removing and installing. Refer to → Chapter "Seat Bench/Single Seat, Removing and Installing".
Note
The floor panel, into which the mounting grommets are inserted, and the wire frame of the bench seat must be checked after every disassembly of the rear bench seat and be readjusted in the case of deformation.
- Check and readjust the wire frame. Refer to → Chapter "Floor Panel for Rear Bench Seat Mounting Grommets and Wire Frame, Checking and Aligning".
3 - Center Storage Compartment
- Removing and installing. Refer to → Chapter "Bench Seat Center Storage Compartment, Removing and Installing".
4 - Rear Seat Bench - Super Sport Seat
- 2-person rear seat bench (storage compartment)
- Allocation. Refer to the Parts Catalog.
- Removing and installing. Refer to → Chapter "Seat Bench/Single Seat, Removing and Installing".
Note
The floor panel, into which the mounting grommets are inserted, and the wire frame of the bench seat must be checked after every disassembly of the rear bench seat and be readjusted in the case of deformation.
- Check and readjust the wire frame. Refer to → Chapter "Floor Panel for Rear Bench Seat Mounting Grommets and Wire Frame, Checking and Aligning".
5 - Bolt
- 2.8 Nm
- Quantity: 2
6 - Trim
- Clipped to the child seat anchorage brackets that are welded to the floor
Overview - Seat Bench Fan/Single Seat
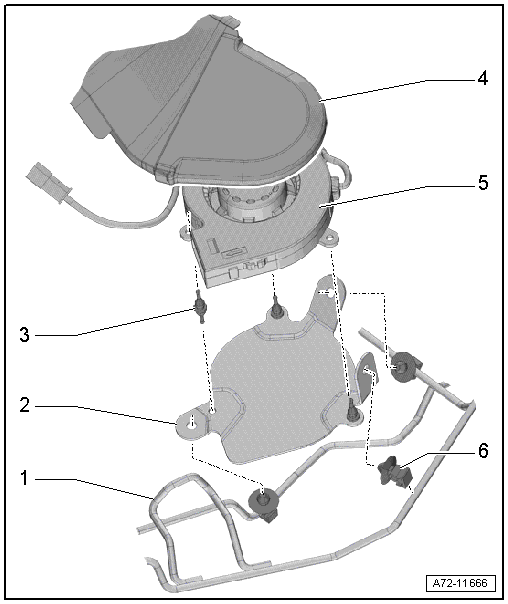
1 - Seat Frame
- for rear seat bench
2 - Bracket
- For blower fan
- Removing and installing. Refer to → Chapter "Left Rear Seat Blower Fan, Removing and Installing".
3 - Rubber Buffer
- Fan mount
- Quantity: 3
4 - Air Guide Mat
- With the seat cushion glued on
5 - Right Rear Seat Blower Fan -V270-/Left Rear Seat Blower Fan -V271-
- Removing and installing. Refer to → Chapter "Left Rear Seat Blower Fan, Removing and Installing".
- Allocation. Refer to the Parts Catalog.
6 - Clip
- Quantity: 3
- Installed in the frame
Overview - Seat Bench Fan/Single Seat, Multi-contour Seat
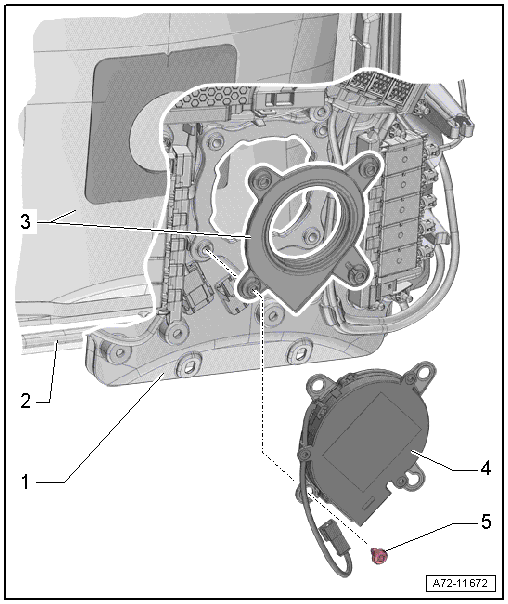
1 - Module Carrier With Air Cushions For Lumbar Support
- Cannot be disassembled
- Removing and installing. Refer to → Chapter "Module Carrier, Removing and Installing".
2 - Backrest Padding
3 - Air Guide Mat
- Bonded with backrest padding
- Install the rubber boot in the module carrier
4 - Left Rear Seat Backrest Blower Fan -V273-
- Front passenger side: Right Rear Seat Backrest Blower Fan -V272-
- Removing and installing. Refer to → Chapter "Rear Seat Backrest Fan, Removing and Installing".
5 - Expanding Rivet
- Quantity: 4
