Audi A6 Typ 4G: Seat Pan Cover and Cushion, Removing and Installing
Lower Seat Frame Cover and Cushion, Removing and Installing, Standard Seat
Special tools and workshop equipment required
- Backrest Panel Tool -3370-
Removing
 WARNING
- Follow all Safety Precautions when working with pyrotechnic components. Refer to → Chapter "Pyrotechnic Components Safety Precautions".
- Before handling pyrotechnic components (for example, disconnecting the connector), the person handling it must "discharge static electricity". This can be done by touching the door striker, for example.
- Remove the front seat. Refer to → Chapter "Front Seat, Removing and Installing".
- Fasten the front seat on the Engine/Transmission Holder - Seat Repair Fixture -VAS6136-. Refer to → Chapter "Front Seat, Mounting on Fixture for Seat Repair".
- Remove the backrest. Refer to → Chapter "Front Backrest, Removing and Installing, Standard Seat/Sport Seat/Super Sport Seat".
- Vehicles with a front passenger seat with a child seat anchor: remove the LATCH child seat anchor. Refer to → Chapter "Front LATCH Child Seat Anchor, Removing and Installing".
- Equipment level with storage compartment: remove the storage compartment. Refer to → Chapter "Storage Compartment, Removing and Installing".
- Remove the bracket for the sill-side trim:
- For the manual standard seat. Refer to → Chapter "Seat Side Trim on Sill Panel Side, Removing and Installing, Front Seat (Manual)".
- For the power standard seat. Refer to → Chapter "Seat Side Trim on Sill Panel Side, Removing and Installing, Front Seat (Power)".
Front Passenger Seat - Country-Specific with Passenger Occupant Detection System for Front Passenger Airbag Deactivating:
 Caution
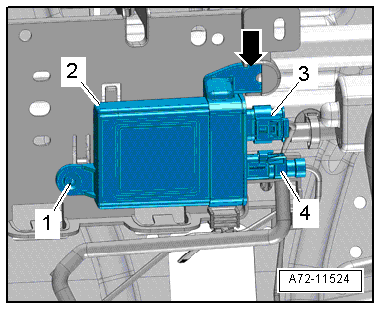
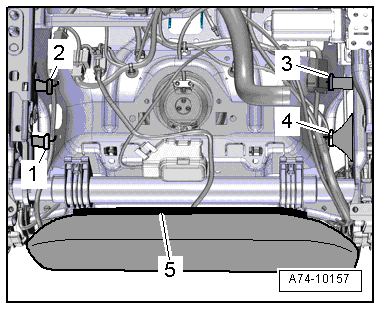
Never disconnect the connector -4- from the Passenger Occupant Detection System Control Module -J706-.
- Disconnect the connector -3- from the control module.
- Remove the bolt -1-.
- Disengage the control module -2- from the bracket -arrow- and free up the control module and wire.
Continuation for Driver Seat and Front Passenger Seat
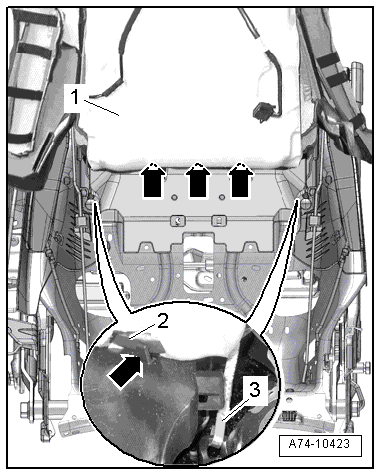
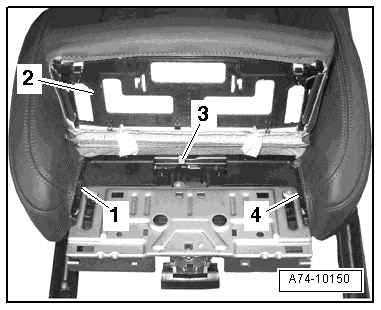
- Disengage the hooks -1 and 4- from the lower seat frame -2-.
- Disconnect and free up the connectors.
- Detach the molding -3- of the seat cover -5- in the rear area using the Backrest Panel Tool -3370-.
- Detach the molding -2 and 4- of the seat cover in the front and side areas using the Backrest Panel Tool -3370-.
- Remove the seat cover -1- with the seat cushion from the lower seat frame -3-. If necessary, free up the wiring harness for the seat heating and passenger occupant detection system.
Installing
WARNING
- Follow all Safety Precautions when working with pyrotechnic components. Refer to → Chapter "Pyrotechnic Components Safety Precautions".
- Before handling pyrotechnic components (for example, connecting the connector), the person handling it must "discharge static electricity". This can be done by touching the door striker, for example.
- Observe all measures when installing the front seat. Refer to → Chapter "Front Seat, Removing and Installing".
Install in reverse order of removal. Note the following:
Installation notes, for example tightening specifications, replacing components. Refer to → Chapter "Overview - Seat Pan Cover and Cushion, Standard Seat".
Seat Pan Cover and Cushion, Removing and Installing, Sport Seat/Super-Sport Seat
Removing
WARNING
- Follow all Safety Precautions when working with pyrotechnic components. Refer to → Chapter "Pyrotechnic Components Safety Precautions".
- Before handling pyrotechnic components (for example, disconnecting the connector), the person handling it must "discharge static electricity". This can be done by touching the door striker, for example.
- Remove the front seat. Refer to → Chapter "Front Seat, Removing and Installing".
- Fasten the front seat on the Engine/Transmission Holder - Seat Repair Fixture -VAS6136-. Refer to → Chapter "Front Seat, Mounting on Fixture for Seat Repair".
- Remove the backrest. Refer to → Chapter "Front Backrest, Removing and Installing, Standard Seat/Sport Seat/Super Sport Seat".
- Vehicles with a front passenger seat with a LATCH child seat anchor: remove the LATCH child seat anchor. Refer to → Chapter "Front LATCH Child Seat Anchor, Removing and Installing".
- Equipment level with storage compartment: remove the storage compartment. Refer to → Chapter "Storage Compartment, Removing and Installing".
- Remove the bracket for the sill-side trim:
- For the manual sport seat. Refer to → Chapter "Seat Side Trim on Sill Panel Side, Removing and Installing, Front Seat (Manual)".
- For the power sport seat/super sport seat. Refer to → Chapter "Seat Side Trim on Sill Panel Side, Removing and Installing, Front Seat (Power)".
- Disconnect and free up the connectors.
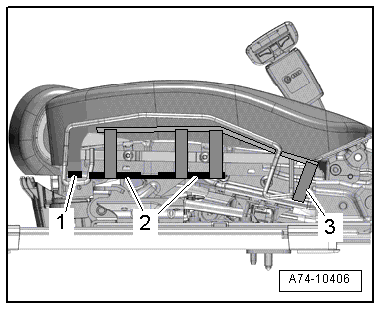
- Pull the seat depth adjuster all the way out.
- Unclip the tabs -2-.
- Move the support with the seat cushion and seat cover -1- for the seat depth adjuster as far as possible upward -arrow- so that the tab remains unlocked.
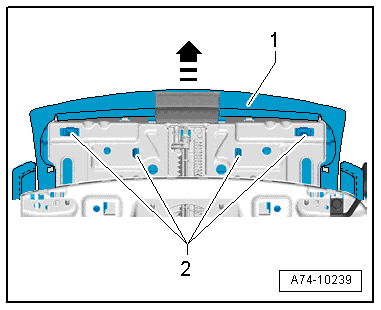
- Remove the support -2- with the seat cushion and seat cover for the seat depth adjuster upward and toward the front.
 Note
Note
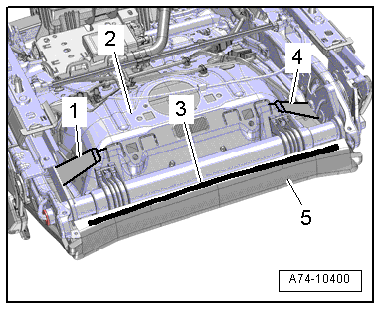
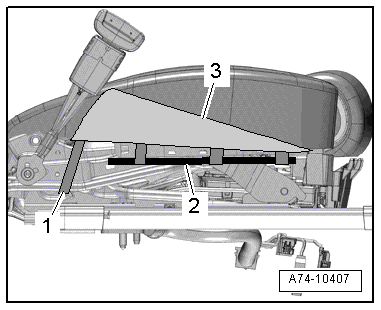
The illustration does not show the seat pan lower frame.
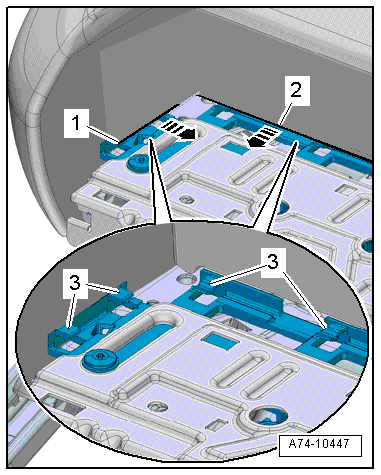
- Unclip the cover retaining strips -1, 3 and 4- and rear cushion.
- To do this, unclip the retaining channels -1 and 2- in direction of -arrow- out from the tabs -3-.
Note
Proceed very carefully when removing and installing because it is relatively easy to damage the tabs.
Front Passenger Seat - Country-Specific with Passenger Occupant Detection System for Front Passenger Airbag Deactivating:
Caution
Never disconnect the connector -4- from the Passenger Occupant Detection System Control Module -J706-.
- Disconnect the connector -3- from the control module.
- Remove the bolt -1-.
- Disengage the control module -2- from the bracket -arrow- and free up the control module and wire.
Continuation for Driver Seat and Front Passenger Seat
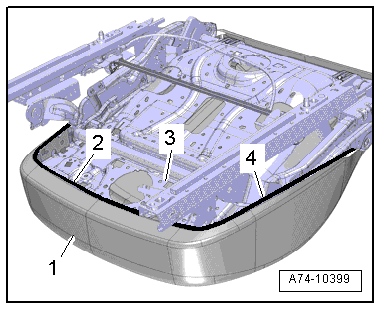
- Disengage the hooks -1 and 4- from the lower seat frame -2-.
- Disconnect and free up the connectors.
- Detach the molding -3- of the seat cover -5- in the rear area using the Backrest Panel Tool -3370-.
- Detach the molding -1 and 2- of the seat cover in the front and side areas using the Backrest Panel Tool -3370-.
- Remove the seat cover -4- with the seat cushion from the seat pan -3-. If necessary, free up the wiring harness for the seat heating and passenger occupant detection system.
Note
The seat depth adjuster support (plastic) remains on the seat cushion.
Installing
WARNING
- Follow all Safety Precautions when working with pyrotechnic components. Refer to → Chapter "Pyrotechnic Components Safety Precautions".
- Before handling pyrotechnic components (for example, connecting the connector), the person handling it must "discharge static electricity". This can be done by touching the door striker, for example.
- Observe all measures when installing the front seat. Refer to → Chapter "Front Seat, Removing and Installing".
Install in reverse order of removal. Note the following:
Installation notes, for example tightening specifications, replacing components. Refer to → Chapter "Overview - Seat Pan Cover and Cushion, Sport Seat/Super Sport Seat".
Seat Pan Seat Bolster Cushion, Removing and Installing, Multi-contour Seat
Special tools and workshop equipment required
- Backrest Panel Tool -3370-
Removing
WARNING
- Follow all Safety Precautions when working with pyrotechnic components. Refer to → Chapter "Pyrotechnic Components Safety Precautions".
- Before handling pyrotechnic components (for example, disconnecting the connector), the person handling it must "discharge static electricity". This can be done by touching the door striker, for example.
- Remove the front seat. Refer to → Chapter "Front Seat, Removing and Installing".
- Fasten the front seat on the Engine/Transmission Holder - Seat Repair Fixture -VAS6136-. Refer to → Chapter "Front Seat, Mounting on Fixture for Seat Repair".
- Remove the backrest. Refer to → Chapter "Front Backrest, Removing and Installing, Multi-contour Seat".
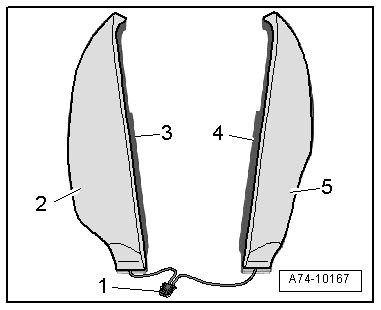
- Detach the molding -5- at the rear of the seat pan using the Backrest Panel Tool -3370-.
Note
Ignore items -1 to 4-.
- Detach the molding -3- from the seat frame on the sill-side.
- Detach the molding -1 and 2- from the seat frame on the sill-side.
- Lift the seat cover -3- on the tunnel side.
- Disengage the tab -1- on the seat frame on the tunnel side.
- Detach the molding -2- from the seat pan frame on the tunnel side.
- Disconnect the connector -1- and free up the heating element wire.
- Remove the seat bolster cushion -3 and 4-.
Note
The seat bolster cushion -3 and 4 - is only available together with the heating element -2 and 5.-
Installing
WARNING
- Follow all Safety Precautions when working with pyrotechnic components. Refer to → Chapter "Pyrotechnic Components Safety Precautions".
- Before handling pyrotechnic components (for example, connecting the connector), the person handling it must "discharge static electricity". This can be done by touching the door striker, for example.
- Observe all measures when installing the front seat. Refer to → Chapter "Front Seat, Removing and Installing".
Install in reverse order of removal. Note the following:
Installation notes, for example tightening specifications, replacing components. Refer to → Chapter "Overview - Seat Pan Cover and Cushion, Multi-contour Seat".
Seat Pan Cover and Cushion, Removing and Installing, Multi-contour Seat
Special tools and workshop equipment required
- Backrest Panel Tool -3370-
- Trim Removal Wedge -3409-
Removing
WARNING
- Follow all Safety Precautions when working with pyrotechnic components. Refer to → Chapter "Pyrotechnic Components Safety Precautions".
- Before handling pyrotechnic components (for example, disconnecting the connector), the person handling it must "discharge static electricity". This can be done by touching the door striker, for example.
- Remove the front seat. Refer to → Chapter "Front Seat, Removing and Installing".
- Fasten the front seat on the Engine/Transmission Holder - Seat Repair Fixture -VAS6136-. Refer to → Chapter "Front Seat, Mounting on Fixture for Seat Repair".
- Remove the backrest. Refer to → Chapter "Front Backrest, Removing and Installing, Multi-contour Seat".
Front Passenger Seat - Country-Specific with Passenger Occupant Detection System for Front Passenger Airbag Deactivating
Caution
Never disconnect the connector -4- from the Passenger Occupant Detection System Control Module -J706-.
- Disconnect the connector -3- from the control module.
- Remove the bolt -1-.
- Disengage the control module -2- from the bracket -arrow- and free up the control module and wire.
Continuation for Driver Seat and Front Passenger Seat
- Remove front trim bracket, compressor and Multi-contour seat control module. Refer to → Chapter "Front Seat Trim Bracket/Compressor/Control Module, Removing and Installing, Multi-contour Seat".
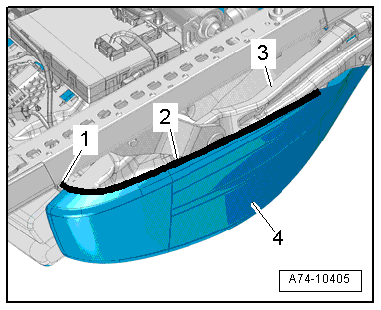
- Detach rubber strap -2- and molding -1- at the front of the seat pan.
- Detach tab hooks -1 to 4- at the bottom of the seat pan.
- Detach the molding -5- at the rear of the seat pan using the Backrest Panel Tool -3370-.
- Detach the molding -3- from the seat frame on the sill-side.
- Detach the molding -1 and 2- from the seat frame on the sill-side.
- Free up the electric wire for the heating element and remove the sill-side seat bolster padding.
- Lift the seat cover -3- on the tunnel side.
- Disengage the tab -1- on the seat frame on the tunnel side.
- Detach the molding -2- from the seat pan frame on the tunnel side.
- Free up the heating element connector and remove the tunnel-side seat bolster padding.
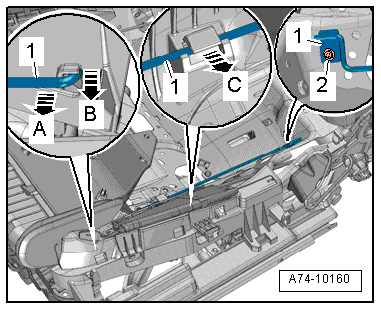
- Remove the expanding rivet -2- from the padding wire -1-.
- Unclip the center of the padding wire from the lower seat frame -arrow C-.
- Push the front padding wire down -arrow A- and remove from the lower seat frame -arrow B-.
- Repeat the procedure on the other side of the vehicle.
- Disconnect the connector on the seat cushion and free up the wires.
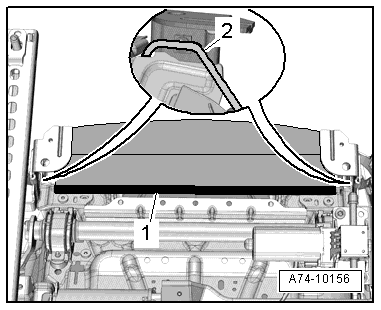
- Lift the seat cover and rear seat cushion -1- carefully and disengage the rubber band -3- for the seat cover from the lower seat frame.
- Unclip the seat cover clamping strip -2- at the seat depth adjuster cover using the Trim Removal Wedge -3409--arrows-.
- Remove the seat cover and seat cushion.
Installing
WARNING
- Follow all Safety Precautions when working with pyrotechnic components. Refer to → Chapter "Pyrotechnic Components Safety Precautions".
- Before handling pyrotechnic components (for example, connecting the connector), the person handling it must "discharge static electricity". This can be done by touching the door striker, for example.
- Observe all measures when installing the front seat. Refer to → Chapter "Front Seat, Removing and Installing".
Install in reverse order of removal. Note the following:
Installation notes, for example tightening specifications, replacing components. Refer to → Chapter "Overview - Seat Pan Cover and Cushion, Multi-contour Seat".