Audi A6 Typ 4G: Sunroof Seals, Removing and Installing
Sunroof Seals, Removing and Installing, Sedan
Procedure
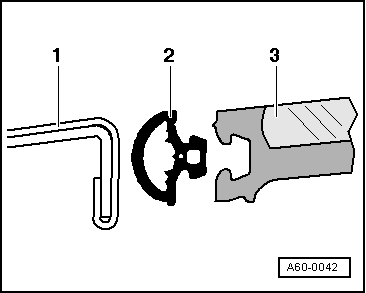
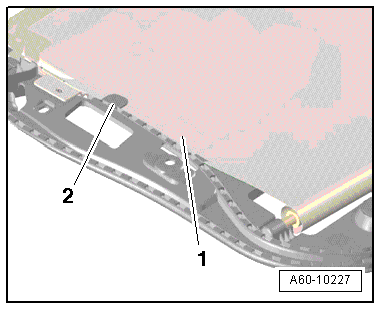
- Sunroof panel -3- removed.
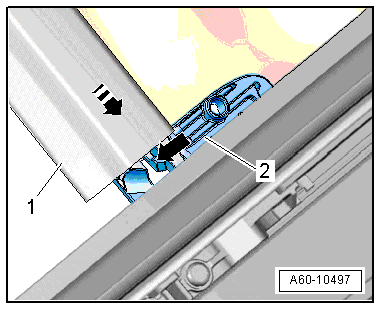
- Remove panel seal -2- from sunroof panel -3-.
- Push new panel seal into sunroof panel -3- starting at rear of panel edge in center.
 Note
Note
Coat the edge of the panel with soapy water to make it easier to install the seal.
Sunroof Seals, Removing and Installing, Avant
Procedure
Note
Spray the seal with soapy solution to make the installation easier.
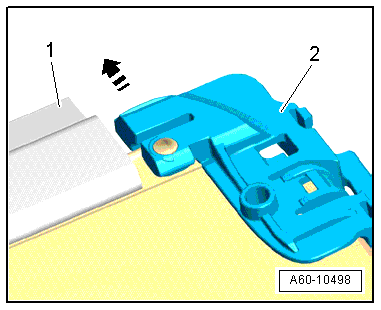
- Align the seal in the center to the sunroof panel and push it into the both front guides.
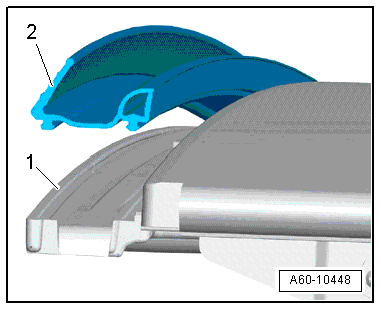
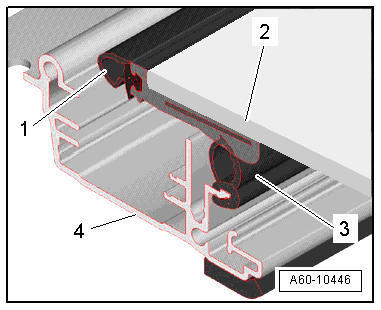
- Press the seal -1- into the guides and the sunroof panel -2-.
- Removing the seal -3- is only possible when removing the sunroof panel "2"
- Remove the frame -4- to the side.
Panorama Sliding Sunroof Seal, Removing and Installing
Special tools and workshop equipment required
- Roller -3356-
- Cleaning Solution -D 009 401 04-
Procedure
- Remove both sunroof panels.
- Remove the Panorama sunroof frame. Refer to → Chapter "Sunroof Frame, Removing and Installing, Avant".
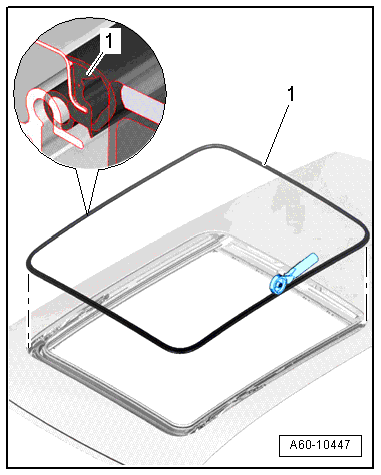
- Remove the seal -1- from the side body flange.
Note
- Adhesion surfaces must be free of dust and grease.
- Heat the adhesive surface and seal to 40 ºC (104 ºF) before bonding.
- Remove the remaining adhesive if necessary, and clean the body flange.
- Clean the adhesive surfaces on the vehicle body with Cleaning Solution -D 009 401 04-.
- First remove the protective film from the adhesive tape on the rear side and press the seal and the joint on the rear vehicle center (pay attention to the marking).
- Press seal in the front rounded areas.
- Press on seal on the front side.
- Press seal in the rear radii.
- Press on seal on the rear side.
- Press seal on the long sides, and if necessary, evenly to prevent any excess length.
- Press on the surrounding seal with the Roller -3356-.
Sunroof Shade, Removing and Installing
Sunroof Shade, Removing and Installing
Removing
- Open the sun shade all the way.
- Remove the frame and sunroof panel "2".
- Remove the motor for the sun shade.
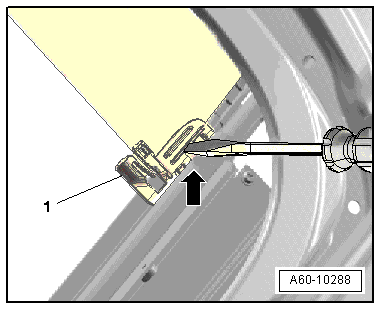
- Release the retainer -arrow- for the tension bow -1- on the left side on the coupling plate -2-.
- Slide the tension bow in direction of -arrow-.
- Lift the tension bow -1- on the opposite side upward from the coupling plate -2- and remove it sideways from the cloth strip.
- Push the retainer -arrow- to the side with a small screwdriver and unlock it.
- Slide the coupling plate -1- slightly forward off the cable.
- Secure the sun shade axle -1- from rolling off and secure it with a piece of wire -2-.
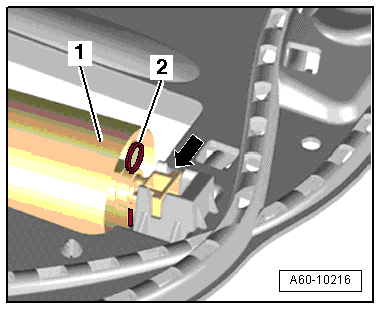
- Using a small screwdriver, for example, push back the tab -2- in direction of -arrow- and lift the shaft -1- upward.
- Pull the sun shade material to the rear out of the frame and remove the sun shade shaft.

Installing
Install in reverse order of removal. Note the following:
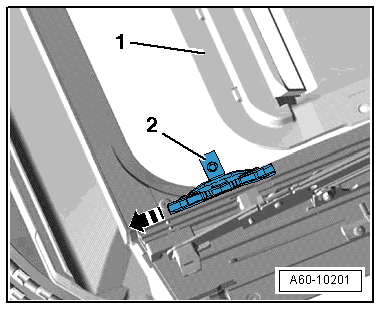
- Make sure that the side reinforcement is engaged in the frame guide tabs -1- and runs under the guide tab -2-.
- Remove the securing pin on the shaft just after installing in the frame.
- With the tension bow installed, push the sun shade all the way to the rear and install the Roof Shade Control Module -J394-.
Note
- If the axle in the sun shade shaft is rolled up, it is possible to re-establish the pretension by doing the following.
- Before the sun shade can be pretensioned, first make sure that the spring is evenly removed of tension by gently tapping the shaft.
- Turn the axle of the rolled up sun shade -1- until it is possible to feel a slight resistance.
- Then turn the axle with the end piece -arrow- 12 turns while holding the shaft secure and the secure it from unrolling either with the securing pin -2- or a piece of wire.
- Then the sun shade can be re-installed.
Sun Shade Motor, Removing and Installing
- Install the headliner. Refer to → Body Interior; Rep. Gr.70; Roof Trim Panels; Headliner, Removing and Installing.
- Disconnect the connectors.
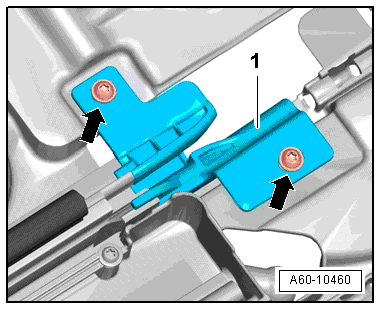
- Remove the three screws. Refer to -item 1- and remove the motor from the frame.
- After installing, perform an adaptation.
Sun Shade, Removing and Installing
Removing
- Sunroof panel removed.
- Remove the screw -2- for the spring -3-.
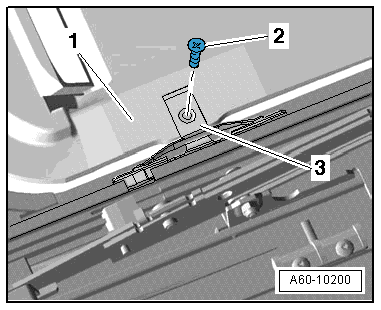
- Push the headliner -1- slightly to the rear and remove the spring.
- Remove the spring toward the wear.
- Remove headliner upward.
Installing
Install in reverse order of removal.
Power Sunroof Control Module -J245-, Programming
Motor Neutral Position, Adjusting, Sedan
- Motor is removed, connectors connected.
- Move rotary control to "roof closed" position.
- Motor automatically runs to zero position and switched off.
- Install motor in this position with sunroof closed.
Motor Adaptation
Note
In order for the sunroof to work correctly after the motor has been removed/installed or replaced, perform an adaptation.
 WARNING
- An adaption must only be performed for sunroof panel that has already been installed otherwise it may become damaged.
- When replacing the Power Sunroof Control Module -J245- or Roof Shade Control Module -J394-, a coding and adaptation must be performed via the Guided Functions in the Guided Fault Finding under diagnostic address 46 in the Vehicle Diagnostic Tester.
Sunroof Shade Cable, Removing and Installing
- Sunroof frame removed.
- Roof Shade Control Module -J394- removed.
- Remove the screw -arrow- and remove the stop -1-.
- Pull the cable to the rear and out of the frame.
- When installing, make sure the plates are parallel.
Adjust the Parallel Movement of the Cables
- When installing, the new cables must be adjusted parallel to each other.
- Install the cables on both sides of the frame.
- Install the stop -1- and tighten the screw.
- Push the cables on both side all the way to the stop and install the Roof Shade Control Module -J394-.
- Perform an adaptation. Refer to → Chapter "Motor Adaptation".
