Audi A6 Typ 4G: Transmission Fluid
Transmission Fluid Level, Checking
Special tools and workshop equipment required
- Pressurized Gearbox Oil Filler Kit -VAS6617-
- Used Oil Collection and Extraction Unit -SMN372500-
- Protective eyewear
Procedure
 Note
Note
- General Repair Instructions, refer to → Chapter "General Repair Information".
- Rules for cleanliness when working on the S tronic transmission, refer to → Chapter "Guidelines for Clean Working Conditions".
- Do not exchange the transmission (MTF) chamber with the ATF chamber.
- The manual transmission, the manual transmission and the transfer case in the S tronic transmission 0B5 share a common transmission (MTF) fluid chamber, which is checked and filled by a single plug.
- Gear oil at about 20 ℃ (room temperature).
- Move vehicle onto a four-pillar workshop hoist or over a work pit so that it is absolutely horizontal.
- The Pressurized Gearbox Oil Filler Kit -VAS6617- must be clean. Flush it with transmission fluid (MTF), if necessary. Do not mix other transmission fluids.
- The transmission must be still for at least 15 minutes to make sure the oil settles internally.
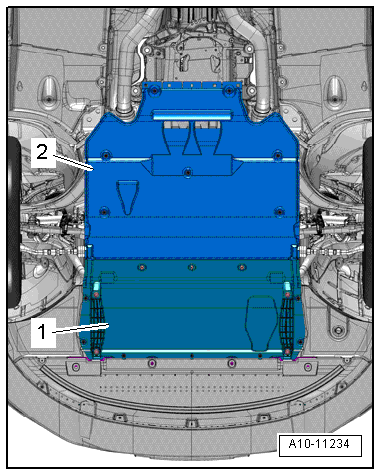
- Remove the rear noise insulation -2-, refer to → Body Exterior; Rep. Gr.66; Noise Insulation; Noise Insulation, Removing and Installing.
 Note
Note
Place a cloth over the tunnel crossmember to prevent transmission fluid (MTF) from getting into the cast pockets on the top.
- Place the Used Oil Collection and Extraction Unit -SMN372500- under the transmission.
 WARNING
Danger of eye injury.
Wear protective eyewear.
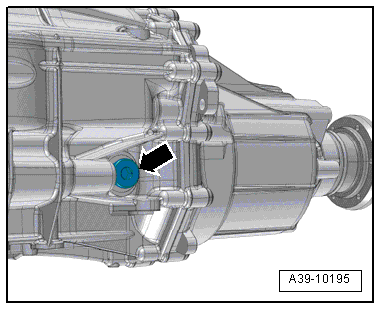
- Remove the fill and check plug -arrow- on the side of the transmission housing.
- The transmission fluid (MTF) must be up to the lower edge of the check- and fill hole.
If the transmission fluid (MTF) is below the lower edge of the check and fill hole:
- Fill the transmission fluid (MTF) slowly using Pressurized Gearbox Oil Filler Kit -VAS6617- until it starts to run out of the check- and fill hole.
- Transmission fluid (MTF) specification, refer to the Parts Catalog.
- Repeat the process every 15 seconds until it is not possible to add any more transmission fluid (MTF).
 Note
Note
It is important to follow the waiting period to make sure the various oil spaces in the transmission are filled equally.
- Tighten the plug.
Install in reverse order, paying attention to the following:
 Note
Note
All the transmission fluid (MTF) must be removed completely if any transmission fluid (MTF) has gotten into the cast pockets on the top of the tunnel crossmember.
- Remove the cloth from the tunnel crossmember.
- Clean the tunnel crossmember and wipe off any remaining transmission fluid.
Transmission Fluid, Draining and Filling
Special tools and workshop equipment required
- Pressurized Gearbox Oil Filler Kit -VAS6617-
- Used Oil Collection and Extraction Unit -SMN372500-
- Protective eyewear
Draining
 Note
Note
- General Repair Instructions, refer to → Chapter "General Repair Information".
- Rules for cleanliness when working on the S tronic transmission, refer to → Chapter "Guidelines for Clean Working Conditions".
- Gear oil at about 20 ℃ (room temperature).
- Move vehicle onto a four-pillar workshop hoist or over a work pit so that it is absolutely horizontal.
- Remove the rear noise insulation -2-, refer to → Body Exterior; Rep. Gr.66; Noise Insulation; Noise Insulation, Removing and Installing.
- Place the Used Oil Collection and Extraction Unit -SMN372500- under the transmission.
 WARNING
Danger of eye injury.
Wear protective eyewear.
 Note
Note
- Place a cloth over the tunnel crossmember to prevent transmission fluid (MTF) from getting into the cast pockets on the top.
- In the following description, vehicles with drain plugs for transmission fluid (MTF) are differentiated from vehicles with Transmission Fluid Temperature Sensor 2 -G754- in place of drain plugs for transmission fluid (MTF).
- Place a cloth over the tunnel crossmember.

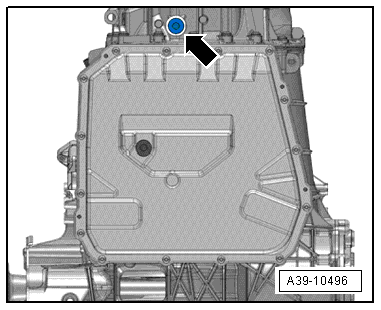
Vehicles with a transmission fluid (MTF) drain plug -arrow-:
 Note
Note
The drain plug for the transmission fluid is located behind the transmission fluid pan.
- Remove the transmission fluid (MFT) drain plug -arrow- on the bottom of the transmission housing.
- Drain the transmission fluid (MTF).
- Tighten the transmission fluid drain plug (MTF) -arrow-.
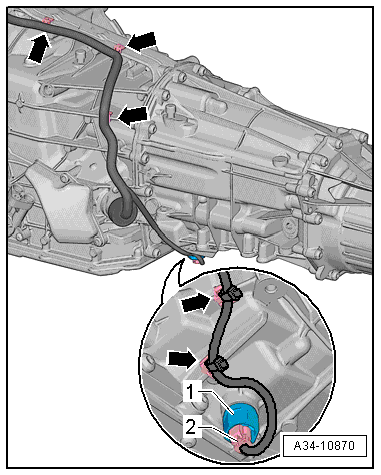
Vehicles with Transmission Fluid Temperature Sensor 2 -G754--1- instead of a transmission fluid (MTF) drain plug:
- Turn off the ignition.
 Note
Note
The connector on the Transmission Fluid Temperature Sensor 2 -G754- can be disconnected only when the ignition is turned off. The transmission will switch to emergency mode if the ignition is on. The counter for the increased temperature will count up and a DTC memory entry will be stored in the Transmission Control Module -J217- after 10 minutes.
- Disconnect the connector -2- from Transmission Fluid Temperature Sensor 2 -G754- and tie it up.
 Note
Note
Protect the connector -2- and the contacts on Transmission Fluid Temperature Sensor 2 -G754- from transmission fluid. Clean the connectors immediately if they come in contact with transmission fluid (Manual Transmission Fluid). Transmission fluid can cause contact problems in the connector contacts.
- Remove the Transmission Fluid Temperature Sensor 2 -G754--1-.
- Drain the transmission fluid (MTF).
- Tighten the Transmission Fluid Temperature Sensor 2 -G754--1- and connect the connector -2-.
- Tightening Specification: Transmission Fluid Temperature Sensor 2 -G754- to transmission, 45 Nm
All vehicles:
 Caution
Danger of causing damage to the transmission.
If there is no transmission fluid in the transmission or if there is insufficient transmission fluid (Manual Transmission Fluid) in the transmission,
- do not start the engine and
- do not tow the vehicle
Filling
 Note
Note
- General Repair Instructions, refer to → Chapter "General Repair Information".
- Rules for cleanliness when working on the S tronic transmission, refer to → Chapter "Guidelines for Clean Working Conditions".
- Gear oil at about 20 ℃ (room temperature).
- Move vehicle onto a four-pillar workshop hoist or over a work pit so that it is absolutely horizontal.
- The Pressurized Gearbox Oil Filler Kit -VAS6617- must be clean. Flush it with transmission fluid (MTF), if necessary. Do not mix other transmission fluids.
- The transmission must be still for at least 15 minutes to make sure the oil settles internally.
- If necessary, remove the rear noise insulation, refer to → Body Exterior; Rep. Gr.66; Noise Insulation; Noise Insulation, Removing and Installing.
 Note
Note
Place a cloth over the tunnel crossmember to prevent transmission fluid (MTF) from getting into the cast pockets on the top.
- Place the Used Oil Collection and Extraction Unit -SMN372500- under the transmission.
 WARNING
Danger of eye injury.
Wear protective eyewear.
- Remove the fill and check plug -arrow- on the side of the transmission housing.
- Fill the transmission fluid (MTF) using Pressurized Gearbox Oil Filler Kit -VAS6617- until it starts to run out of the check- and fill hole.
- Transmission fluid (MTF) specification, refer to the Parts Catalog.
- Perform this process every 15 seconds with 50 ml of transmission fluid (MTF) until the transmission is full.
 Note
Note
It is important to follow the waiting period to make sure the various oil spaces in the transmission are filled equally.
- The transmission fluid (MTF) must be up to the lower edge of the check- and fill hole.
If the transmission fluid (MTF) is below the lower edge of the check and fill hole:
- Tighten the plug.
 Note
Note
It is not necessary to check the oil level again at this stage.
Install in reverse order, paying attention to the following:
 Note
Note
All the transmission fluid (MTF) must be removed completely if any transmission fluid (MTF) has gotten into the cast pockets on the top of the tunnel crossmember.
- Remove the cloth from the tunnel crossmember.
- Clean the tunnel crossmember and wipe off any remaining transmission fluid.

Only for vehicles with Transmission Fluid Temperature Sensor 2 -G754--item 1-:
- Perform "Guided Function"02 - reset transmission fluid temperature sensor 2 (G754) on the Vehicle Diagnostic Tester after changing the transmission fluid, refer to → Chapter "Transmission Guided Functions".

Automatic Transmission Fluid
Overview - Drain and Check Plugs
 Note
Note
The manual transmission, the manual transmission and the transfer case in the S tronic transmission 0B5 share a common transmission fluid chamber, which is checked and filled by a single plug.
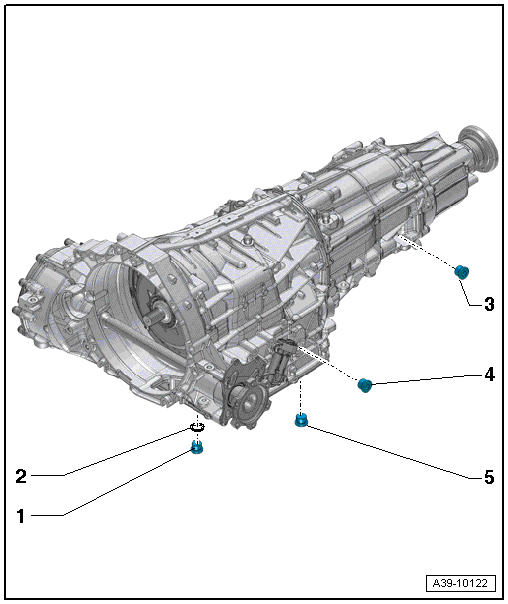
1 - ATF Drain Plug
- 45 Nm
2 - Seal
- For the ATF drain plug
- Replacing
3 - Transmission Fluid (MTF) Fill and Check Plug
- 45 Nm
- Inside the manual transmission, front final drive and transfer case
4 - ATF Fill and Check Plug
- 45 Nm
5 - Transmission Fluid (MTF) Drain Plug
- 45 Nm
- Inside the manual transmission, front final drive and transfer case
- Depending on the date of manufacture, Transmission Fluid Temperature Sensor 2 -G754- may also serve as the transmission fluid drain plug; tightening specification for removing and installing.
Seals
Overview - Seals
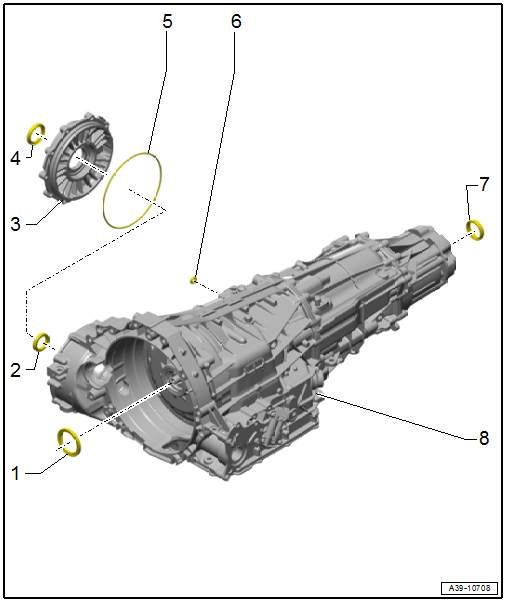
1 - Seal
- For the input shaft
- Replacing, refer to → S tronic Transmission Internal Components; Rep. Gr.35; Input Shaft; Input Shaft Seal, Replacing.
2 - Left Seal
- For the flange shaft
- Replacing, refer to → S tronic Transmission Internal Components; Rep. Gr.39; Seals; Left Seal, Replacing.
3 - Front Final Drive Cover
4 - Right Seal
- For the flange shaft
- Replacing, refer to → Chapter "Right Seal, Replacing".
5 - O-Ring
- On the front final drive cover
- Replacing is only possible with the transmission removed.
6 - Seal
- For the selector shaft
- Replacing, refer to → Chapter "Selector Shaft Seal, Replacing".
7 - Seal
- For the transmission output shaft.
- Replacing, refer to → Rep. Gr.39; Center differential; Transmission Output Shaft Seal, Replacing
8 - Transmission
Left Seal, Replacing
- The transmission is removed.
Description of the procedure, refer to → Rep. Gr.39; Seals; Left Seal, Replacing.
Right Seal, Replacing
Procedure
- Transmission installed or removed
- Remove the right flange shaft, refer to → Chapter "Right Flange Shaft, Removing and Installing".
- Replacing the right flange shaft seal, refer to → S tronic Transmission Internal Components; Rep. Gr.39; Seals; Right Seal, Replacing.
- Install the right flange shaft, refer to → Chapter "Right Flange Shaft, Removing and Installing".

