Audi A6 Typ 4G: Antenna Systems - General Information
General Information - Antenna Systems, USA
The antenna system consists of the Roof Antenna -R216-, the rear window antennas and, from MY 2015, bumper antennas.
Roof Antenna -R216-
- GPS Antenna -R50-, only on 7T2, 7T6 and 7UG
- Telephone Antenna -R65-, only for 9ZE/9ZC
- Satellite Antenna -R170-, only on QV8
Window Antenna - Sedan
- Radio Antenna 2 -R93- (AM/FM1)/Central Locking and Anti-Theft Alarm System Antenna -R47- (central locking system) to the Antenna Amplifier 2 -R111- on the upper left side of the D-pillar.
- Antenna -R11- (FM2)/TV Antenna 2 -R56- (TV2) to Antenna Amplifier -R24- at the bottom of the left D-pillar.
- TV Antenna 1 -R55- (TV1) to the Antenna Amplifier 3 -R112- on the right side of the D-pillar at the top
- TV Antenna 3 -R57- (TV3) to the Antenna Amplifier 4 -R113- on the lower right side of the D-pillar.
Window Antenna - Avant
- Radio Antenna 2 -R93- (AM/FM1)/Central Locking and Anti-Theft Alarm System Antenna -R47- (central locking system) to the Antenna Amplifier 2 -R111- on the upper left side of the rear lid
- Antenna -R11- (FM2)/TV Antenna 1 -R55- (TV1) to the Antenna Amplifier -R24- on the lower left side of the rear lid
- TV Antenna 2 -R56- (TV2) to Antenna Amplifier 4 -R113- on the right side of the rear lid at the top
- TV Antenna 3 -R57- (TV3) to the Antenna Amplifier 3 -R112- on the left side of the C-pillar.
The Antenna Amplifier 3 -R112- with the DAB connection is only applicable to Europe and QV3.
Bumper Antennas
- LTE Antenna 1 -R297- under the rear bumper cover on the right side, only on 9ZC/9ZK
- LTE Antenna 2 -R306- under the rear bumper cover on the left side, only on 9ZC/9ZK
Antenna wires, repairing. Refer to → Electrical Equipment; Rep. Gr.97; Antenna Wires, Repairing.
Component Location Overview - Antenna Systems
Component Location Overview - Antenna Systems, Sedan, USA
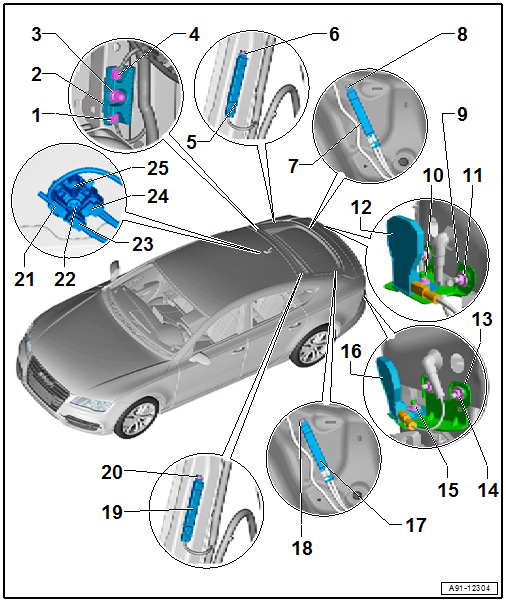
1 - Nut
- 9 Nm
2 - Windshield Antenna Suppression Filter -C18-
- Removing and Installing. Refer to → Chapter "Windshield Antenna Suppression Filter -C18-, Removing and Installing, Sedan".
3 - Nut
- 9 Nm
4 - Nut
- 9 Nm
5 - Antenna Amplifier 3 -R112-
- Connector Assignment.
- Removing and Installing. Refer to → Chapter "Antenna Amplifier 2 -R111-/Antenna Amplifier 3 - R112-, Removing and Installing, Sedan".
6 - Bolt
- 2 Nm
7 - Antenna Amplifier 4 -R113-
- Connector Assignment.
- Removing and Installing. Refer to → Chapter "Antenna Amplifier -R124- / Antenna Amplifier 4 - R113-, Removing and Installing, Sedan".
8 - Bolt
- 2 Nm
9 - Bracket
10 - Nut
- 4 Nm
11 - Nut
- 4 Nm
- Quantity: 2
12 - LTE Antenna 1 -R297-
- Removing and Installing. Refer to → Chapter "Bumper Antennas, Removing and Installing".
13 - Bracket
14 - Nut
- 4 Nm
- Quantity: 2
15 - Nut
- 4 Nm
16 - LTE Antenna 2 -R306-
- Removing and Installing. Refer to → Chapter "Bumper Antennas, Removing and Installing".
17 - Antenna Amplifier -R24-
- Connector Assignment.
- Removing and Installing. Refer to → Chapter "Antenna Amplifier -R124- / Antenna Amplifier 4 - R113-, Removing and Installing, Sedan".
18 - Bolt
- 2 Nm
19 - Antenna Amplifier 2 -R111-
- Connector Assignment.
- Removing and Installing. Refer to → Chapter "Antenna Amplifier 2 -R111-/Antenna Amplifier 3 - R112-, Removing and Installing, Sedan".
20 - Bolt
- 2 Nm
21 - SAT Connection for the Satellite Antenna -R170-
22 - Bolt
- 6 Nm
23 - GSM Connection from Telephone Antenna -R65-
24 - GPS Connection from GPS Antenna -R50-
25 - Roof Antenna -R216-
- Connector Assignment.
- Removing and Installing. Refer to → Chapter "Roof Antenna, Removing and Installing".
Component Location Overview - Antenna Systems, Avant, USA
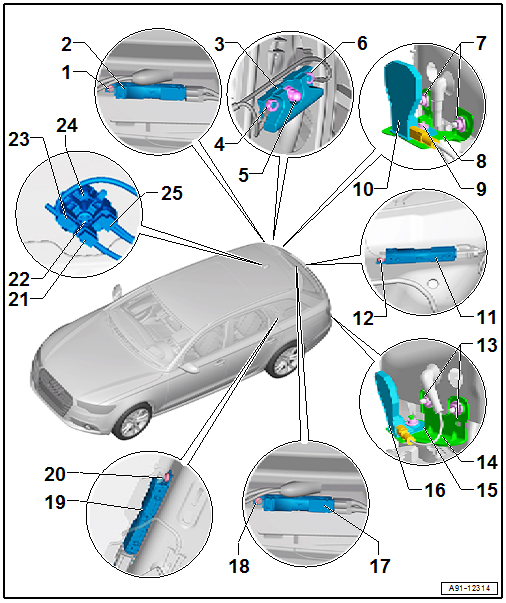
1 - Bolt
- 2 Nm
2 - Antenna Amplifier 4 -R113-
- Connector Assignment.
- Removing and Installing. Refer to → Chapter "Antenna Amplifier 4 -R113-, Removing and Installing, Avant".
3 - Windshield Antenna Suppression Filter -C18-
- Removing and Installing. Refer to → Chapter "Windshield Antenna Suppression Filter -C18-, Removing and Installing, Avant".
4 - Nut
- 9 Nm
5 - Nut
- 9 Nm
6 - Nut
- 9 Nm
7 - Nut
- 4 Nm
- Quantity: 2
8 - Bracket
9 - Nut
- 4 Nm
10 - LTE Antenna 1 -R297-
- Removing and Installing. Refer to → Chapter "Bumper Antennas, Removing and Installing".
11 - Antenna Amplifier -R24-
- Connector Assignment.
- Removing and Installing. Refer to → Chapter "Antenna Amplifier -R24-, Removing and Installing, Avant".
12 - Bolt
- 2 Nm
13 - Nut
- 4 Nm
- Quantity: 2
14 - Bracket
15 - Nut
- 4 Nm
16 - LTE Antenna 2 -R306-
- Removing and Installing. Refer to → Chapter "Bumper Antennas, Removing and Installing".
17 - Antenna Amplifier 2 -R111-
- Connector Assignment.
- Removing and Installing. Refer to → Chapter "Antenna Amplifier 2 -R111-, Removing and Installing, Avant".
18 - Bolt
- 2 Nm
19 - Antenna Amplifier 3 -R112-
- Connector Assignment.
- Removing and Installing. Refer to → Chapter "Antenna Amplifier 3 -R112-, Removing and Installing, Avant".
20 - Bolt
- 2 Nm
21 - GSM Connection from Telephone Antenna -R65-
22 - Bolt
- 6 Nm
23 - SAT Connection for the Satellite Antenna -R170-
24 - Roof Antenna -R216-
- Connector Assignment.
- Removing and Installing. Refer to → Chapter "Roof Antenna, Removing and Installing".
25 - GPS Connection from GPS Antenna -R50-
