Audi A6 Typ 4G: Balance Weight, Removing And Installing
 Caution
This procedure contains mandatory replaceable parts.
Refer to component overview and parts catalog prior to
starting procedure.
Mandatory Replacement Parts
- Bolts - Vibration damper to brake caliper.
Depending on the model there are two balance weights
installed in each front brake caliper.
Removing
- Remove the dust cap if equipped.
- Remove the bolt -1-.
- Remove the vibration damper -2-
from the brake caliper -3-.
Installing
- Clean the brake caliper around the balance weight.
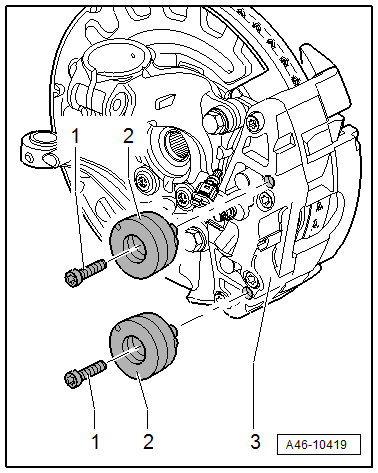
- Install the damper -2- in the
brake caliper.
- Install the new bolts -1- and tighten -item 1-.
- Replace the existing protective cap.
READ NEXT:
Brake Pads, Removing and Installing, Steel Brakes, 1LA/1LJ
Special tools and workshop equipment
required
Torque Wrench 1331 5-50Nm -VAG1331-
Piston Resetting Tool -T10145-
Lithium grease. Refer t
Brake Caliper, Removing and Installing, Steel Brakes, 1LA/1LJ
Special tools and workshop equipment
required
Torque Wrench 1332 40-200Nm -VAG1332-
Caution
This procedure contains mandatory
Brake Caliper, Replacing, Steel Brakes, 1LA/1LJ/1LF/1LL/1LU and Ceramic
Brakes, LN/1LW
Special tools and workshop equipment
required
Torque Wrench 1332 40-200Nm -VAG1332-
Brake Pedal Actuator -VA
SEE MORE:
Tires, Rolling Noises, General Information
Rolling noise perceived by the human ear is caused by
vibrations transmitted from the noise source to the ear via the
air.
Here we are interested in noises created by certain
characteristics of the tires as well as the effects of rolling
(noise source).
Vehicles with a High Voltage System (Hybrid Vehicles)
Extremely Dangerous Due to High-Voltage
The high-voltage system is under high-voltage. Death or serious
bodily injury by electric shock.
- Individuals with electronic/medical life- and health sustaining
machines in or on their person canno
