Audi A6 Typ 4G: Rear Lid, Adjusting
Rear Lid, Adjusting, Gap Dimensions
Special tools and workshop equipment required
- Gauge - Gap Adjustment -3371-
Gap Dimensions on the Sedan
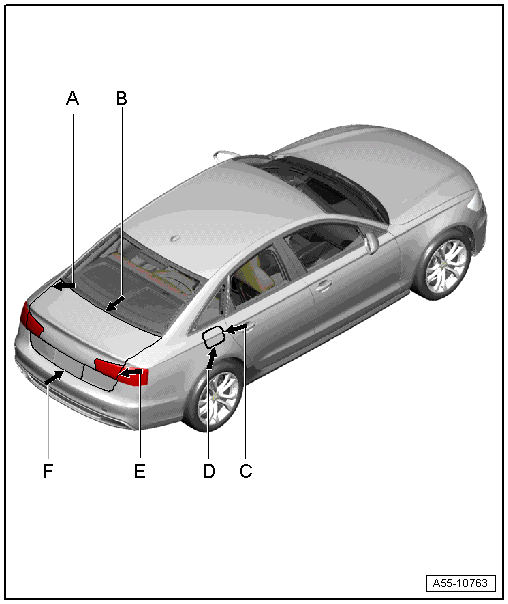
The gap dimensions can be checked with the Adjustment Gauge -3371-.
- Dimension -A- = 3.5 mm
- Dimension -B- = 5.5 mm
- Dimension -C- = 2.2 mm
- Dimension -D- = 2.2 mm
- Dimension -E- = 3.5 mm
- Dimension -F- = 5.0 mm
Gap Dimensions on the Avant
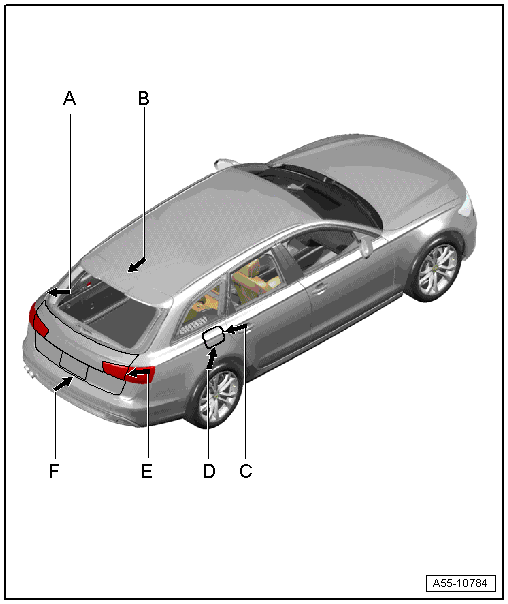
- Dimension -A- = 3.5 mm
- Dimension -B- = 4.5 mm
- Dimension -C- = 2.2 mm all the way around
- Dimension -D- = 2.3 mm
- Dimension -E- = 3.5 mm
- Dimension -F- = 5.0 mm
- Make sure the gap is parallel to the body.
Rear Lid, Adjusting, Vehicles with Fixed Striker Pin
Procedure
- Remove the rear lid end trim panel. Refer to → Body Interior; Rep. Gr.70; Luggage Compartment Trim Panels; Lock Carrier Trim Panel, Removing and Installing.
 Note
Note
Before adjusting, install the adjusting buffer on the rear lid side completely. For Sedan. Refer to → Chapter "Rear Lid, Adjusting, Adjusting Buffer, Sedan". For Avant. Refer to → Chapter "Rear Lid, Adjusting, Adjusting Buffer, Avant".
- Loosen nuts -1 and 3-. The striker pin -2- must be movable.
- Close the door and check that it is flush.
- If necessary adjust the flush via the upper stop buffer.
- Rear lid latch must be engaged in main detent (second retainer) during this.
- Open the rear lid and tighten the nuts.
- Remove the stop buffer just enough until the closed rear lid with the stop buffer comes into contact with the stop on the body.
- Check if rear lid still closes easily, continue adjusting the stop buffer if necessary.
- If rear lid is difficult to close, tighten the stop buffer slightly.
Tightening Specifications
- Striker pin on the body: 21 Nm
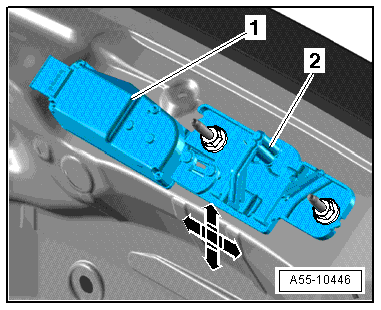
Rear Lid, Adjusting, Vehicles with Rear Lid Closing Assist Motor -V382-
Procedure
- Remove the rear lid end trim panel. Refer to → Body Interior; Rep. Gr.70; Luggage Compartment Trim Panels; Lock Carrier Trim Panel, Removing and Installing.
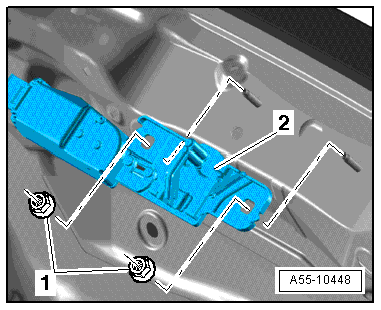
- Loosen the nuts. The rear lid lock unit -1- and striker pin -2- must still be movable.
- For easier installation, there are markings in the rear lid end piece to help adjust the rear lid lock unit.
 Caution
Risk of damage!
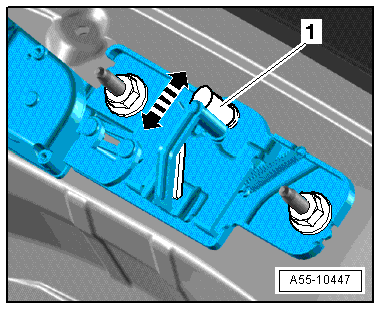
- To adjust the rear lid, the striker pin must be in the "rear lid closed" position (lower end position).
- Striker pin cannot be installed in position not visible in drawing (upper end position) -1- because rear lid can block contact when closing and can be damaged.
- Do not use the Door Closing Assist Control Module to adjust the power rear lid.
- Turn the upper section of the rear lid side of the adjusting buffer completely before adjusting the rear lid.
- Close the rear lid and check the position.
- If necessary adjust the striker pin the in upper adjusting buffer.
- Rear lid latch must be engaged in main detent (second retainer) during this.
- Tighten the nuts -1- on the Rear Lid Lock Unit -2- to the tightening specification.
- Remove the lower adjusting buffer until the closed rear lid with the adjusting buffers comes into contact with the stop buffers in the body.
- See if rear lid still closes easily, continue adjusting the adjusting buffer if necessary.
- If rear lid is difficult to close, tighten the adjusting buffer slightly.
Tightening Specifications
- Rear Lid Closing Assist Motor on the body: 21 Nm
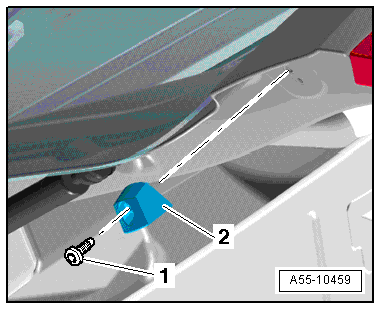
Rear Lid, Adjusting, Adjusting Buffer, Sedan
Procedure
- Close the rear lid.
Note
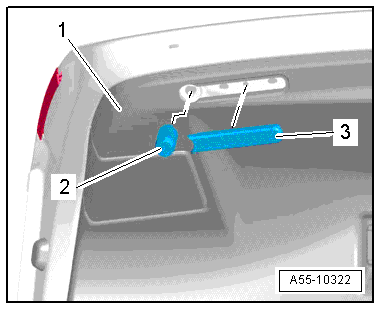
If the lid is adjusted correctly, the stop buffers -2- must lightly contact the body when the lid is closed.
- The stop buffers can be loosened or tightened as needed to be flush.
- The buffers -3- must engage audibly when pressing them in and the hood trim -1- must be installed.
- Check the gap dimensions.
- Turn the adjusting buffer just enough so that the stop buffers on the closed rear lid touch the luggage compartment trim panel.
- Check whether rear lid still closes easily, repeat adjustment at adjusting buffer if necessary.
- If rear lid is difficult to close, tighten the adjusting buffer slightly.
Rear Lid, Adjusting, Adjusting Buffer, Avant
Procedure
Note
The gas-filled struts must be attached before installing a new rear lid.
- Install the adjusting screw -2- and cap -1- all the way into the adjusting buffer -3- before adjusting the rear lid.
- Remove the adjusting screw just far enough until the cap touches the stop on the rear lid when the lid is closed.
- Push and pull on the side edges of the rear lid under the rear window to make sure there is no play and that it closes flush.
- Repeat the adjustment if necessary.
Installing the Stop
- Tighten the bolt -1- to the tightening specification when installing the stop -2-. Refer to -item 3-.
- Height adjustment is carried out using adjusting buffer on body side.