Audi A6 Typ 4G: Backrest Cover, Removing and Installing
Backrest Cover, Removing and Installing, Standard Seat/Sport Seat/Super Sport Seat
Special tools and workshop equipment required
- Safety Glove
Removing
 WARNING
Danger of being injured by burrs on the backrest cover.
Wear protective gloves.
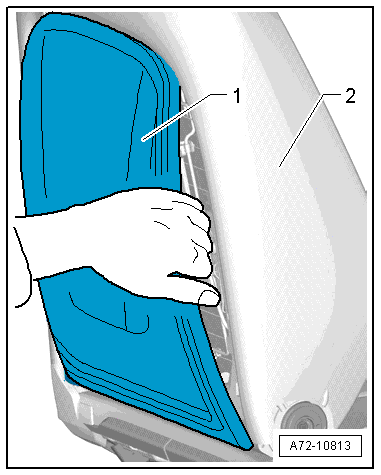
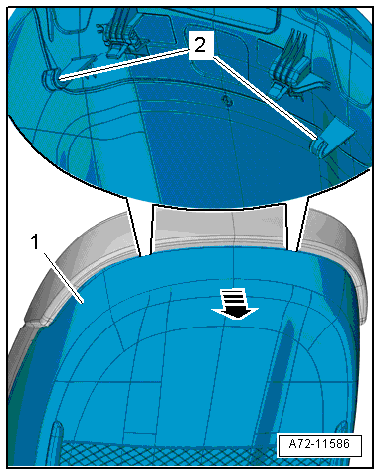
- Reach behind the backrest cover -1- and pull the cover off the backrest frame to the right as illustrated.
 Note
Note
If difficult loosen the hook with Pry Lever -80-200-.
- Repeat the procedure on the opposite side.
- Continue to remove the backrest cover and roll it up until the upper retaining hooks detach from the backrest frame.
- Remove the backrest cover from the backrest -2- upward.
Installing
Install in reverse order of removal. Note the following:
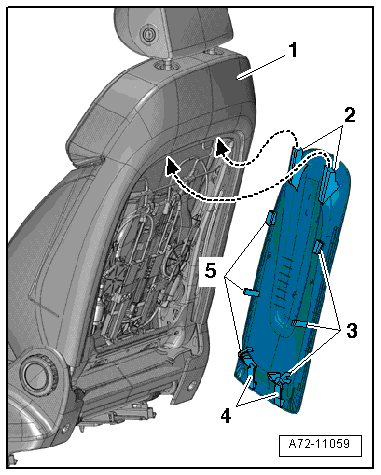
- Insert the backrest cover with the upper hooks -2- into the backrest frame -1-.
- Tilt the backrest cover down and engage the side retaining tabs -3 and 5- and the lower hooks -4-.
- Make sure the tabs on the side fit correctly into the backrest frame and the lower hooks are bent correctly over the backrest frame.
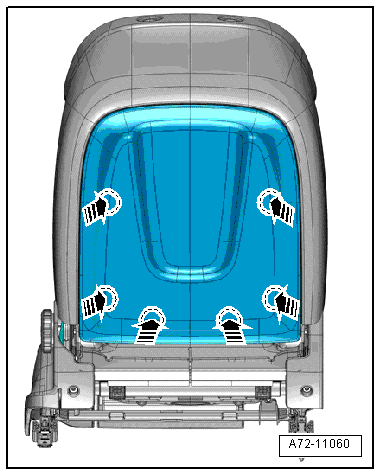
- Push forcefully on backrest cover on the areas marked with the -arrows- until the tabs and hooks click into place.
- Check if the backrest cover is correctly latched.
- It must not be possible to move the backrest cover at the bottom.
Installation notes, for example tightening specifications, replacing components. Refer to → Chapter "Overview - Front Backrest, Standard Seat/Sport Seat".
Backrest Cover, Removing and Installing, Multi-contour Seat
Special tools and workshop equipment required
- Pry Lever -80-200-
- Omega Clip Tool -T40280-
Removing
- Move the front seat all the way forward/up.
Note
The clips -1 and 2- together with hooks on the backrest frame can only be detached up to the first catch.
- Release the clips -1 and 2- up to the first retainer -A arrows- using the Pry Lever -80-200-.
- To disengage the clips -1- with the hooks, move the backrest cover -3- in direction of -arrow C-. The clips will slide out of the guide on the backrest cover.
- Then, to disengage the clips -2- with the hooks, move the backrest cover in direction of -arrow B-. The clips will slide out of the guide on the backrest cover.

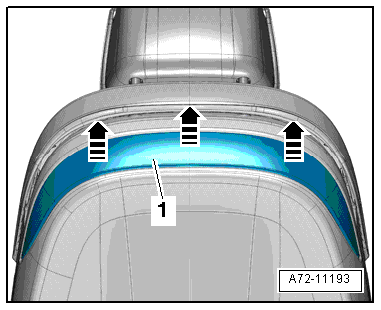
- Pull the backrest cover -1- in the upper section as far as possible toward the rear from the backrest -arrow-.
- Press down and remove the backrest cover hooks -2- with a large flat blade screwdriver from the backrest frame.
Note
Use a flashlight and mirror if necessary.
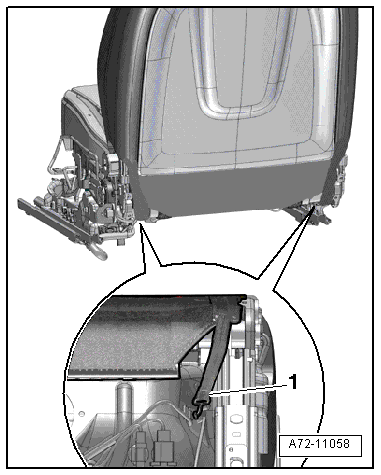
- Detach left and right rubber strap -1- at the bottom of the seat pan.
- Pull off backrest cover in upward direction.
Installing
Install in reverse order of removal. Note the following:
- Install backrest cover with catches at the bottom of the backrest frame.
- Insert the clips together with hooks into the guides on the backrest cover.
- Forcefully press backrest cover in the direction of the backrest until the clips engage audibly.
- Check if the backrest cover is correctly latched.
Installation notes, for example tightening specifications, replacing components. Refer to → Chapter "Overview - Front Backrest, Multi-contour Seat".
Backrest Cover, Removing and Installing, Market-Specific
Special tools and workshop equipment required
- Trim Removal Wedge -3409-
Removing
- Vehicles with rear seat entertainment: remove the mount for the rear seat entertainment. Refer to → Chapter "Rear Seat Entertainment Mount/Bracket, Removing and Installing, Market-Specific".
- Unclip the trim -1- using the Trim Removal Wedge -3409- in direction of -arrows- and remove.
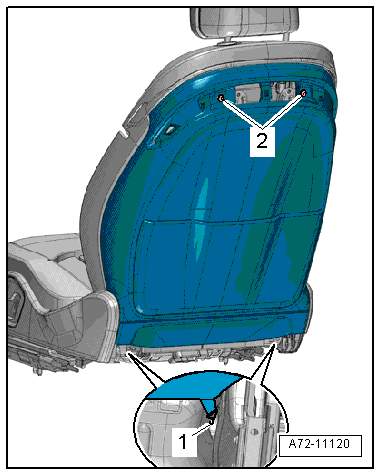
- Detach left and right rubber strap -1- at the bottom of the seat pan.
- Remove the bolts -2-.
- Pull off backrest cover in upward direction.
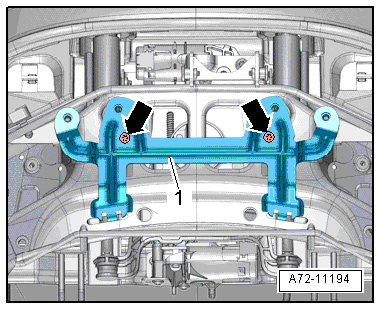
Backrest Cover Bracket
- Remove bolts -arrows- and backrest cover bracket -1-.
Installing
Install in reverse order of removal. Note the following:
- Forcefully press backrest cover in the direction of the backrest until the retaining clips engage audibly.
- Check if the backrest cover is correctly latched.
Installation notes, for example tightening specifications, replacing components. Refer to → Chapter "Overview - Front Backrest, Market-Specific".