Audi A6 Typ 4G: Front Brake Caliper Piston, Removing and Installing
Brake Caliper Piston, Removing and Installing, 1LA/1LJ
Removing
Special tools and workshop equipment required
- Trim Removal Wedge -3409-
- Piston Resetting Tool -T10145-
- Protective Eyewear
- Safety Gloves
- Lithium grease. Refer to the Parts Catalog.
Removing
- Remove the brake caliper and disconnect from the hydraulic system. Refer to → Chapter "Brake Caliper, Replacing, Steel Brakes, 1LA/1LJ/1LF/1LL/1LU and Ceramic Brakes, LN/1LW".
- Tension the brake caliper in a vise with protective covers over the jaws.
 WARNING
Risk of injury!
- Wear protective eyewear.
- When removing the brake caliper piston, never touch the brake caliper chamber with fingers.
- Place a cloth over the brake caliper chamber to catch any spraying brake fluid. Place another cloth tightly around the compressed air gun nozzle on the brake caliper.
- To prevent skin contact with brake fluid, wear chemical resistant safety gloves.
 Note
Note
- Do not damage the paint coat of the brake caliper.
- Do not damage the surface of the cylinder.
- Place a piece of wood in the brake caliper chamber so that the brake caliper piston will not be damaged when pressed out.
- Position the compressed air gun nozzle on the hole -arrow- for the brake hose and press the brake caliper piston out of the brake caliper.
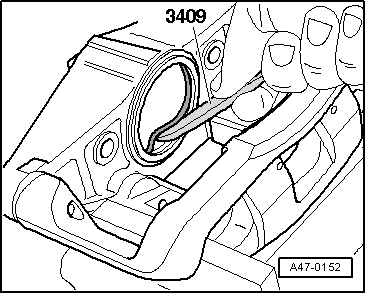
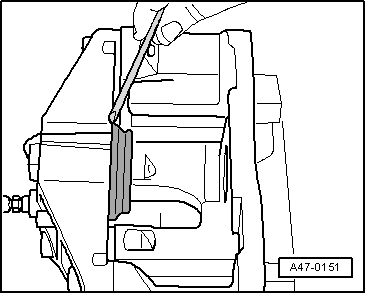
- Remove the protective cap from the brake caliper using the Trim Removal Wedge -3409-.
- Remove the gasket using the Trim Removal Wedge -3409-.
Installing
Note
- Install the entire repair kit.
- Only use mineral spirits to clean the brakes.
- When a brake caliper piston or a piston cylinder are damaged, the brake caliper must be replaced.
- Clean the surfaces on the brake caliper piston and gasket only with mineral spirits and then dry.
- Thinly coat the brake caliper pistons and seals with lithium grease before installing.
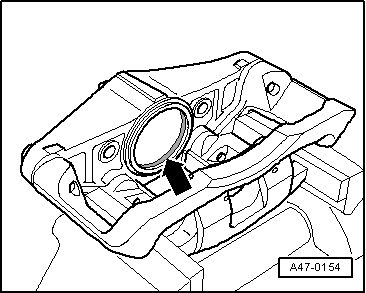
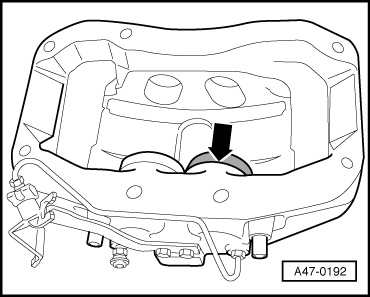
- Insert the inner gasket in the brake caliper groove -arrow-.
- Press the protective cap onto the brake caliper housing so that it contacts the brake caliper housing all around.
- It should no longer be possible to remove the protective cap from the brake caliper housing by hand.
 Caution
Risk of damaging the protective cap and gasket.
Do not tilt the brake caliper piston.
- Press the brake caliper piston lightly on the protective cap.
- Blow out the protective cap with the nozzle of the compressed air gun (maximum 3 bar).
- The brake caliper piston thereby jumps on the brake caliper piston.
- Press the brake caliper pistons into the caliper using Piston Resetting Tool -T10145-.
- Inner sealing lip of protective cap will then engage in the brake caliper piston groove.
- Install the brake caliper. Refer to → Chapter "Brake Caliper, Replacing, Steel Brakes, 1LA/1LJ/1LF/1LL/1LU and Ceramic Brakes, LN/1LW".
Brake Caliper Piston, Removing and Installing, 1LF/1LL
Special tools and workshop equipment required
- Trim Removal Wedge -3409-
- Piston Resetting Tool -T10145-
- Piston Resetting Tool - Cap 5 -T10146/5- from Piston Resetting Tool - Caps /1,/2,/3,/4,/5 -T10146-
- Protective Eyewear
- Safety Gloves
- Lithium grease. Refer to the Parts Catalog.
Removing
- Remove the brake caliper and disconnect from the hydraulic system. Refer to → Chapter "Brake Caliper, Replacing, Steel Brakes, 1LA/1LJ/1LF/1LL/1LU and Ceramic Brakes, LN/1LW".
- Tension the brake caliper in a vise with protective covers over the jaws.
WARNING
Risk of injury!
- Wear protective eyewear.
- When removing the brake caliper piston, never touch the brake caliper chamber with fingers.
- Place a cloth over the brake caliper chamber to catch any spraying brake fluid. Place another cloth tightly around the compressed air gun nozzle on the brake caliper.
- To prevent skin contact with brake fluid, wear chemical resistant safety gloves.
Note
- Make sure that the paint coat on the brake caliper is not damaged when removing the brake caliper pistons and the protective caps.
- When removing, make sure that the cylinder surface is not damaged.
- Only one brake caliper piston can be pressed out at a time.
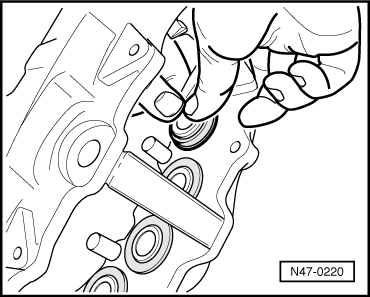
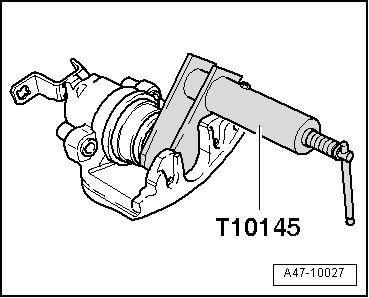
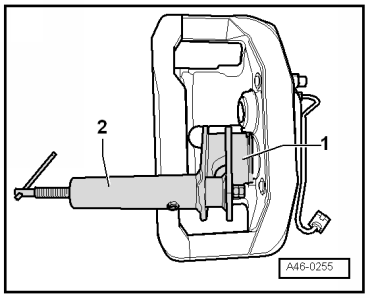
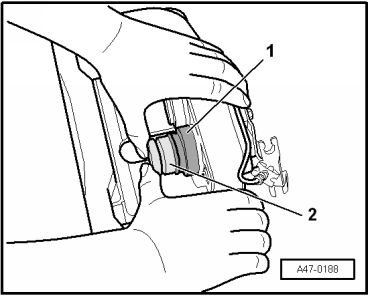
- Hold the two brake caliper pistons in the brake caliper using the Piston Resetting Tool -T10145--item 1-.
- Place a piece of wood in the brake caliper chamber so that the brake caliper piston will not be damaged when pressed out.
- Position the compressed air gun nozzle on the hole for the brake hose and press the brake caliper piston out of the brake caliper.
- Remove the protective cap from the brake caliper using the Trim Removal Wedge -3409-.
- Remove the sealing ring using the Trim Removal Wedge -3409--item 2-.
1 - Piston Resetting Tool -T10145-
Installing
Note
- Install the entire repair kit.
- Only use mineral spirits to clean the brakes.
- When a brake caliper piston or a piston cylinder are damaged, the brake caliper must be replaced.
- Clean the surfaces on the pistons and seal only with mineral spirits and then dry.
- Thinly coat the brake caliper pistons and seals with lithium grease before installing.
- Insert inner seal in brake caliper groove using the Trim Removal Wedge -3409-.

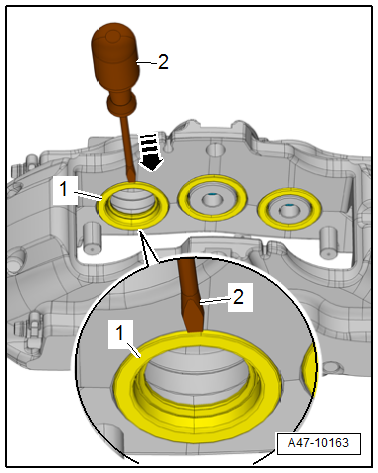
- Insert the protective cap using the Piston Resetting Tool - Cap -T10146/5--item 1- and Piston Resetting Tool -T10145--item 2-.
- Press the protective cap onto the brake caliper housing so that it contacts the brake caliper housing all around -arrow-.
- It should no longer be possible to remove the protective cap from the brake caliper housing by hand.
- Thinly coat the pistons and protective cap with lithium grease before installing.
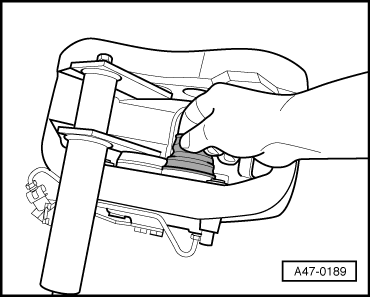
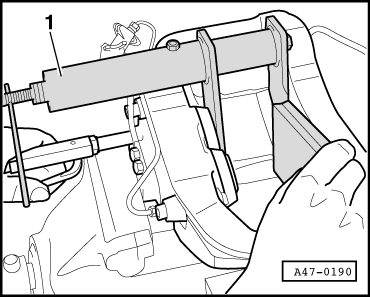
- Lift the brake caliper piston with commercially available extension -1- and ratchet adapter and lightly press against the protective cap as shown.
- Do not tilt the piston to avoid damaging the sealing boot.
- Position the compressed air nozzle -2- on the bore hole for the brake hose and blow compressed air on the protective cap (maximum 3 bar). At the same time the protective cap jumps onto the piston.
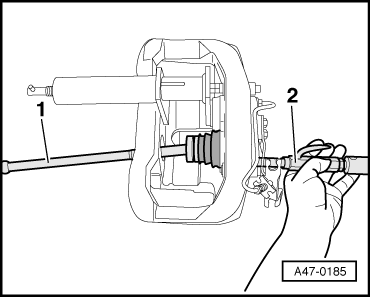
- Press piston -2- into the brake caliper housing by hand.
- The inner sealing lip of the protective cap -1- thereby slips into the groove on the piston.
- Repeat the work procedure on the other brake caliper piston.
- Install the brake caliper. Refer to → Chapter "Brake Caliper, Replacing, Steel Brakes, 1LA/1LJ/1LF/1LL/1LU and Ceramic Brakes, LN/1LW".
Brake Caliper Piston, Removing and Installing, 1LU/1LM/1LX/1LN/1LW
Special tools and workshop equipment required
- Trim Removal Wedge -3409-
- Piston Resetting Tool -T10145-
- Protective Eyewear
- Safety Gloves
- Lithium grease. Refer to the Parts Catalog.
Note
The work procedure is the same for steel brakes and ceramic brakes.
Removing
- Remove the brake caliper and disconnect from the hydraulic system. Refer to → Chapter "Brake Caliper, Replacing".
- Tension the brake caliper in a vise with protective covers over the jaws.
WARNING
Risk of injury!
- Wear protective eyewear.
- When removing the brake caliper piston, never touch the brake caliper chamber with fingers.
- Place a cloth over the brake caliper chamber to catch any spraying brake fluid. Place another cloth tightly around the compressed air gun nozzle on the brake caliper.
- To prevent skin contact with brake fluid, wear chemical resistant safety gloves.
Note
- Make sure that the paint coat on the brake caliper is not damaged when removing the brake caliper pistons and the protective caps.
- Only one brake caliper piston can be pressed out at a time.
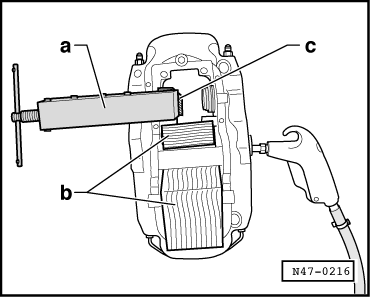
- Hold the opposite brake caliper piston in the brake caliper using the Piston Resetting Tool -T10145--item a-.
- To prevent damage to the brake caliper paint coating, place a piece of rubber between the Piston Resetting Tool -T10145- and the brake caliper.
- Block the other pistons, for example, using wooden blocks -b-. In addition, place a wooden board -c- in front of the Piston Resetting Tool -T10145- so that the brake caliper piston will not be damaged when pressed out.
- Position the compressed air gun nozzle on the hole for the brake hose and press the brake caliper piston out of the brake caliper.
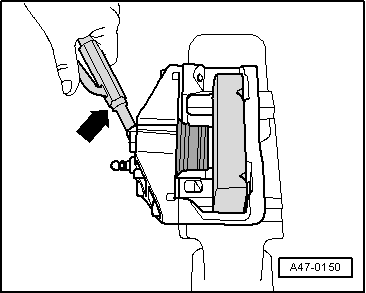
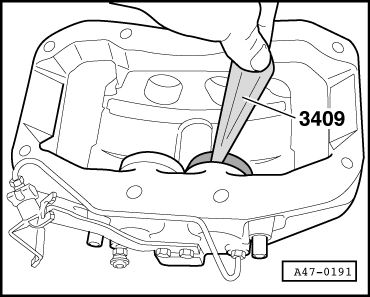
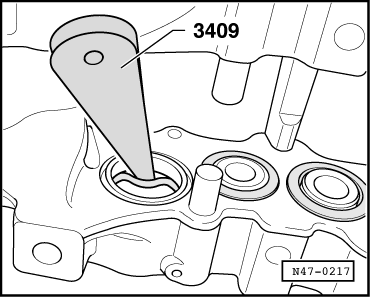
- Carefully remove the protective cap -1- with a screwdriver -2- with light hammer strokes -arrow- from the brake caliper, while doing this do not damage the brake caliper coating.
- Remove the sealing ring using the Trim Removal Wedge -3409-.
Installing
Note
- Install the entire repair kit.
- Only use mineral spirits to clean the brakes.
- When a brake caliper piston or a piston cylinder are damaged, the brake caliper must be replaced.
- Clean the surfaces on the pistons and seal only with mineral spirits and then dry.
- Thinly coat the brake caliper pistons and seals with lithium grease before installing.
- Insert the gasket into the brake caliper.
Caution
Risk of damaging the ceramic brake caliper pistons.
The ceramic inserts on the brake caliper piston serves as a heat insulator and must not be removed from the brake piston. If the ceramic inserts are damaged, the brake caliper must be replaced for safety reasons.

- Install the protective cap on the brake caliper piston.
- Without tilting it, push the brake caliper pistons using constant pressure.
- Press the protective cap into the groove on the brake caliper.
- The protective cap must fit tightly in the groove. If necessary, push down on it slightly with the Piston Resetting Tool -T10145-.
- Repeat the work procedure on the next brake caliper piston.
- Install the brake caliper. Refer to → Chapter "Brake Caliper, Replacing".