Audi A6 Typ 4G (2011–2018) Workshop Manual / Body / Body Exterior / Hood, Lids / Hood Latch, Removing and Installing
Audi A6 Typ 4G: Hood Latch, Removing and Installing
Rear Lid Lock, Removing and Installing, Sedan

1 - Cover
- Before removing the lid trim, remove from the lid latch
2 - Lid Latch
- Before removal, remove the lid latch cover.
- The rear lid lower trim panel is removed. Refer to → Body Interior; Rep. Gr.70; Luggage Compartment Trim Panels; Lower Rear Lid Trim Panel, Removing and Installing.
- Disconnect the connector.
- Remove nuts and remove lid latch.
- Remove the lid latch with the clip from the centering hole.
3 - Nut
- 21 Nm
4 - Cover for Lid Latch
- When installing, cover must engage audibly in lid latch.
5 - Release Cable
- Market-specific
Hood Latch, Removing and Installing, Avant
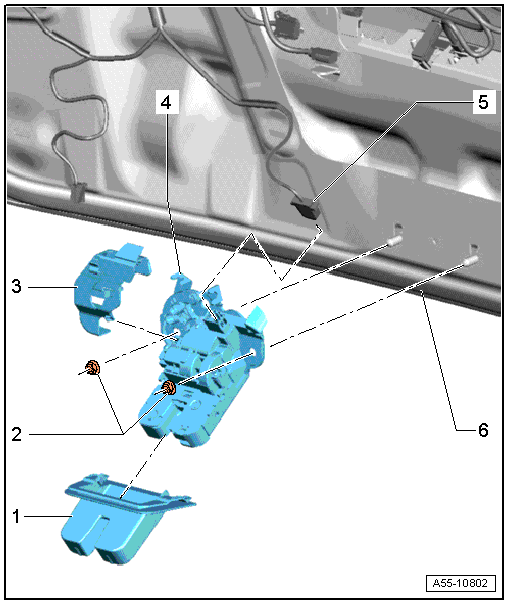
1 - Cover for Lid Latch
- When assembling, cover must engage audibly into lid latch.
- Mount the cover onto the lid latch.
2 - Nuts
- 21 Nm
3 - Cover
- Mount the cover on the lock until it audibly clicks into place.
4 - Lid Latch
- Remove the cover for the lid latch.
- Remove the rear lid trim panel. Refer to → Body Interior; Rep. Gr.70; Luggage Compartment Trim Panels; Lower Rear Lid Trim Panel, Removing and Installing
- Remove the cover -3-.
- Disconnect the connector to the lid latch.
- Remove the nuts -2- and then remove the lid latch.
5 - Connector
6 - Rear Lid
Lid Latch Emergency Release, Removing and Installing, Sedan
 Note
Note
The emergency release is installed only in vehicles with a fixed rear panel.
Routing on the Lid Side
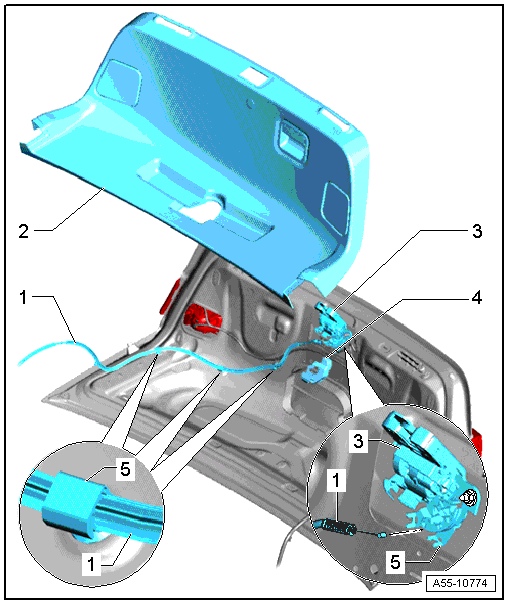
1 - Release Cable
Note
- When re-installing, route the release cable starting from the lid latch on the inside of the lid, over the hinge and into the vehicle interior.
- The clips for the cable have been prepositioned and can be inserted into the holes.
- Before removing, unclip the cover on the lid latch
- First unclip from the cable bracket on the lid latch and then disengage from the release lever.
2 - Rear Lid Trim Panel
- Removed. Refer to → Body Interior; Rep. Gr.70; Luggage Compartment Trim Panels; Lower Rear Lid Trim Panel, Removing and Installing.
3 - Lid Latch
4 - Cover
- Unclip from the rear lid latch
5 - Emergency Release Lever
- When installing, first engage the release cable on the release lever and then press it into the cable bracket on the lid latch.
6 - Clip
- Pre-positioned on the release cable
Routing on the Body Side

1 - Eye
- Secure it under the rear seat bench with tape
2 - Bracket
- No replacement part
- Engage the release cable in the bracket on the rear lid latch as illustrated.
3 - Rear Lid Latch
4 - Release Cable
- Starting from the lid latch, route the cable over the lid hinge and into the vehicle interior as illustrated.
- Mounted on the lid hinge and attach it to the back side with the cover.
- The cable must be correctly routed into the cover.
5 - Clip
- The clips have been prepositioned and must be clipped into the holes.
