Audi A6 Typ 4G: Low Beam Headlamp Bulb, Removing and Installing
Removing
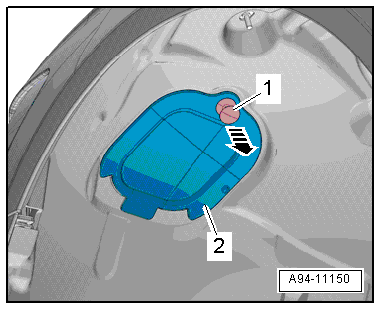
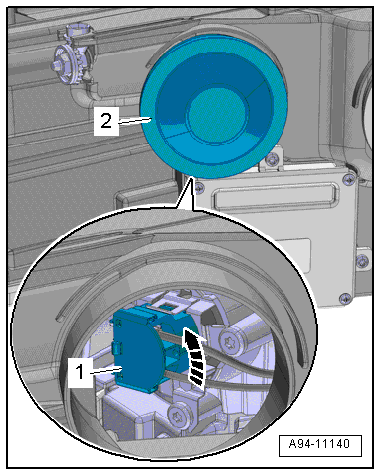
- Loosen the expanding clip -1- and disengage the cap -2- from the front wheel housing liner in direction of -arrow-.
 Note
Note
- Depending on the date of manufacture, a bolt may be installed instead of the expanding clip.
- The front area in the wheel housing liner must be loosened on vehicles without a cap. Refer to → Body Exterior; Rep. Gr.66; Wheel Housing Liner; Front Wheel Housing Liner, Removing and Installing.
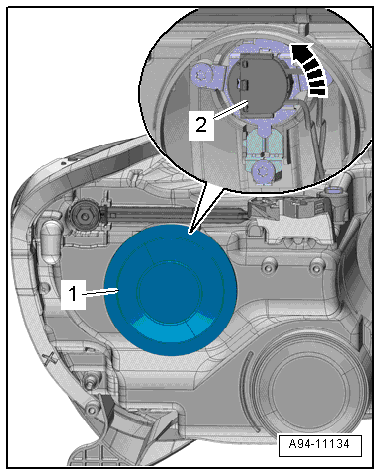
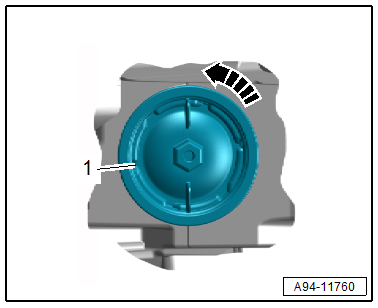
- Remove the housing cover -1- from the headlamp housing.
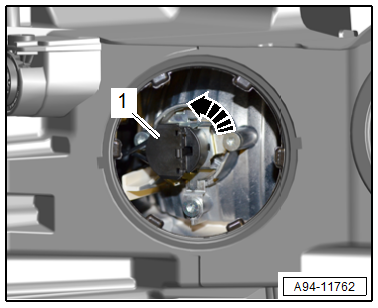
- Turn the bulb socket -2- in direction of the -arrow- and remove it.
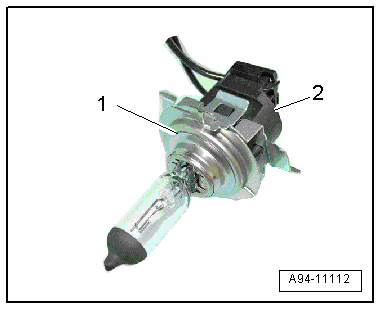
- Remove bulb -1- from socket -2-.
Installing
Install in reverse order of removal. Note the following:
- Insert the new bulb in the socket. Do not touch the glass bulbs with bare hands.
- Close the housing cover.
- Install the cap and then secure it with the expanding clip.
Left/Right Daytime Running Lamp Bulb -L174-/-L175-, Left/Right High Beam Headlamp Bulb -M30-/-M32-, Removing and Installing
 DANGER!
Damaged high voltage components may produce dangerously high voltage.
Note the following when working near high voltage components and cables:
- Do not use tools that have sharp edges, that are used for cutting or shaping, or that generate heat, such as welding, soldering, hot air or thermal adhesive equipment.
- Inspect the high voltage components in the area where the work will be performed before starting the procedure.
- Perform a visual inspection of the Electric Drive Power and Control Electronics -JX1-, the Electro-Drive Drive Motor -V141-, the Electrical A/C Compressor -V470- and the high voltage cables when working inside the engine compartment.
- Perform a visual inspection of the high voltage cables and the covers when working on the floor panel.
- Perform a visual inspection of the high voltage cables and the electro-box with the High Voltage System Maintenance Connector -TW- when working in the rear of the vehicle.
- Perform a visual inspection of all of the potential equalization cables.
Note the following when performing the visual inspection:
- None of the components may display any exterior damage.
- The high voltage cable insulation and the potential equalization cables may not be damaged.
- The high voltage cables may not be deformed in any way.
- Each high voltage component muss be labeled with a red warning label.
Removing
- On the right: remove the air filter housing. Refer to → 6-Cylinder TDI Common Rail 3.0L 4V Engine; Rep. Gr.23; Air Filter; Air Filter Housing, Removing and Installing or → Rep. Gr.24; Air Filter; Air Filter Housing, Removing and Installing.
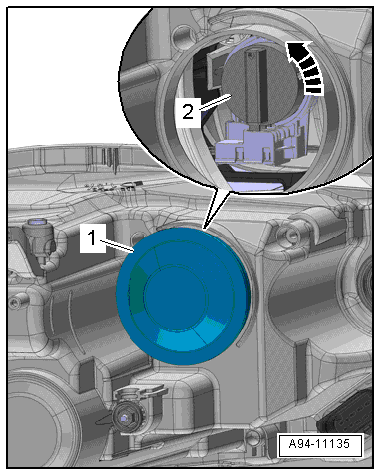
- Remove the housing cover -1- from the headlamp housing.
- Turn the bulb -2- counterclockwise -arrow- and remove from the housing.
Installing
Install in reverse order of removal. Note the following:
- Insert the new bulb into the housing. Do not touch the glass bulbs with bare hands.
- Close the housing cover.
Left/Right HID Headlamp Bulb -L13-/-L14-, Removing and Installing
Left/Right HID Headlamp Bulb -L13-/-L14-, Removing and Installing, through MY 2011
WARNING
Risk of death due to high voltage, injury risk and environmental hazard.
HID headlamp usage and safety precautions. Refer to → Chapter "HID Headlamp Usage and Safety Precautions".
Removing
- On the right: remove the air filter housing. Refer to → 6-Cylinder TDI Common Rail 3.0L 4V Engine; Rep. Gr.23; Air Filter; Air Filter Housing, Removing and Installing or → Rep. Gr.24; Air Filter; Air Filter Housing, Removing and Installing.
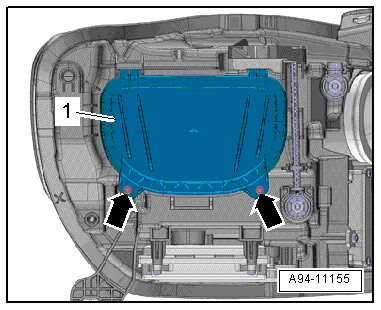
- Loosen the expanding clip -1- and disengage the cap -2- from the front wheel housing liner -arrow-.
Note
Depending on the date of manufacture, a bolt may be installed instead of the expanding clip.
- Remove the bolts -arrows-.
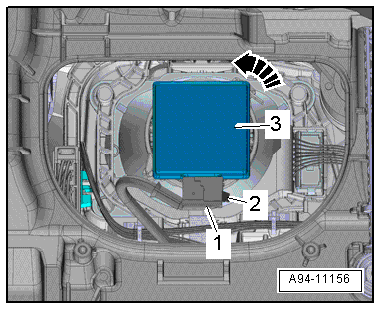
- Remove the housing cover -1- by pushing the front wheel housing liner slightly to the rear.
- Press the tab -1- and disconnect the connector -2-.
- Turn the HID headlamp bulb -3- counter-clockwise -arrow- and remove it from the housing.
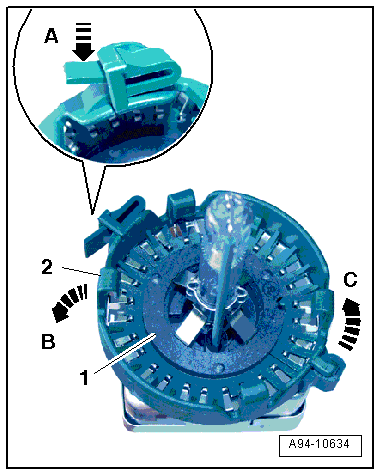
- Release the clip in direction of -arrow A- and open the adapter ring -2- in direction of -arrow B-.
- Remove the adapter ring on the HID headlamp bulb -1- in direction of -arrow C-.
Installing
Install in reverse order of removal. Note the following:
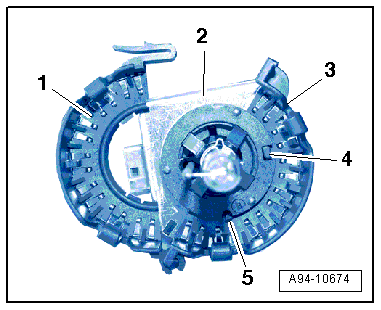
- Mount half of the adapter ring -3- with the anti-twist mechanism onto the HID headlamp bulb -2-.
- The anti-twist mechanism -4 and 5- must be inserted into the mounts.
- Close the second half -1- until it engages audibly.
- Connect the connector and insert the new HID bulb into the housing. Do not touch the glass bulb with bare hands.
- Installation position: the electrical connection faces down.
- Close the housing cover and tighten the bolts.
Left/Right Daytime Running Lamp and Position Lamp LED Module - L176-/-L177-, Removing and Installing
The daytime running lamps and position lamps are LED lamps and are integrated in the headlamp housing. The LEDs cannot be replaced. The entire headlamp must be replaced.
- Replace the headlamp housing. Refer to → Chapter "Headlamp Housing, Removing and Installing, HID Headlamp and LED Headlamp through MY 2014".
Cornering Lamp Bulb, Removing and Installing
Left/Right Stationary Cornering Lamp -M51-/-M52-, Left/Right Cornering Lamp Bulb -L148-/-L149-, Removing and Installing, through MY 2014
DANGER!
Damaged high voltage components may produce dangerously high voltage.
Note the following when working near high voltage components and cables:
- Do not use tools that have sharp edges, that are used for cutting or shaping, or that generate heat, such as welding, soldering, hot air or thermal adhesive equipment.
- Inspect the high voltage components in the area where the work will be performed before starting the procedure.
- Perform a visual inspection of the Electric Drive Power and Control Electronics -JX1-, the Electro-Drive Drive Motor -V141-, the Electrical A/C Compressor -V470- and the high voltage cables when working inside the engine compartment.
- Perform a visual inspection of the high voltage cables and the covers when working on the floor panel.
- Perform a visual inspection of the high voltage cables and the electro-box with the High Voltage System Maintenance Connector -TW- when working in the rear of the vehicle.
- Perform a visual inspection of all of the potential equalization cables.
Note the following when performing the visual inspection:
- None of the components may display any exterior damage.
- The high voltage cable insulation and the potential equalization cables may not be damaged.
- The high voltage cables may not be deformed in any way.
- Each high voltage component muss be labeled with a red warning label.
Removing
- On the right: remove the air filter housing. Refer to → 6-Cylinder TDI Common Rail 3.0L 4V Engine; Rep. Gr.23; Air Filter; Air Filter Housing, Removing and Installing or → Rep. Gr.24; Air Filter; Air Filter Housing, Removing and Installing.
- Left: If equipped, remove the resonator with air filter. Refer to → Rep. Gr.26; Secondary Air Injection System; Secondary Air Injection Pump Motor V101, Removing and Installing.
- Remove the housing cover -2- from the headlamp housing.
- Turn the bulb socket -1- in direction of -arrow-.
- Remove bulb -1- from socket -2-.
Installing
Install in reverse order of removal. Note the following:
- Insert the new bulb in the socket. Do not touch the glass bulbs with bare hands.
- Close the housing cover.
Left/Right Stationary Cornering Lamp -M51-/-M52-, from MY 2015
Removing
- On the right: remove the air filter housing. Refer to → 6-Cylinder TDI Common Rail 3.0L 4V Engine; Rep. Gr.23; Air Filter; Air Filter Housing, Removing and Installing or → Rep. Gr.24; Air Filter; Air Filter Housing, Removing and Installing.
- Turn the housing cover -1- counter-clockwise in direction of -arrow- and remove it from the headlamp housing.
- Turn the bulb socket -1- in direction of -arrow-.
- Remove bulb -1- from socket -2-.
Installing
Install in reverse order of removal. Note the following:
- Insert the new bulb in the socket. Do not touch the glass bulbs with bare hands.
- Close the housing cover clockwise.
Left/Right Low Beam Headlamp Reflector Motor -V294-/-V295-, Removing and Installing
The low beam headlamp reflector motor sits in the headlamp housing and cannot be replaced separately if it is faulty.
- Replace the headlamp housing. Refer to → Chapter "Headlamp Housing, Removing and Installing, HID Headlamp and LED Headlamp through MY 2014".
Left/Right Adaptive Cornering Lamp Motor -V318-/-V319-, Removing and Installing
The adaptive cornering lamp motor sits in the headlamp housing and cannot be replaced separately if it is faulty.
- Replace the headlamp housing. Refer to → Chapter "Headlamp Housing, Removing and Installing, HID Headlamp and LED Headlamp through MY 2014".
