Audi A6 Typ 4G: Overview - Seat Pan, Seat Adjustment Actuator/Switch
Operating/Seat Adjustment Switch, Standard Seat/Sport Seat/Super Sport Seat
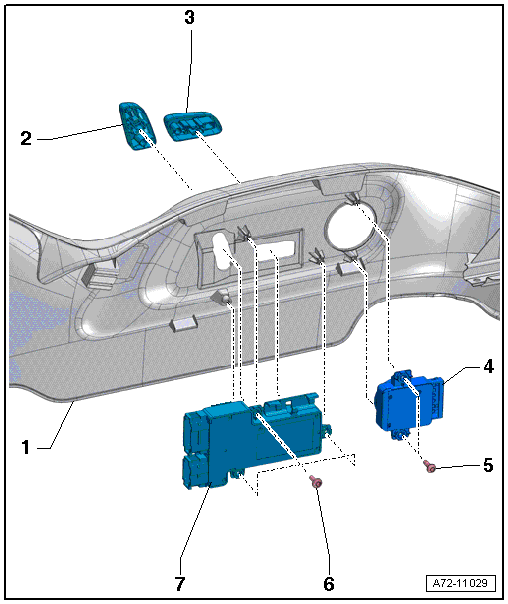
1 - Sill-Side Trim
- Removing and installing. Refer to → Chapter "Seat Side Trim on Sill Panel Side, Removing and Installing, Front Seat (Power)".
2 - Actuator
- For backrest adjustment
- Equipment levels
- Clipped on
- Removing and installing. Refer to → Chapter "Seat Adjustment Control Head, Removing and Installing".
3 - Actuator
- For seat adjustment
- Equipment levels
- Clipped on
- Removing and installing. Refer to → Chapter "Seat Adjustment Control Head, Removing and Installing".
4 - Driver Seat Lumbar Support Adjustment Switch -E176-
- Front passenger side Front Passenger Seat Lumbar Support Adjustment Switch -E177-
- Removing and installing. Refer to → Chapter "Driver Seat Lumbar Support Adjustment Switch -E176-/Front Passenger Seat Lumbar Support Adjustment Switch -E177-, Removing and Installing".
5 - Bolt
- 0.8 Nm
- Quantity: 2
6 - Bolt
- 0.8 Nm
- Quantity: 3
7 - Driver Seat Adjustment Control Head -E470-
- With:
- Driver Backrest Adjustment Switch -E96-
- Driver Seat Angle Adjustment Switch -E222-
- Driver Seat Forward/Back Adjustment Switch -E363-
- Driver Seat Height Adjustment Switch -E364-
- Front passenger side: Front Passenger Seat Adjustment Control Head
-E471- with:
- Front Passenger Seat Forward/Back Adjustment Switch -E64-
- Front Passenger Backrest Adjustment Switch -E98-
- Front Passenger Seat Angle Adjustment Button -E334-
- Front Passenger Seat Height Adjustment Switch -E365-
- Equipment levels
- Removing and installing. Refer to → Chapter "Seat Adjustment Control Head, Removing and Installing".
Operation/Seat Adjustment Switch, Multi-contour Seat
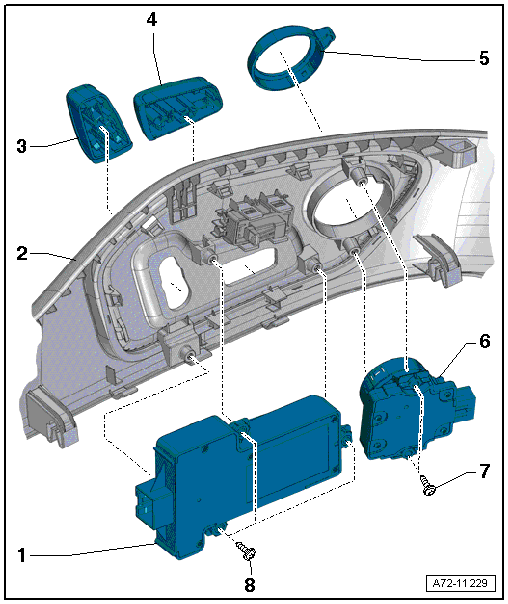
1 - Driver Seat Switch Module -E663-
- With:
- Driver Backrest Adjustment Switch -E96-
- Driver Headrest Adjustment Button -E155-
- Driver Seat Angle Adjustment Switch -E222-
- Driver Seat Forward/Back Adjustment Switch -E363-
- Driver Seat Height Adjustment Switch -E364-
- Front passenger side: Front Passenger Seat Switch Module -E664-
with:
- Front Passenger Seat Forward/Back Adjustment Switch -E64-
- Front Passenger Backrest Adjustment Switch -E98-
- Front Passenger Headrest Adjustment Switch -E170-
- Front Passenger Seat Angle Adjustment Button -E334-
- Front Passenger Seat Height Adjustment Switch -E365-
- Removing and installing. Refer to → Chapter "Seat Adjustment Control Head, Removing and Installing".
2 - Sill-Side Trim
- Removing and installing. Refer to → Chapter "Seat Side Trim on Sill Panel Side/Front Seat Trim, Removing and Installing, Multi-contour Seat".
3 - Actuator
- For backrest adjustment
- Clipped on
- Removing and installing. Refer to → Chapter "Seat Adjustment Control Head, Removing and Installing".
- Press on until it engages audibly
4 - Actuator
- For seat adjustment
- Clipped on
- Removing and installing. Refer to → Chapter "Seat Adjustment Control Head, Removing and Installing".
- Press on until it engages audibly
5 - Rocker
- For Driver Seat Switch Module 2 -E667-/Front Passenger Seat Switch Module 2 -E668-
- Clipped on
- Removing and installing. Refer to → Chapter "Driver Seat Switch Module 2 -E667 -/Front Passenger Seat Switch Module 2 -E668-, Removing and Installing".
6 - Driver Seat Switch Module 2 -E667-
- Front passenger side: Front Passenger Seat Switch Module 2 -E668-
- Removing and installing. Refer to → Chapter "Driver Seat Switch Module 2 -E667 -/Front Passenger Seat Switch Module 2 -E668-, Removing and Installing".
7 - Bolt
- 0.8 Nm
- Quantity: 2
8 - Bolt
- 0.8 Nm
- Quantity: 3
Overview - Seat Pan, Storage Compartment
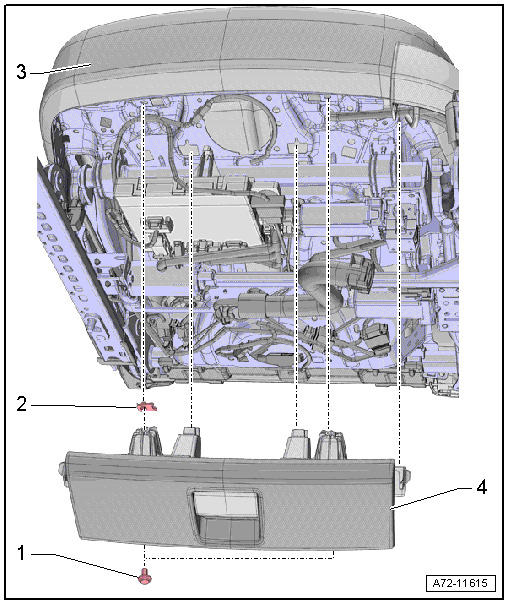
1 - Bolt
- 8 Nm
- Quantity: 2
2 - Spring Nut
- Quantity: 2
- Inserted in the seat pan
- Replace any damaged or deformed threaded clips
3 - Front Seat
4 - Storage Compartment
- Equipment levels
- Removing and installing. Refer to → Chapter "Storage Compartment, Removing and Installing".
- Cannot be disassembled, only available as a complete replacement part
- Allocation. Refer to the Parts Catalog
Overview - Seat Pan, Front Seat Control Module
Seat Ventilation Control Module (Integrated in the Seat Heating)
1 - Left Front Seat Ventilation Control Module -J800- (integrated in the seat heating)
- Front passenger side: Left Front Seat Ventilation Control Module -J799- (integrated in the seat heating function)
- Clipped with the bracket
- Removing and installing. Refer to → Chapter "Seat Ventilation Control Module (Integrated in Seat Heating), Removing and Installing".
2 - Bracket
- Engaged and clipped in the seat pan
- Removing and installing. Refer to → Chapter "Front Seat Control Module Bracket, Removing and Installing".
3 - Front Seat
4 - Pin
- For securing the bracket to the seat pan
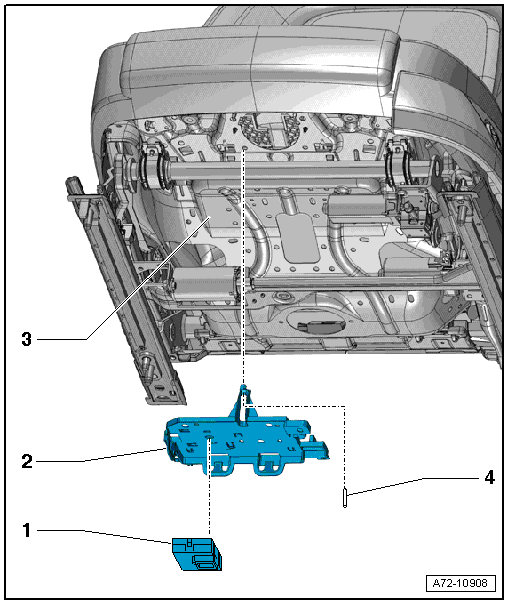
Sear/Steering Column Adjustment Control Module with Memory Function, Standard Seat/Sport Seat/Super Sport Seat
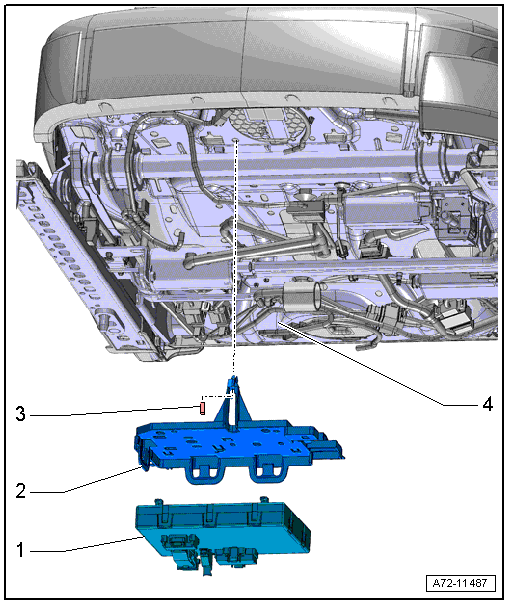
1 - Memory Seat/Steering Column Adjustment Control Module -J136-
- Vehicles with seat ventilation: seat ventilation and left front seat heating integrated
- Front passenger side: Front Passenger Memory Seat Control Module -J521-
- Vehicles with seat ventilation: seat ventilation and right front seat heating integrated
- Clipped with the bracket
- Removing and installing. Refer to → Chapter "Seat/Steering Column Adjustment Control Module with Memory Function, Removing and Installing".
2 - Bracket
- Engaged and clipped in the seat pan
- Removing and installing. Refer to → Chapter "Front Seat Control Module Bracket, Removing and Installing".
3 - Pin
- For securing the bracket to the seat pan
4 - Front Seat
Seat/Steering Column Adjustment Control Module with Memory Function, Multi-contour Seat
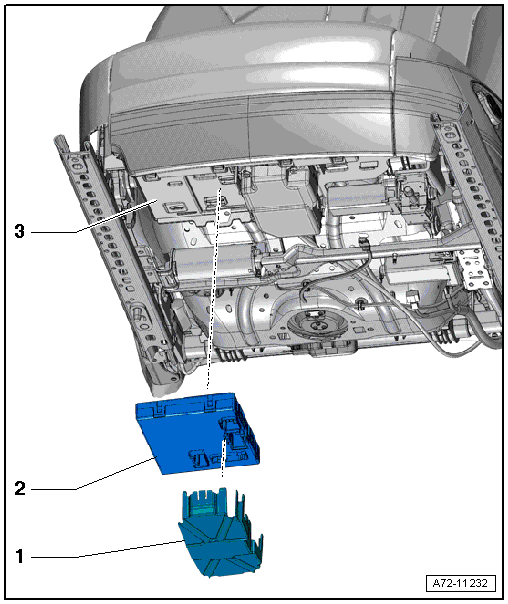
1 - Cover
- Installed depending on the version
- Must engage audibly in the bracket
2 - Memory Seat/Steering Column Adjustment Control Module -J136-
- Vehicles with seat ventilation: seat ventilation and left front seat heating integrated
- Front passenger side: Front Passenger Memory Seat Control Module -J521-
- Vehicles with seat ventilation: seat ventilation and right front seat heating integrated
- Removing and installing. Refer to → Chapter "Seat/Steering Column Adjustment Control Module with Memory Function, Removing and Installing".
- Press on it until it clicks into the bracket
3 - Bracket
- For front trim, compressor and Multi-contour seat control module
- Removing and installing. Refer to → Chapter "Front Seat Trim Bracket/Compressor/Control Module, Removing and Installing, Multi-contour Seat".
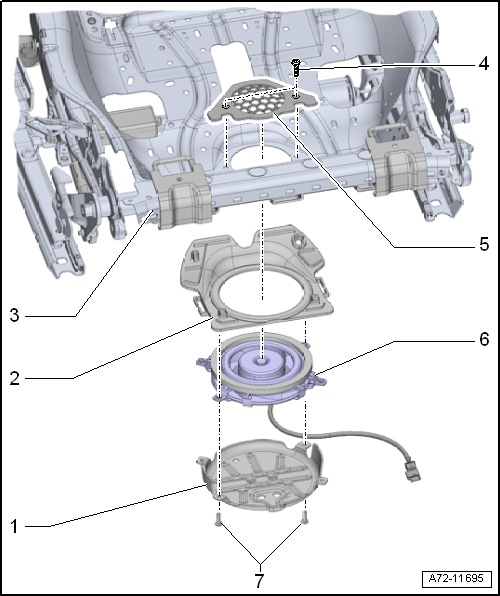
Overview - Seat Pan, Seat Cushion Blower Fans
Seat Cushion Fan, Standard Seat/Sport Seat/Super Sport Seat
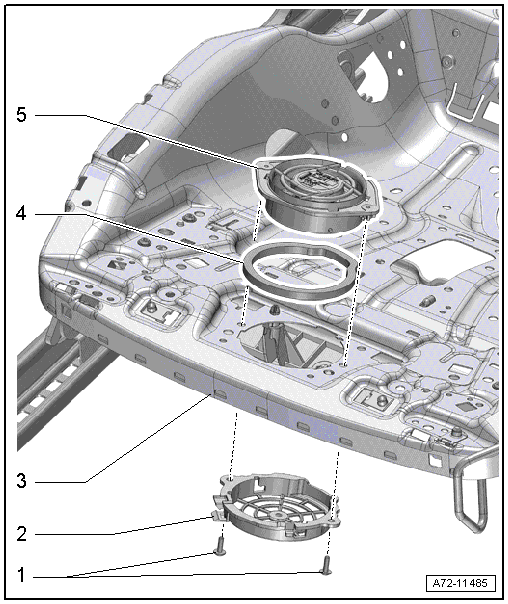
1 - Screws
- 1.5 Nm
2 - Cover Grille
3 - Front Seat
4 - Seal
- Install between the lower seat frame and the fan
5 - Driver Seat Cushion Blower Fan -V390-/Driver Seat Cushion Blower Fan 2 -V419-
- Front passenger side: Front Passenger Seat Cushion Blower Fan -V391-/Front Passenger Seat Cushion Blower Fan 2 -V420-
- Removing and installing. Refer to → Chapter "Seat Cushion Blower Fan, Removing and Installing, Standard Seat/Sport Seat/Super Sport Seat".
Seat Cushion Fan, Multi-contour Seat through 08/2012
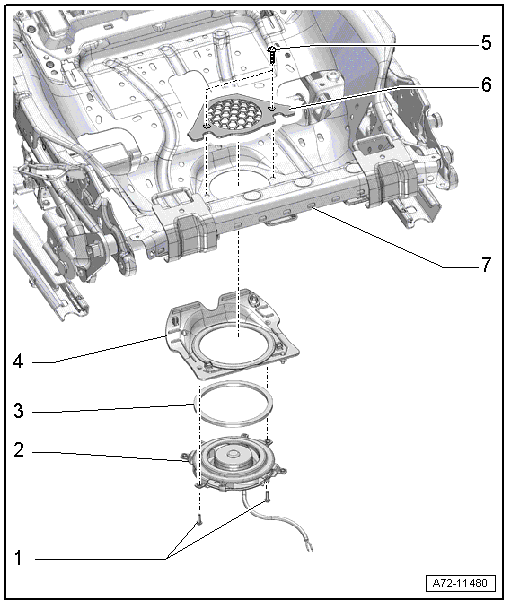
1 - Screws
- 2.4 Nm
2 - Driver Seat Cushion Blower Fan -V390-
- Front passenger side: Front Passenger Seat Cushion Blower Fan -V391-
- Removing and installing. Refer to → Chapter "Seat Cushion Blower Fan, Removing and Installing, Multi-contour Seat".
3 - Seal
- Place between the fan and the bracket
4 - Bracket
- For blower fan
- Removing and installing. Refer to → Chapter "Seat Cushion Blower Fan Bracket, Removing and Installing, Multi-contour Seat".
- Engaged and clipped in the seat pan
- Press on until it engages audibly
5 - Bolt
- 2.4 Nm
6 - Grille
- For blower fan
- Removing and installing. Refer to → Chapter "Seat Cushion Blower Fan Bracket, Removing and Installing, Multi-contour Seat".
7 - Seat Pan
Seat Cushion Fan, Multi-contour Seat from 09/2012
1 - Cover
- Removing and installing. Refer to → Chapter "Seat Cushion Blower Fan, Removing and Installing, Multi-contour Seat".
2 - Bracket
- For blower fan
- Removing and installing. Refer to → Chapter "Seat Cushion Blower Fan Bracket, Removing and Installing, Multi-contour Seat".
- Engaged and clipped in the seat pan
- Press on until it engages audibly
3 - Seat Pan
4 - Screws
- 2.4 Nm
- Quantity: 2
5 - Grille
- For blower fan
- Removing and installing. Refer to → Chapter "Seat Cushion Blower Fan Bracket, Removing and Installing, Multi-contour Seat".
6 - Driver Seat Cushion Blower Fan -V390-
- Front passenger side: Front Passenger Seat Cushion Blower Fan -V391-
- Removing and installing. Refer to → Chapter "Seat Cushion Blower Fan, Removing and Installing, Multi-contour Seat".
7 - Bolt
- 2.4 Nm
- Quantity: 2
Overview - Seat Pan, Safety Ground Lock
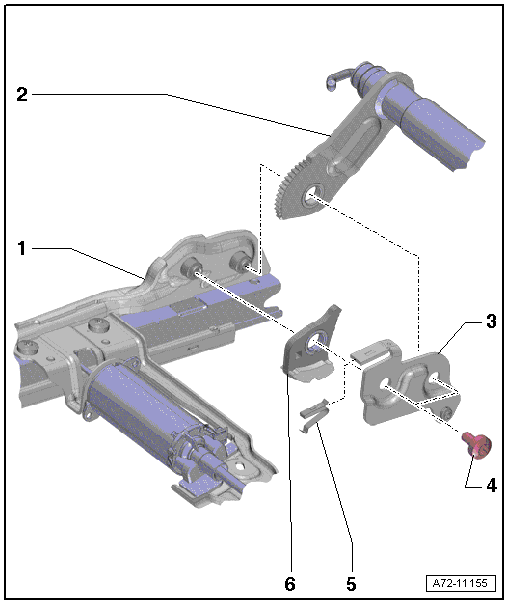
1 - Lower Seat Frame
2 - Upper Seat Frame
3 - Retaining Plate
4 - Bolt
- 28 Nm
- Quantity: 2
5 - Spring
6 - Safety Ground Lock
- Removing and installing. Refer to → Chapter "Safety Ground Lock, Removing and Installing".
- Checking
