Audi A6 Typ 4G: Overview - Rear Lid
Overview - Rear Lid, Sedan
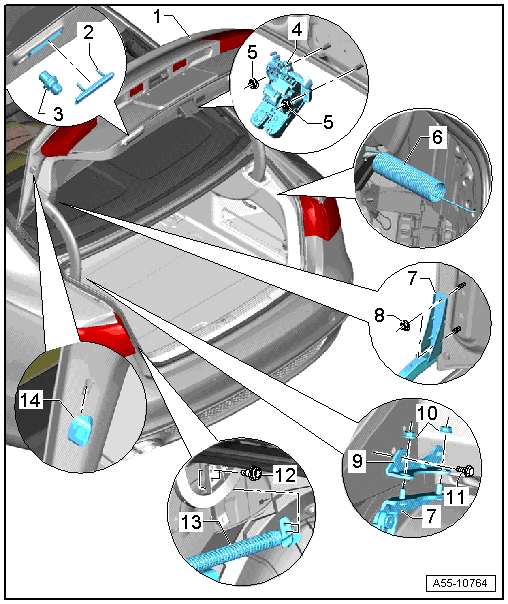
1 - Rear Lid
- Removing and installing. Refer to → Chapter "Rear Lid, Removing and Installing, Sedan".
2 - Stop Strip
3 - Adjusting Buffer
- Adjusting
4 - Rear Lid Latch
- Removing and installing. Refer to → Chapter "Rear Lid Lock, Removing and Installing, Sedan".
5 - Nut
- 21 Nm
6 - Spring
- Attachment points
7 - Lid Hinge
- Removing and installing. Refer to → Chapter "Hinges, Removing and Installing, Sedan".
8 - Nut
- 21 Nm
9 - Bracket
10 - Nut
- 21 Nm
11 - Bolt
- 21 Nm
12 - Bolt
- 21 Nm
13 - Rear Lid Motor 1 -V444-
- Removing and installing. Refer to → Chapter "Rear Lid Motor 1 -V444-, Removing and Installing, Sedan".
14 - Side Stop
- Removing and installing. Refer to → Chapter "Side Stop Buffer, Removing and Installing, Sedan through Model Year 2014".
Overview - Rear Lid, Sedan, Hinge Cable Guide
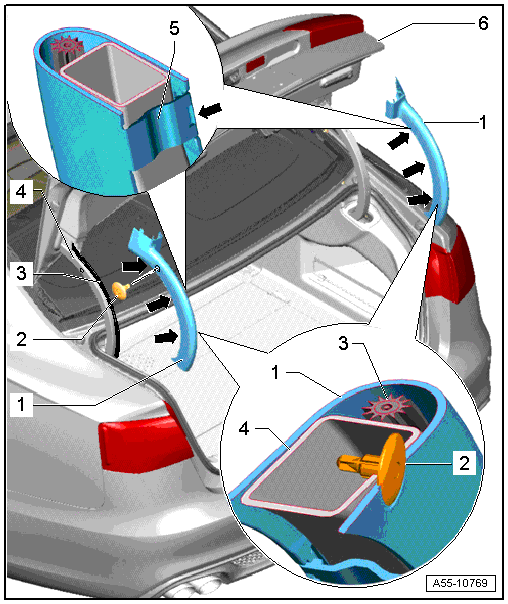
1 - Rear Lid Hinge Cable Guide
- Removing and installing. Refer to → Body Interior; Rep. Gr.70; Luggage Compartment Trim Panels; Lower Rear Lid Trim Panel, Removing and Installing
2 - Expanding Clip
3 - Rear Lid Emergency Release
- Routing → Chapter "Lid Latch Emergency Release, Removing and Installing, Sedan"
4 - Lid Hinge
5 - Tab
6 - Rear Lid
Overview - Rear Lid, Avant
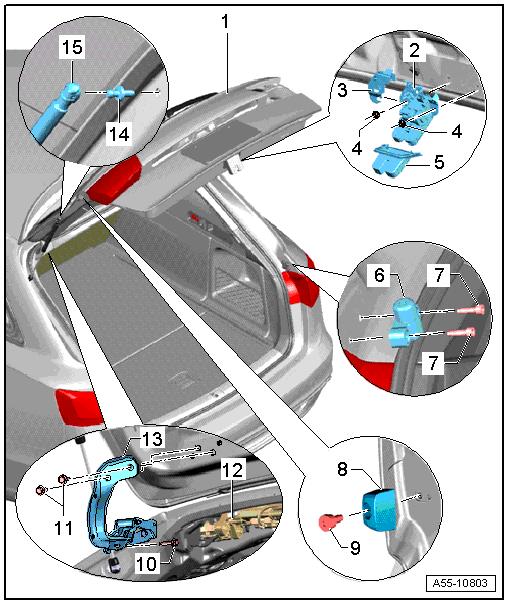
1 - Rear Lid
- Removing and installing. Refer to → Chapter "Rear Lid, Removing and Installing, Avant".
2 - Lid Latch
- Removing. Refer to → Chapter "Hood Latch, Removing and Installing, Avant".
3 - Cover
4 - Nuts
- 21 Nm
5 - Cover
6 - Adjusting Buffer
- Adjusting
7 - Screws
- 8 Nm
8 - Stop
9 - Bolt
- 8 Nm
10 - Bolt
- 21 Nm
11 - Bolt
- 30 Nm
12 - Rear Lid Motor 2 -V445-
13 - Lid Hinge
- Removing. Refer to → Chapter "Hinges, Removing and Installing, Avant".
14 - Ball Stud
- 21 Nm
15 - Gas-Filled Strut
- Noise insulation element must be engaged in rear lid side.
- Push the insulation onto the ball stud while turning it gently.
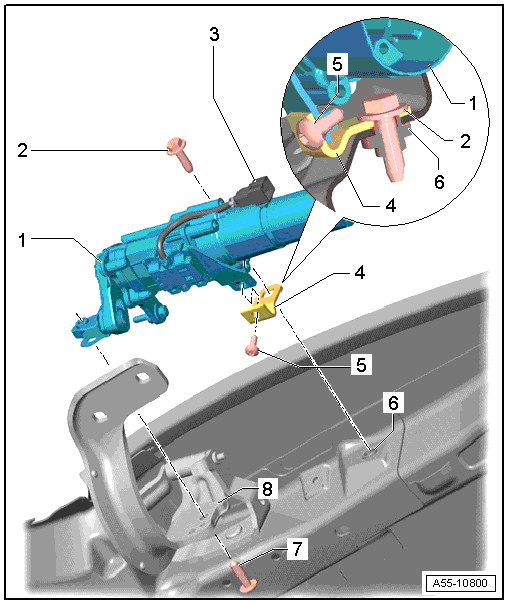
Overview - Rear Lid, Rear Lid Motor, Sedan
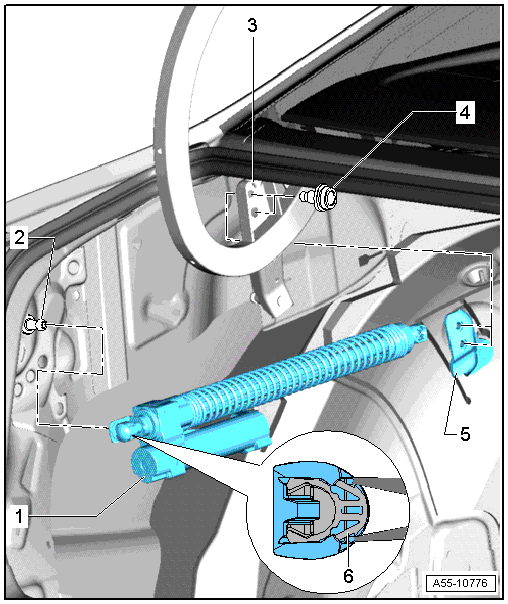
1 - Rear Lid Motor 1 -V444-
- Removing and installing. Refer to → Chapter "Rear Lid Motor 1 -V444-, Removing and Installing, Sedan".
2 - Ball Stud
- 20 Nm
3 - Rear lid hinge
4 - Bolt
- 21 Nm
5 - Bracket
6 - Plastic Clip
- Release with needle nose pliers. Refer to → Chapter "Gas-Filled Strut with Clip, Removing and Installing".
Overview - Rear Lid, Rear Lid Motor, Avant
1 - Rear Lid Motor 2 -V445-
- Removing and installing. Refer to → Chapter "Rear Lid Motor 1 and 2 -V444-/-V445-, Removing and Installing, Avant".
2 - Bolt
- 21 Nm
3 - Connector
- Disconnect the connector before removing the drive unit.
4 - Bracket
- Bracket is positioned with a device in factory and must not be adjusted.
5 - Bolt
- 8 Nm
6 - Roof Frame
7 - Bolt
- Self-threading
- Tightening specification
8 - Lid Hinge
- Removing and installing. Refer to → Chapter "Hinges, Removing and Installing, Avant".
