Audi A6 Typ 4G: Overview - Screen Separator
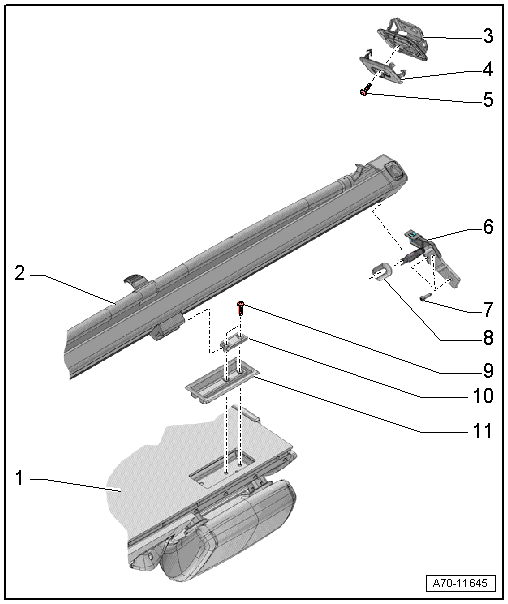
1 - Right 2/3 Rear Seat Backrest
2 - Screen Separator Wall
- Removing and installing. Refer to → Chapter "Screen Separator, Removing and Installing".
- Press all the way in
3 - Mount
- For the screen separator wall
- Quantity: 4
- Removing and installing. Refer to → Chapter "Screen Separator Mount, Removing and Installing".
- Attach the securing tabs to the lifting eyes in the openings on the body
4 - Cover
- For the mount
- Quantity: 4
- Removing and installing. Refer to → Chapter "Screen Separator Mount, Removing and Installing".
- Press on until it engages audibly
5 - Bolt
- 9 Nm
- Quantity: 4
6 - Screen Separator Bracket
- Quantity: 2
- Removing and installing. Refer to → Chapter "Screen Separator Bracket, Removing and Installing".
7 - Bolt
- 6 Nm
- Quantity: 6
8 - Rubber Grommet
- For the screen separator bracket
- Quantity: 2
- Slide over the bracket and insert into the trim panel
9 - Bolt
- 9 Nm
- Quantity: 4
- Replace
- Clean the threaded hole with a thread tap.
- Install with locking compound. For the correct locking compound. Refer to the Parts Catalog.
10 - Screen Separator Mount
- Quantity: 2
- Removing and installing. Refer to → Chapter "Screen Separator Mount, Removing and Installing".
11 - Guide
- For the mount on the right 2/3 of the rear seat backrest
- Quantity: 2
- Removing and installing. Refer to → Chapter "Screen Separator Mount, Removing and Installing".
Overview - Sun Visors
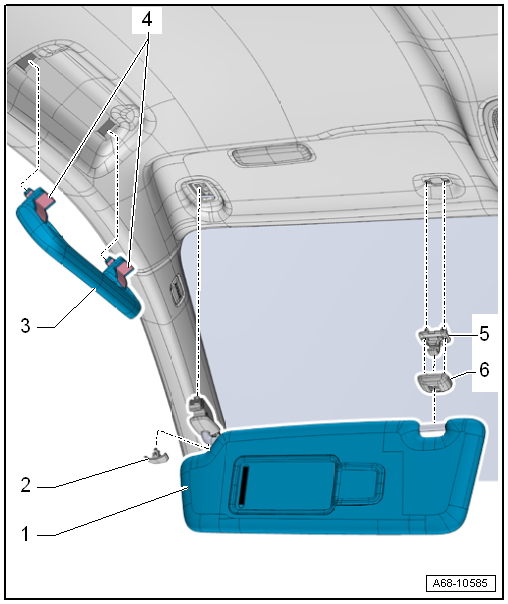
1 - Sun Visor
- Allocation. Refer to the Parts Catalog.
- Removing and installing. Refer to → Chapter "Sun Visor, Removing and Installing".
- Insert visor mount in the body cut-out
2 - Expanding Cap
- Clipped into the sun visor
- Press until it engages completely
3 - Roof Grab Handle
- Quantity: 4
- Removing and installing. Refer to → Chapter "Roof Grab Handle, Removing and Installing".
- Press until it engages completely
4 - Expanding Caps
 Caution
Only up to their lock position (do not pull them out all the way otherwise the silicone brake and spring can fall out and then the handle has to be replaced).
- Press until it engages completely
5 - Sun Visor Center Support
- Removing and installing. Refer to → Chapter "Sun Visor Center Support, Removing and Installing".
- Do not damage spreader clips during insertion
6 - Expanding Cap
- Clipped into the sun visor center bracket
Overview - Sun Shade
Overview - Sun Shade, Sedan
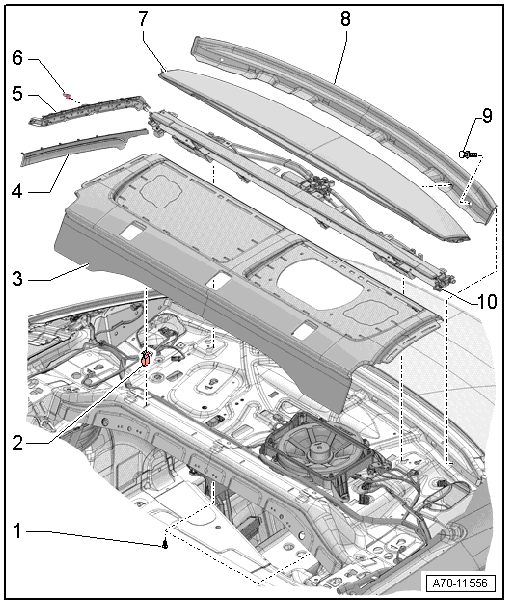
1 - Bolt
- 3 Nm
- Quantity: 4
2 - Clip
- Quantity: 4
- Insert in the front part of the rear shelf
- Remove any remaining clips in the body mounting points using the Omega Clip Tool -T40280-. To install, insert into the rear shelf.
- Replace damaged or deformed clips
3 - Front of Rear Shelf
- Removing and installing. Refer to → Chapter "Rear Shelf, Removing and Installing".
- Mount it on the sun shade and press on it until it audibly latches into place
4 - Trim
- For the sun shade guide strip
- Quantity: 2
- Removing and installing. Refer to → Chapter "D-Pillar Trim, Removing and Installing, Sedan".
- Attach it to the guide strip and press on it until it engages audibly
5 - Guide Strip
- Quantity: 2
- Removing and installing. Refer to → Chapter "Sun Shade, Removing and Installing, Sedan".
- Mount it on the sun shade and press on it until it audibly latches into place
6 - Clip
- Quantity: 4
- Install in the guide strip
- Remove the clips that are still in the mounting points on the body using Omega Clip Tool -T40280-.
- Replace damaged or deformed clips
7 - Rear Shelf Rear Section
- Removing and installing. Refer to → Chapter "Sun Shade, Removing and Installing, Sedan".
- Install the sun shade with rear shelf in the rear window frame and tighten it down
8 - Trim Panel
- For the rear window frame
9 - Expanding Clip
- Quantity: 2
10 - Sun Shade
- Removing and installing. Refer to → Chapter "Sun Shade, Removing and Installing, Sedan".
- Clip into the back part of the rear shelf
- Install the sun shade with rear shelf in the rear window frame and tighten it down
Overview - Sun Shade, Avant
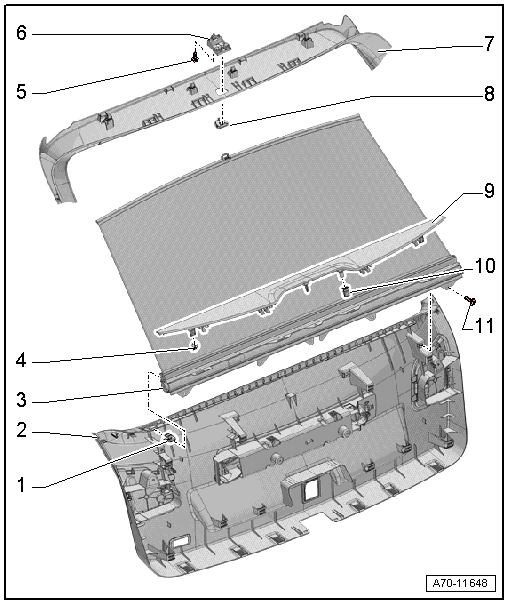
1 - Clip
- Quantity: 3
- Insert in the trim panel
- Remove any remaining clips in the sun shade mounting points using the Omega Clip Tool -T40280-. To install, insert into the trim panel.
- Replace damaged or deformed clips
2 - Rear Lid Lower Trim
- Removing and installing. Refer to → Chapter "Lower Rear Lid Trim Panel, Removing and Installing, Avant".
- Press on until it engages audibly
3 - Sun Shade
- Removing and installing. Refer to → Chapter "Sun Shade, Removing and Installing, Avant".
- Clipped in the rear lid lower trim panel
4 - Clip
- Quantity: 2
- Insert in the cover
- Remove clips left in the mounting points of the sun shade and use for installation in the cover
- Replace damaged or deformed clips
5 - Bolt
- 2 Nm
6 - Mount Bracket
- Removing and installing. Refer to → Chapter "Sun Shade Mount, Removing and Installing".
7 - Rear Lid Upper Trim
- Removing and installing. Refer to → Chapter "Upper Rear Lid Trim Panel, Removing and Installing".
- Insert first behind the side window frame in the rear lid
- Press on until it engages audibly
8 - Sun Shade Mount
- Removing and installing. Refer to → Chapter "Sun Shade Mount, Removing and Installing".
- Hook into the bracket and press until it audibly engages
9 - Sun Shade Cover
- Removing and installing. Refer to → Chapter "Sun Shade, Removing and Installing, Avant".
- Press on until it engages audibly
10 - Clip
- Quantity: 2
- Insert in the cover
- Remove any remaining clips in the sun shade mounting points using the Omega Clip Tool -T40280-. To install, insert into the cover.
- Replace damaged or deformed clips
11 - Bolt
- 3 Nm
- Quantity: 4
Overview - Luggage Compartment Roll Cover

1 - Bolt
- 4.5 Nm
- Quantity: 2
- Tightening sequence.
2 - Luggage Compartment Cover Motor 1 -V473-/Luggage Compartment Cover Motor 2 -V474-
- Removing and installing. Refer to → Chapter "Luggage Compartment Roll Cover, Removing and Installing".
- Cable, adjusting. Refer to → Chapter "Release Cable for the Roll Cover, Adjusting".
3 - Bolt
- 2.5 Nm
- Quantity: 4
- Tightening sequence.
4 - Luggage Compartment Cover Guide Rail
- Quantity: 2
- Removing and installing. Refer to → Chapter "Luggage Compartment Roll Cover, Removing and Installing".
- Cable, adjusting. Refer to → Chapter "Release Cable for the Roll Cover, Adjusting".
5 - Bolt
- 4.5 Nm
- Quantity: 2
- Tightening sequence.
6 - D-Pillar Trim Panel
- Removing and installing. Refer to → Chapter "D-Pillar Trim Panel, Removing and Installing, Avant".
7 - Driver
- For luggage compartment cover
- Removing and installing. Refer to → Chapter "D-Pillar Trim Panel, Removing and Installing, Avant".
- Install the guide rails
8 - Nut
- 4.5 Nm
- Tightening sequence.
