Audi A6 Typ 4G: Rear Brake Caliper, Replacing
Brake Caliper, Replacing, Steel Brakes
Special tools and workshop equipment required
- Torque Wrench 1331 5-50Nm -VAG1331-
- Brake Pedal Actuator -VAG1869/2-.
- Lithium grease. Refer to the Parts Catalog.
 Note
Note
In the following description the brake caliper is removed and replaced without the brake carrier and pads. The brake hose is removed.
Removing
- Loosen the parking brake.
- Switch off the ignition.
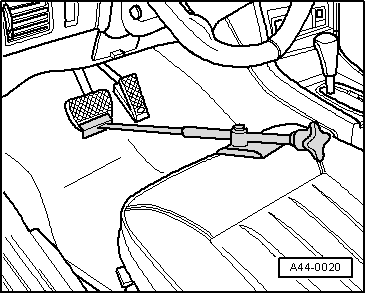
- Insert the Brake Pedal Actuator -VAG1869/2- between the brake pedal and driver seat. Preload the brake pedal at least 60 mm.
Note
By doing this, the valves in the brake master cylinder are closed and the brake fluid reservoir does not run empty.
- Remove the affected rear wheel. Refer to → Suspension, Wheels, Steering; Rep. Gr.44; Wheels, Tires.
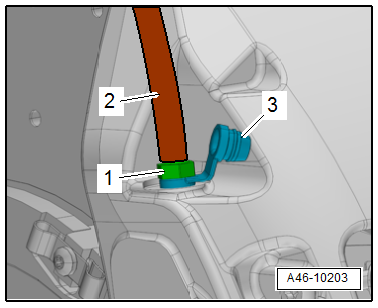
- Remove the protective cap -3- from the bleed screw -1-.
- Connect the bleeder bottle hose -2- as shown.
- Open the bleed screw to reduce the pressure in the brake system.
- Close the bleed screw and remove the bleeder bottle.
Note
Do not remove the Brake Pedal Actuator -VAG1869/2-.
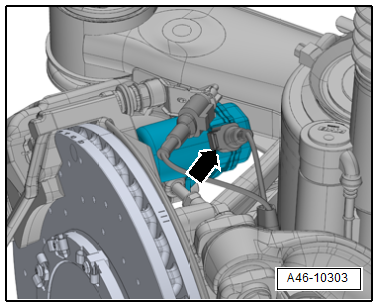
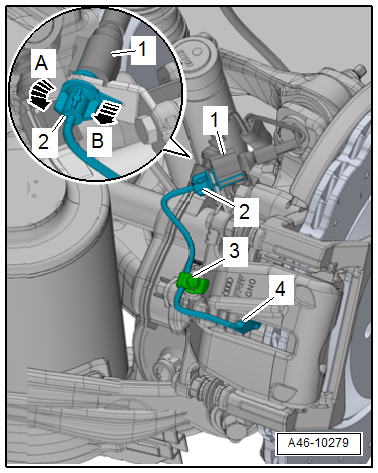
- Disconnect the connector -arrow- from the electromechanical parking brake motor.
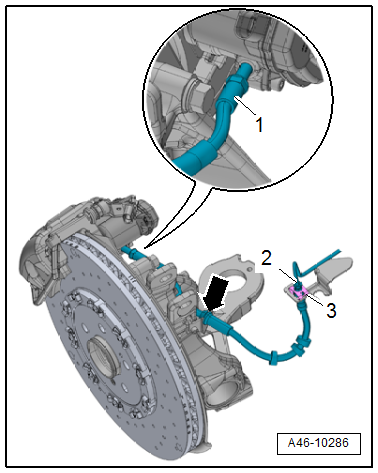
- Remove the union bolt -2-.
- Free up the brake hose on the bracket -arrow-.
- Disconnect the brake hose -1- from the brake caliper.
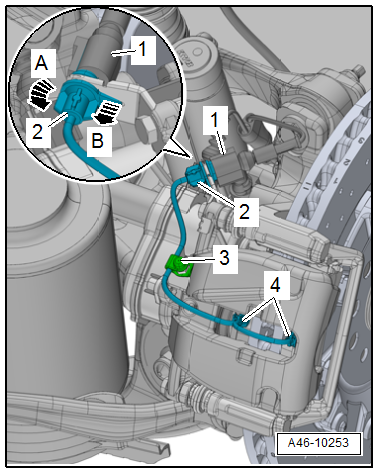
- Disconnect the brake pad wear sensor connector -1-.
- Release the connector -2- to the brake pad wear sensor from its bracket -arrow B- while turning it 90º at the same time -arrow A-.
- Remove the dust cap -3- from the bleed screw and free up the electrical wire.
Note
Ignore -item 4-.
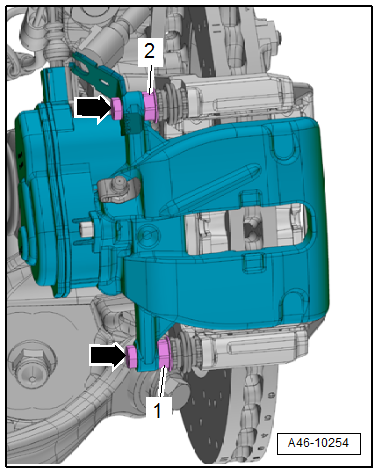
- Remove the bolts -arrows- by counter-holding the guide pins -1 and 2-.
- Remove the brake caliper and guide the brake pad wear indicator wire out at the same time.
- Remove the electromechanical parking brake motor. Refer to → Chapter "Left/Right Parking Brake Motor -V282-/-V283-, Removing and Installing".
Note
Label the brake pads when removing if they are going to be used again. Install in the same position, otherwise the braking effect will be uneven.
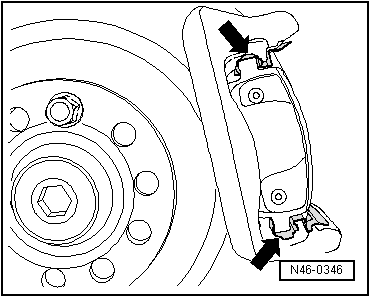
- Remove the brake pads and brake pad springs.
Installing
Install in reverse order of removal and note the following:
Note
Replace the brake caliper bolts.
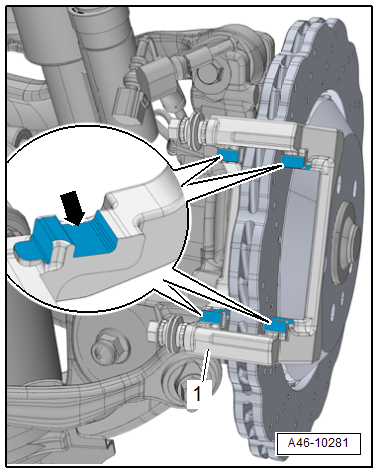
- Clean the brake carrier on the brake pad spring contact surfaces -arrow- and thinly coat them with lithium grease.
- Install the brake pad springs while paying attention to the installed position.
- If reusing, install the marked brake pads in the same location.
- Insert brake pads in brake carrier.
Note
Make sure the brake pads are seated in the brake pad springs -arrows-.
- Install the electromechanical parking brake motor. Refer to → Chapter "Left/Right Parking Brake Motor -V282-/-V283-, Removing and Installing".
- Push the brake caliper over the installed brake pads.
Note
If the previous brake pads are being reinstalled, the electrical wire for the brake pad wear sensor must be guided through the brake caliper.
- Tighten the new brake caliper bolts -arrows- by counter-holding the guide pins -1 and 2-.
Note
Make sure that the brake pad wear sensor fits correctly in the brake pad.
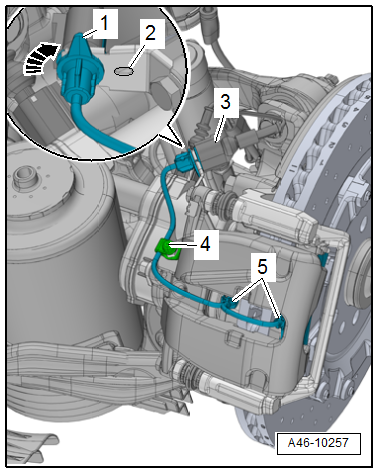
- Secure the electrical wire for the brake pad wear sensor with the dust cap -2- as illustrated.
- Bring the connector -3- into its installed position and turn in the direction of the -arrow- until the tab -4- engages in the hole -5- on the bracket.
- Connect the connector -6-.
Note
Ignore -item 1-.

- Install the brake hose -1- in the brake caliper and tighten.
- Check the retaining spring -3- for damage and replace if necessary.
- Insert the brake hose into the bracket -arrow- and connect it to the brake line by tightening the union bolt -2-.
Note
- Make sure the brake hose is routed correctly.
- Make sure the brake hose is not blocked, bent, twisted or rubbing against the vehicle.
- Connect the connector -arrow- to the electromechanical parking brake motor.
- Remove the Brake Pedal Actuator -VAG1869/2-.
- Drive the parking brake motors up using the Vehicle Diagnostic Tester by following the instructions in the display.
- Only bleed the brakes on the wheel from which the brake caliper and the brake hose was loosened. Refer to → Chapter "Hydraulic System, Standard Bleeding".
Note
If the brake pedal still feels "soft", completely bleed the brakes.
- Install the rear wheel. Refer to → Suspension, Wheels, Steering; Rep. Gr.44; Wheels, Tires.
 WARNING
Risk of accident!
- With the vehicle stationary, firmly press the brake pedal several times so that the brake pads in the operating condition properly sit in their respective position.
- Make sure the brakes are working correctly before driving the vehicle for the first time.
Brake Caliper, Replacing, Ceramic Brakes
Special tools and workshop equipment required
- Torque Wrench 1331 5-50Nm -VAG1331-
- Brake Pedal Actuator -VAG1869/2-.
- Lithium grease. Refer to the Parts Catalog.
Note
In the following description the brake caliper is removed and replaced without the brake carrier and pads. The brake hose is removed.
Removing
- Loosen the parking brake.
- Switch off the ignition.
- Insert the Brake Pedal Actuator -VAG1869/2- between the brake pedal and driver seat. Preload the brake pedal at least 60 mm.
Note
By doing this, the valves in the brake master cylinder are closed and the brake fluid reservoir does not run empty.
- Remove the affected rear wheel, while observing the safety precautions for vehicles with ceramic brakes. Refer to → Suspension, Wheels and Steering; Rep. Gr.44; Wheels, Tires.
- Remove the protective cap -3- from the bleed screw -1-.
- Connect the bleeder bottle hose -2- as shown.
- Open the bleed screw to reduce the pressure in the brake system.
- Close the bleed screw and remove the bleeder bottle.
Note
Do not remove the Brake Pedal Actuator -VAG1869/2-.
- Disconnect the connector -arrow- from the electromechanical parking brake motor.
- Remove the union bolt -2-.
- Free up the brake hose on the bracket -arrow-.
- Disconnect the brake hose -1- from the brake caliper.
- Disconnect the brake pad wear sensor connector -1-.
- Release the connector -2- to the brake pad wear sensor from its bracket -arrow B- while turning it 90º at the same time -arrow A-.
- Remove the dust cap -3- from the bleed screw and free up the electrical wire.
Note
Ignore -item 4-.
- Remove the bolts -arrows- by counter-holding the guide pins -1 and 2-.
- Remove the brake caliper and guide the brake pad wear indicator wire out at the same time.
- Remove the electromechanical parking brake motor. Refer to → Chapter "Left/Right Parking Brake Motor -V282-/-V283-, Removing and Installing".
Note
Label the brake pads when removing if they are going to be used again. Install in the same position, otherwise the braking effect will be uneven.
- Remove the brake pads and brake pad springs.
Installing
Install in reverse order of removal and note the following:
Note
Replace the brake caliper bolts.
- Clean the brake carrier on the brake pad spring contact surfaces -arrow- and thinly coat them with lithium grease.
- Install the brake pad springs while paying attention to the installed position.
- If reusing, install the marked brake pads in the same location.
- Insert brake pads in brake carrier.
Note
Make sure the brake pads are seated in the brake pad springs -arrows-.
- Install the electromechanical parking brake motor. Refer to → Chapter "Left/Right Parking Brake Motor -V282-/-V283-, Removing and Installing".
- Push the brake caliper over the installed brake pads.
Note
If the previous brake pads are being reinstalled, the electrical wire for the brake pad wear sensor must be guided through the brake caliper.
- Tighten the new brake caliper bolts -arrows- by counter-holding the guide pins -1 and 2-.
Note
Make sure that the brake pad wear sensor fits correctly in the brake pad.
- Secure the brake pad wear indicator wire with the dust cap -4- as shown.
- Bring the connector into its installed position and turn in the direction of the -arrow- until the tab -1- engages in the hole -2- on the bracket.
- Connect the connector -3-.
- Install the brake hose -1- in the brake caliper and tighten.
- Check the retaining spring -3- for damage and replace if necessary.
- Insert the brake hose into the bracket -arrow- and connect it to the brake line by tightening the union bolt -2-.
Note
- Make sure the brake hose is routed correctly.
- Make sure the brake hose is not blocked, bent, twisted or rubbing against the vehicle.
- Connect the connector -arrow- to the electromechanical parking brake motor.
- Remove the Brake Pedal Actuator -VAG1869/2-.
- Drive the parking brake motors up using the Vehicle Diagnostic Tester by following the instructions in the display.
- Only bleed the brakes on the wheel from which the brake caliper and the brake hose was loosened. Refer to → Chapter "Hydraulic System, Standard Bleeding".
Note
If the brake pedal still feels "soft", completely bleed the brakes.
- Install the rear wheel, while observing the safety precautions for vehicles with ceramic brakes. Refer to → Suspension, Wheels and Steering; Rep. Gr.44; Wheels, Tires.
WARNING
Risk of accident!
- With the vehicle stationary, firmly press the brake pedal several times so that the brake pads in the operating condition properly sit in their respective position.
- Make sure the brakes are working correctly before driving the vehicle for the first time.
