Audi A6 Typ 4G: Repair Information
Minimum Curing Time for Bonded Windows
 WARNING
- For safety reasons, use only electrically non-conductive 2C-adhesive when installing windshield and rear window using the materials listed below.
- The vehicle can only be used after the minimum curing time has elapsed.

Adhesive Sealant, Removing from Window
Adhesive Remover D 002 000 10 is recommended as a cleaning solution. Follow all safety precautions.
WARNING
When cleaning from vehicle interior out, the window just installed must not be pressed outward.
Paint Surfaces
- First, clean paint surfaces with a dry cloth. Remove residual adhesive with Adhesive Remover -D 002 000 10-.
Plastic Trim
- Let the adhesive sealant harden (approximately 1 hour) and then remove it.
Window Glass, Servicing
Special tools and workshop equipment required
- Window Repair Kit -VAS 1993- or -VAS 6092-
 Note
Note
- Windshields with stone chips can be repaired with the Window Repair Kit -AS 6092- and the Repair Resin, Talon -VAS 1993/2-.
- These damaged areas must not exceed a certain dimension or lie within the driver field of sight.
- For further details on use. Refer to operating instructions enclosed with each kit.
Bonded Window Glass Installation Instructions
Special tools and workshop equipment required
- Cutting Tool for Bonded Windows -VAS 6452-
- Cutting Tool for Bonded Windows - Wire Reel -VAS 6452/1-
- Cutting Tool for Bonded Windows - Wire -VAS 6452/2-
- Bonded Window Tool Kit -VAG1351-
- Bonded Window Tool Kit - Pull Handle -VAG1351/1-
- Double Suction Lifter -VAG1344-
- Window Cutter -VAG1561A-
- Blade, Offset -VAG1561/10-
- Window Cutter - Universal Blade (2 pc.) -VAG1561/11-
- Window Cutter - Scraper (2 pc.) -VAG1561/7+8-
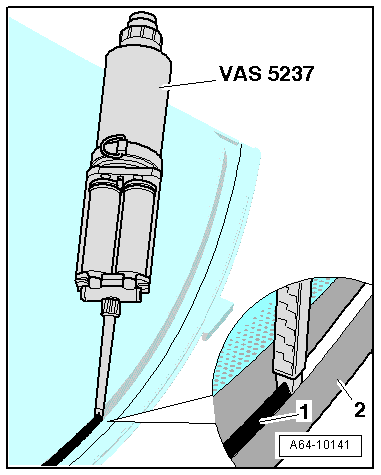
- Double Cartridge Gun -VAS 5237-
- Cartridge Gun -VAG1628-
- Cartridge Heater -VAG1939A-
Materials
- 2K Window Adhesive Kit -D 004 660 M2- → Note
- 1K Window Adhesive -DH 009 100 03- → Note
- Glass-/Paint Primer -D 009 200 02-
- Cleaning Solution -D 009 401 04-
- Applicator -D 009 500 25-
- Adhesive Remover -D 002 000 10-
- Cutting Tool for Bonded Windows - Wire -6452/2- or Cutting Cord -357 853 999-
1) Observe the minimum curing time. Refer to → Chapter "Minimum Curing Time for Bonded Windows".
2) To apply this material, the Double Cartridge Gun -VAS 5237- must be used.
3) Heat according to manufacturer's instructions using Cartridge Heater - VAG1939 A-.
4) Small cartridge (110 ml) for sealing and/or when a 400 ml double cartridge is not sufficient.
Undamaged Window Glass, Preparing for Installation
- When reusing the undamaged window, cut the rest of the adhesive material on the window and flange with the Window Cutter -VAG1561 A- and Window Cutter - Scraper (2 pc.) -VAG1561/8- so it is even, but do not remove it completely.
Note
The remaining material acts as a base for the new adhesive to be applied.
 Caution
- Keep the adhesive surface free of dirt and grease.
- Cut back the adhesive surface shortly before installing.
- Do not prime or use a cleaning solution on the adhesive surface.
New Window Glass, Preparing for Installation
- Clean around the adhesion surface using Cleaning Solution -D 009 401 04-.
- Wipe the cleaned surfaces with a dry, lint free paper.
- Apply the Glass-/Paint Primer -D 009 200 02- as described as follows.
WARNING
- The ceramic application on a new window is not primer.
- It must be primed before the application of adhesive sealing material!
- Glass/paint primer is conductive to electricity and as a result may not touch the distribution wire for example for the rear window heater.
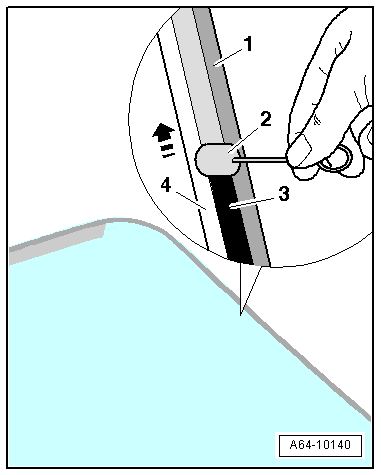
Applying Primer:
- Apply glass-/paint primer -3- with applicator -2- evenly in one stroke near the window molding -1- on the window -4-.
- Beginning applying with saturated felt.
- Primer width approximately 20 mm.
- The glass/paint primer must be positioned in the center of the adhesive bead.
- Curing time 10 minutes
Applying Adhesive
Note
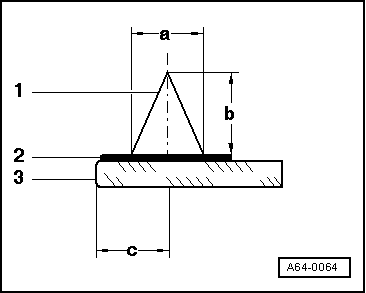
Cross-section thickness of adhesive bead is determined by dimension of opening in nozzle tip and rate of application.
Dimensions for adhesive application:
1 - Adhesive Bead
2 - Glass/Paint Primer
3 - Washer
- Dimension -a- = 8 mm.
- Dimension -b- = 12 mm.
- Dimension -c- = note the different spacing dimensions to the window edge. Refer to -item 2-.
- Position complete surface of nozzle -2- onto window.
- Application direction -arrow- for adhesive bead -1-.
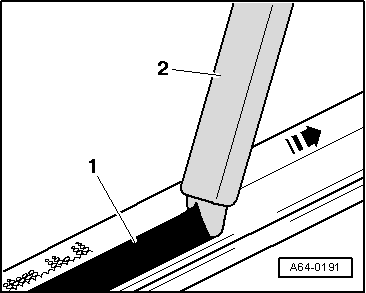
- Apply adhesive sealing material -1- all around on window -2- according to illustration.
- Insert the windshield or rear window into the opening for the window with the help of two suction cups.
Caution
The window must be installed within 15 minutes or the adhesive sealing material will not adhere properly.
Body Flange, Preparing for Installation
WARNING
Keep adhesive surface free of dirt and grease.
- Making sure not remove it completely, cut back the residual material on the body flange with a cutting blade just before installing the window .
Note
Residual material acts as a base for the adhesive sealing material.
- If the window glass flange was damaged, the paint must be repaired and corrosion protection must be applied, if necessary. Refer to the Audi Paint Guide.
- First clean the repaired area with Cleaning Solution -D 009 401 04-and then apply the Glass And Paint Primer -D 009 200 02-.
Adhesive, Removing
Adhesive Remover -D 002 000 10- is recommended as a cleaning solution. Follow all safety precautions.
WARNING
When cleaning from vehicle interior out, the window just installed must not be pressed outward.
Paint Surfaces
- First, clean paint surfaces with a dry cloth. Remove residual adhesive with Adhesive Remover -D 002 000 10-.
Plastic Trim
- Let the adhesive sealant harden (approximately 1 hour) and then remove it.
Window Glass, Sealing
- Allow leaky area to dry, and clean it.
- Apply adhesive sealing material to leaking area between window and sheet metal flange and spread.
- Allow the adhesive to harden.
- Perform a leak test.
- Perform visual inspection of vehicle interior.
