Audi A6 Typ 4G: Storage Compartment, Removing and Installing
Removing
 WARNING
- Follow all Safety Precautions when working with pyrotechnic components. Refer to → Chapter "Pyrotechnic Components Safety Precautions".
- Before handling pyrotechnic components (for example, disconnecting the connector), the person handling it must "discharge static electricity". This can be done by touching the door striker, for example.
- Remove the front seat. Refer to → Chapter "Front Seat, Removing and Installing".
- Fasten the front seat on the Engine/Transmission Holder - Seat Repair Fixture -VAS6136-. Refer to → Chapter "Front Seat, Mounting on Fixture for Seat Repair".
- Open the storage compartment -1- and remove the bolts -2-.

- Release the tab -arrow- on the storage compartment -2- and remove the storage compartment downward from the sill-side trim -1-.

- Push the storage compartment -1- in direction of -arrow- and disengage the retainer -lower arrow- from the upper seat frame -2-.
- Remove the storage compartment from the seat pan upper frame.
Installing
WARNING
- Follow all Safety Precautions when working with pyrotechnic components. Refer to → Chapter "Pyrotechnic Components Safety Precautions".
- Before handling pyrotechnic components (for example, connecting the connector), the person handling it must "discharge static electricity". This can be done by touching the door striker, for example.
- Observe all measures when installing the front seat. Refer to → Chapter "Front Seat, Removing and Installing".
Install in reverse order of removal. Note the following:
Installation notes, for example tightening specifications, replacing components. Refer to → Chapter "Overview - Seat Pan, Storage Compartment".
Seat Depth Adjuster, Removing and Installing, Sport Seat/Super Sport Seat
Special tools and workshop equipment required
- Trim Removal Wedge -3409-
Removing
WARNING
- Follow all Safety Precautions when working with pyrotechnic components. Refer to → Chapter "Pyrotechnic Components Safety Precautions".
- Before handling pyrotechnic components (for example, disconnecting the connector), the person handling it must "discharge static electricity". This can be done by touching the door striker, for example.
- Remove the front seat. Refer to → Chapter "Front Seat, Removing and Installing".
- Fasten the front seat on the Engine/Transmission Holder - Seat Repair Fixture -VAS6136-. Refer to → Chapter "Front Seat, Mounting on Fixture for Seat Repair".
- Equipment level with storage compartment: remove the storage compartment. Refer to → Chapter "Storage Compartment, Removing and Installing".
- Move the seat depth adjuster all the way forward.
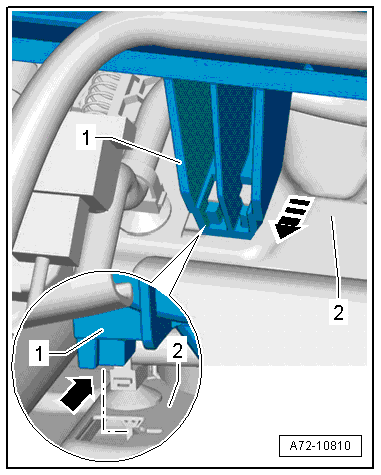
- Unclip the tabs -arrows- on the trim -1- using a Trim Removal Wedge -3409-.
- Remove the trim from the seat depth adjuster.
- Move the seat depth adjuster all the way forward in direction of -arrow-.
- Unclip catches -2- using the Trim Removal Wedge -3409-.
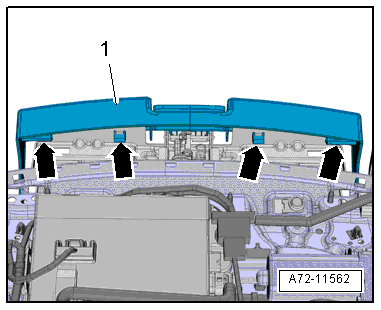
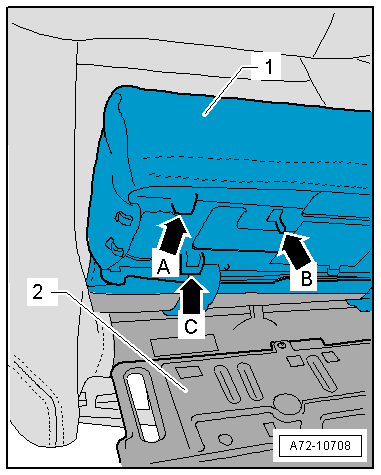
- Swivel the support with the seat cushion and seat cover -1- for the seat depth adjuster upward so that the tabs -arrow A- and -arrow B- remain unlocked.
 Note
Note
The illustration shows the padding disengaged.
- Remove the support with the seat cushion and seat cover for the seat depth adjuster upward and toward the front.
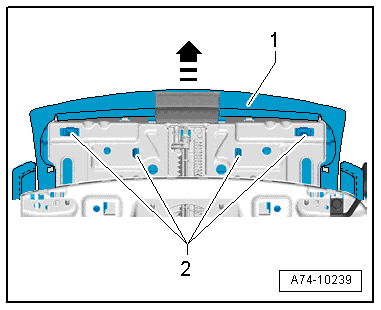
- Disengage the tabs -arrow C- on the seat depth adjuster -2- and move the support with the seat cushion and seat cover upward.
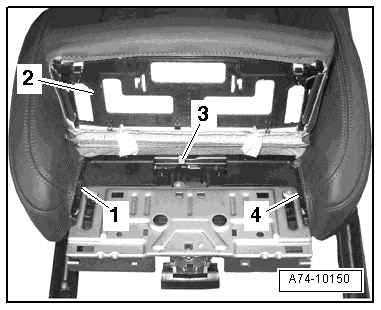
- Lay the support -2- with the seat cushion and seat cover on the front seat.
Note
The lower seat frame is not illustrated.
- Remove the cushion retaining channels -1, 3 and 4- across and at the sides from the seat depth adjustor.
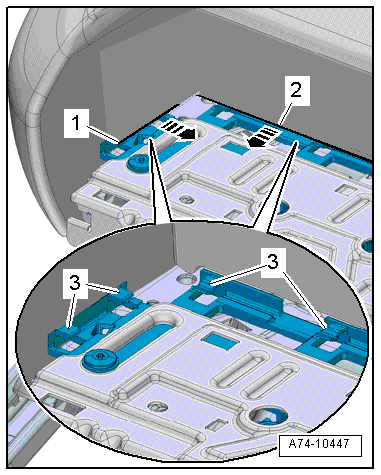
- To do this, unclip the retaining channels -1- and -2- in direction of -arrow- out from the tabs -3-.
Note
Proceed very carefully when removing and installing because it is relatively easy to damage the tabs.
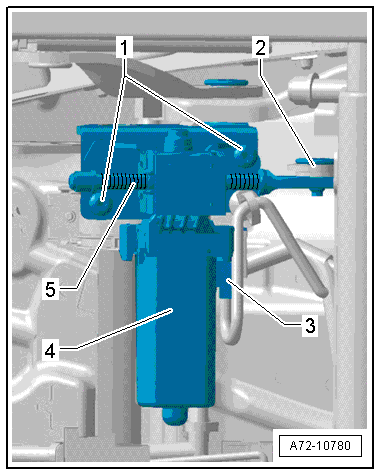
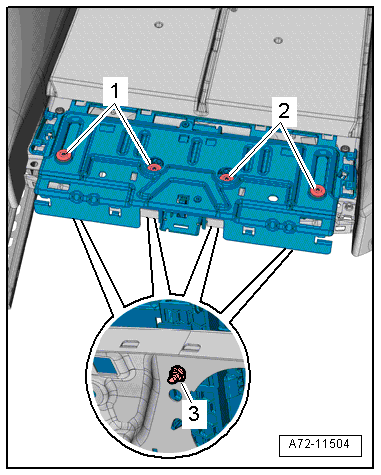
- Remove the bolts -1 and 2- and nuts -3- from the seat depth adjuster.
- Unclip the retaining tabs -1 and 3- using the Trim Removal Wedge -3409-.
- Remove the seat depth adjuster -2- from the lower seat frame upward and forward in direction of -arrows-.
- Disengage the tabs -4- from the lower seat frame while doing this.
- Remove the seat depth adjuster from the front seat.
Installing
WARNING
- Follow all Safety Precautions when working with pyrotechnic components. Refer to → Chapter "Pyrotechnic Components Safety Precautions".
- Before handling pyrotechnic components (for example, connecting the connector), the person handling it must "discharge static electricity". This can be done by touching the door striker, for example.
- Observe all measures when installing the front seat. Refer to → Chapter "Front Seat, Removing and Installing".
Install in reverse order of removal. Note the following:
Installation notes, for example tightening specifications, replacing components. Refer to → Chapter "Overview - Seat Pan, Seat Depth Adjuster".
Seat Depth Adjuster, Removing and Installing, Multi-contour Seat
Removing
WARNING
- Follow all Safety Precautions when working with pyrotechnic components. Refer to → Chapter "Pyrotechnic Components Safety Precautions".
- Before handling pyrotechnic components (for example, disconnecting the connector), the person handling it must "discharge static electricity". This can be done by touching the door striker, for example.
- Lower the front seat all the way down and then raise approximately 1/3.
- Move seat depth adjuster forward.
- Remove the front seat. Refer to → Chapter "Front Seat, Removing and Installing".
- Fasten the front seat on the Engine/Transmission Holder - Seat Repair Fixture -VAS6136-. Refer to → Chapter "Front Seat, Mounting on Fixture for Seat Repair".
- Remove front trim bracket, compressor and Multi-contour seat control module. Refer to → Chapter "Front Seat Trim Bracket/Compressor/Control Module, Removing and Installing, Multi-contour Seat".
- Remove seat cover and seat cushion. Refer to → Chapter "Seat Pan Cover and Cushion, Removing and Installing, Multi-contour Seat".
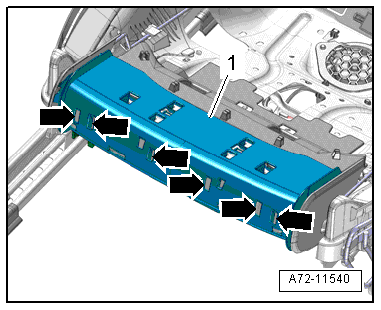
- Release latches -arrows- with a screwdriver and remove depth adjustment motor carrier -1-
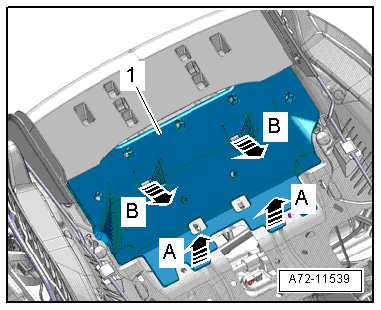
- Unclip the cover -1- from the lower seat frame -A arrows-, disengage is from the seat depth adjuster -arrows B- and remove it.
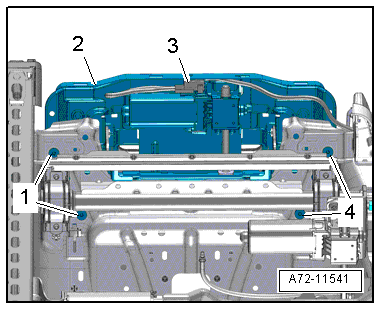
- Disconnect and free up the connector -3-.
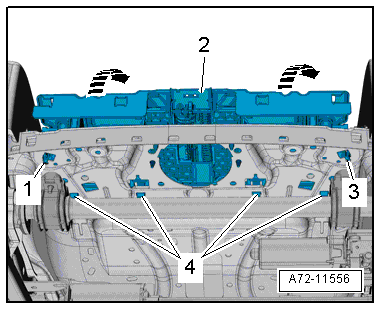
- Remove the screws -1 and 4- and the seat depth adjuster motor -2-.
- Remove the screws -1- and move the seat angle adjustment motor -4- to the side.
Installing
WARNING
- Follow all Safety Precautions when working with pyrotechnic components. Refer to → Chapter "Pyrotechnic Components Safety Precautions".
- Before handling pyrotechnic components (for example, connecting the connector), the person handling it must "discharge static electricity". This can be done by touching the door striker, for example.
- Observe all measures when installing the front seat. Refer to → Chapter "Front Seat, Removing and Installing".
Install in reverse order of removal. Note the following:
Installation notes, for example tightening specifications, replacing components. Refer to → Chapter "Overview - Seat Pan, Seat Depth Adjuster".