Audi A6 Typ 4G: Ceramic Brake Rotor, Determining Wear
Brake Rotor Thickness
- Clean the brake rotor before determining the wear.
 Note
Note
The brake rotor vent holes must be free of brake dust and dirt. It may be necessary to use a suitable tool to carefully clean the holes. Do not use any force when doing so.
 WARNING
Health Risk.
Always wear a mouth and nose mask when using compressed air to clean the ceramic brake rotor.
- Clean the brake rotors thoroughly with compressed air between the cooling channels and the vent holes.
- To determine brake rotor wear:
- Brake Rotor Thickness, Checking for Wear
- Wear Indicators, Checking
- Brake Rotor, Weighing
WARNING
Risk of accident due to insufficient braking effect.
Ceramic brakes should be replaced when, one of the defined wear limits is reached. The brake rotor can no longer be driven.
Risk of accident due to uneven braking.
- Always replace brake rotors on both sides of the axle.
- Brake pads likewise must be replaced on both sides of the axle.
Brake Rotor Thickness, Checking for Wear
Special tools and workshop equipment required
- Commercially Available Digital Caliper or Micrometer Gauge
Note
- New measurement tolerance of +0.05 mm for brake rotors with stamped minimum weight "min weight".
- Refer to → Chapter "Brake Rotor Thickness, Checking, with Stamped Minimum Weight"
Procedure
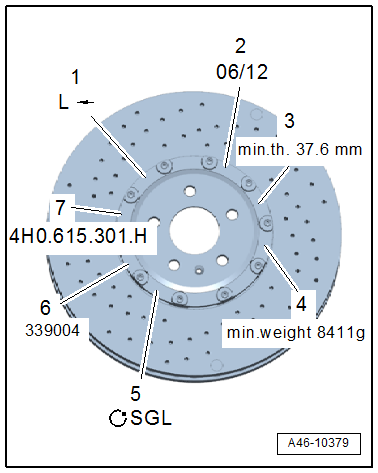
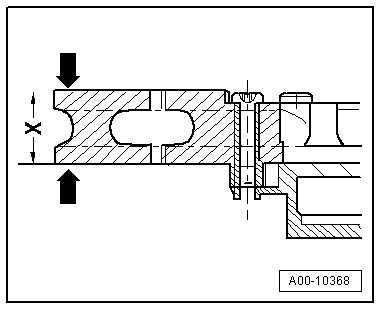
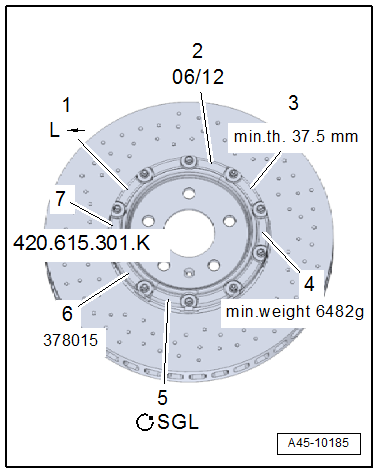
- The minimum permitted brake rotor thickness "min.th." is engraved in the brake rotor cup -item 3-.
- Measure the brake rotor thickness -x- three times around the circumference in addition to the individual wear indicators.
Note
When dimension x = min. Th. +0.2 mm is reached, then determine the wear on the brake rotor again using the wear indicators. Refer to → Chapter "Wear Indicators, Checking".
Note
- New measurement tolerance of +0.05 mm for brake rotors with stamped minimum weight "min weight".
- Refer to → Chapter "Brake Rotor Thickness, Checking, with Stamped Minimum Weight".
WARNING
Risk of accident due to insufficient braking effect.
Ceramic brakes should be replaced when, one of the defined wear limits is reached. The brake rotor can no longer be driven.
Risk of accident due to uneven braking.
- Always replace brake rotors on both sides of the axle.
- Brake pads likewise must be replaced on both sides of the axle.
Brake Rotor Thickness, Checking, with Stamped Minimum Weight
Special tools and workshop equipment required
- Commercially Available Digital Caliper or Micrometer Gauge
Note
Here the minimum weight "min.weight" is stamped on the brake rotor on the brake rotor cup the tolerance for the brake rotor thickness is still only +0.05 mm.
Procedure
- The minimum permitted brake rotor thickness "min.th." is engraved in the brake rotor cup -item 3-.
- Measure the brake rotor thickness -x- three times around the circumference in addition to the individual wear indicators.
Note
- Here the tolerance is much smaller than on traditional measurement.
- When dimension x = min.th. plus tolerance of +0.05 mm is reached, then also determine the brake rotor wear at the wear indicators.
If the permissible minimum thickness "min.th." is reached or is under, then the brake rotor can no longer be used. The brake rotor must be replaced.
If there is abrasion both brake rotors on both sides of the axle must always be replaced.
The brake pads must always be replaced.
Brake Rotor, Weighing
Special tools and workshop equipment required
- Commercially Available Scale with a Measuring Exactness of up to +-1 Gram.
Note
- New tolerance for brake rotors withe stamped minimum weight.
- Refer to → Chapter "Determining Brake Rotor Thickness Weighing, with Stamped Minimum Weight".
Procedure
- The minimum permitted brake rotor weight "min.weight" is engraved in the brake rotor cup -item 4-.
- Remove the brake rotor to weigh it.
- Clean and dry the brake rotor before weighing it.
WARNING
Health Risk.
Always wear a mouth and nose mask when using compressed air to clean the ceramic brake rotor.
 Caution
Risk of false results.
Never clean the brake rotor with water or any other fluid.
Note
- The brake rotor vent holes must be free of dirt. It may be necessary to use a suitable tool to carefully clean the holes.
- Clean the brake rotors thoroughly with compressed air between the cooling channels and the vent holes.
- Carefully lay the clean brake rotor on the scale.
Note
If the threshold plus 20 grams is reached, then determine the brake wear by checking the wear indicators. Refer to → Chapter "Wear Indicators, Checking".
Note
- New tolerance for brake rotors withe stamped minimum weight
- Refer to → Chapter "Determining Brake Rotor Thickness Weighing, with Stamped Minimum Weight"
WARNING
Risk of accident due to insufficient braking effect.
Ceramic brakes should be replaced when, one of the defined wear limits is reached. The brake rotor can no longer be driven.
Risk of accident due to uneven braking.
- If there is abrasion always replace the brake rotors on both sides of the axle.
- Brake pads likewise must be replaced on both sides of the axle.
Determining Brake Rotor Thickness Weighing, with Stamped Minimum Weight
Special tools and workshop equipment required
- Commercially Available Scale with a Measuring Exactness of up to +-1 Gram.
Note
- Here the minimum weight of the brake rotor is stamped on the brake rotor cup "min.weight", there is no tolerance. If the stamped-on minimum weight is not reached, replace the brake rotor.
- Additional checking of the brake rotor is not necessary.
Brake rotor with stamped minimum weight.
Procedure
- Remove the brake rotor to weigh it.
- Clean and dry the brake rotor before weighing it.
WARNING
Health Risk.
Always wear a mouth and nose mask when using compressed air to clean the ceramic brake rotor.
Caution
Risk of false results.
Never clean the brake rotor with water or any other fluid.
Note
- The brake rotor vent holes must be free of dirt. It may be necessary to use a suitable tool to carefully clean the holes.
- Clean the brake rotors thoroughly with compressed air between the cooling channels and the vent holes.
- Carefully lay the clean brake rotor on the scale.
Note
- Here the minimum weight "min.weight" of the brake rotor is stamped on the brake rotor cup, there is no tolerance. If the stamped-on minimum weight has been reached or falls short, replace the brake rotor.
- Additional checking of the brake rotor is not necessary.
If there is abrasion both brake rotors on both sides of the axle must always be replaced.
WARNING
Risk of accident due to insufficient braking effect.
Ceramic brakes should be replaced when, one of the defined wear limits is reached. The brake rotor can no longer be driven.
Risk of accident due to uneven braking.
- If there is abrasion always replace the brake rotors on both sides of the axle.
- Brake pads likewise must be replaced on both sides of the axle.
Wear Indicators, Checking
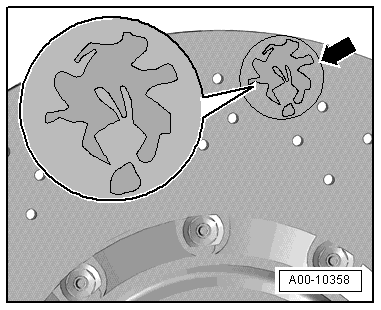
The wear indicators on the brake rotor friction surface are positioned 120 degrees from each other.
- The wear indicators -arrow- can be recognized by their different color.
- On the front and back side of the brake rotor are three wear indicators.
- With increasing wear of the brake rotor a dark burned-out recess develops on the wear indicator.
If one of the wear indicators is fully burned out, the brake rotor must be replaced.
If there is abrasion both brake rotors on both sides of the axle must always be replaced.
WARNING
Risk of accident due to insufficient braking effect.
Ceramic brakes should be replaced when, one of the defined wear limits is reached. The brake rotor can no longer be driven.
Risk of accident due to uneven braking.
- If there is abrasion always replace the brake rotors on both sides of the axle.
- Brake pads likewise must be replaced on both sides of the axle.