Audi A6 Typ 4G: Front Backrest, Removing and Installing
Front Backrest, Removing and Installing, Standard Seat/Sport Seat/Super Sport Seat
Removing
 WARNING
- Follow all Safety Precautions when working with pyrotechnic components. Refer to → Chapter "Pyrotechnic Components Safety Precautions".
- Before handling pyrotechnic components (for example, disconnecting the connector), the person handling it must "discharge static electricity". This can be done by touching the door striker, for example.
- Remove the front seat. Refer to → Chapter "Front Seat, Removing and Installing".
- Fasten the front seat on the Engine/Transmission Holder - Seat Repair Fixture -VAS6136-. Refer to → Chapter "Front Seat, Mounting on Fixture for Seat Repair".
- Remove the trim on the tunnel side. Refer to → Chapter "Seat Side Trim on the Tunnel Side, Removing and Installing".
- Remove the sill-side trim:
- For the manual standard seat/sport seat. Refer to → Chapter "Seat Side Trim on Sill Panel Side, Removing and Installing, Front Seat (Manual)".
- For the standard seat/sport seat/power sport seat. Refer to → Chapter "Seat Side Trim on Sill Panel Side, Removing and Installing, Front Seat (Power)".
- Disconnect the electrical connectors for the backrest and free up the disconnected wiring harnesses. Refer to → Chapter "Front Seat Wire Routing".
 Note
Note
The wiring harness between the connection point and the side airbag is continuous.
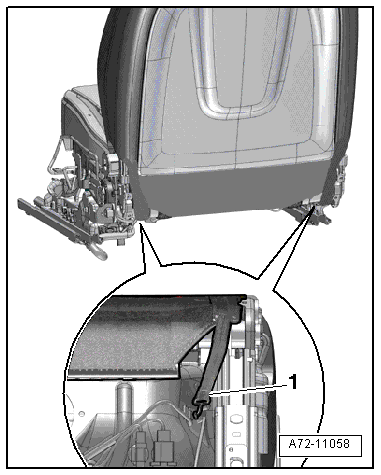
- Detach left and right rubber strap -1- at the bottom of the seat pan.
- Remove the left and right bolts -1 and 2- from the backrest hinge.
- Remove the backrest from the seat pan by carefully removing the side airbag electrical wiring harness and depending on the version, removing all other wiring harnesses to the backrest from the seat pan.
Installing
WARNING
- Follow all Safety Precautions when working with pyrotechnic components. Refer to → Chapter "Pyrotechnic Components Safety Precautions".
- Before handling pyrotechnic components (for example, connecting the connector), the person handling it must "discharge static electricity". This can be done by touching the door striker, for example.
- Observe all measures when installing the front seat. Refer to → Chapter "Front Seat, Removing and Installing".
Install in reverse order of removal. Note the following:
Installation notes, for example tightening specifications, replacing components. Refer to → Chapter "Overview - Front Backrest".
Front Backrest, Removing and Installing, Multi-contour Seat
Removing
WARNING
- Follow all Safety Precautions when working with pyrotechnic components. Refer to → Chapter "Pyrotechnic Components Safety Precautions".
- Before handling pyrotechnic components (for example, disconnecting the connector), the person handling it must "discharge static electricity". This can be done by touching the door striker, for example.
- Remove the front seat. Refer to → Chapter "Front Seat, Removing and Installing".
- Fasten the front seat on the Engine/Transmission Holder - Seat Repair Fixture -VAS6136-. Refer to → Chapter "Front Seat, Mounting on Fixture for Seat Repair".
- Remove the seat side trim:
- Refer to → Chapter "Seat Side Trim on Sill Panel Side/Front Seat Trim, Removing and Installing, Multi-contour Seat".
- Refer to → Chapter "Seat Side Trim on the Tunnel Side, Removing and Installing".
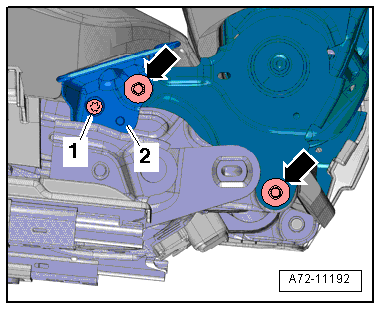
- Remove the expanding rivet from the sill-side trim -2-.
- Release catches -arrows- using a screwdriver, remove backrest hinge trim -1-.
- Remove the front seat belt latch. Refer to → Chapter "Front Seat Belt Latch, Removing and Installing, Multi-contour Seat".
Multi-contour Seat through 08/2012
- Carefully release the retainer -arrow- and disconnect the pneumatic lines -1 and 2-.
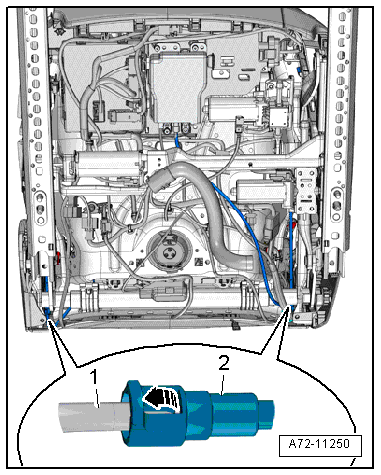
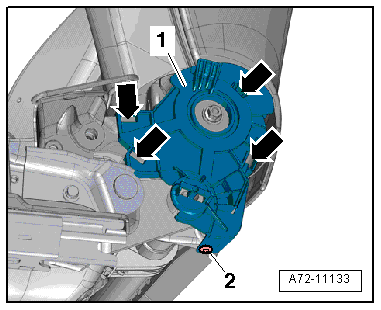
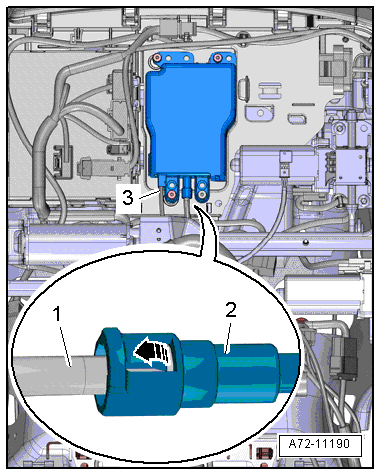
- Carefully release the retainer -arrow- and remove the pneumatic line -1- from the compressor -2-.
- Free up pneumatic lines to the backrest.
Note
Ignore -item 3-.
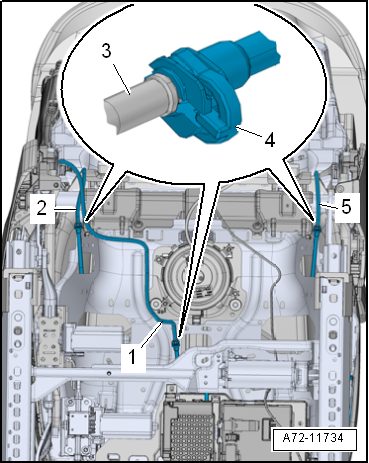
Multi-contour Seat from 09/2012:
- Disconnect the pneumatic lines -1, 2 and 5-.
- To do this, press the release mechanism -4- and simultaneously pull out the pneumatic line -3-.
- Free up pneumatic lines to the backrest.
Procedure for All Seat Versions
- Disconnect the electrical connectors for the backrest wiring harnesses and free up the disconnected wiring harnesses. Refer to → Chapter "Front Seat Wire Routing".
Note
The wiring harness between the connection point and the side airbag is continuous.
- Detach left and right rubber strap -1- at the bottom of the seat pan.
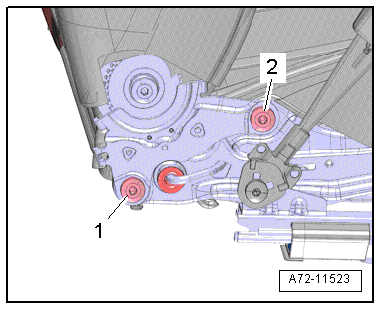
- Remove belt guide bolt -1- and -2-.
- Remove the bolts -arrows- on the left and right sides of the backrest hinge.
- Remove backrest from the seat pan by carefully removing the side airbag wiring harness and, depending on the version, removing all other wiring harnesses as well as the pneumatic lines to the backrest from the seat pan.
Installing
WARNING
- Follow all Safety Precautions when working with pyrotechnic components. Refer to → Chapter "Pyrotechnic Components Safety Precautions".
- Before handling pyrotechnic components (for example, connecting the connector), the person handling it must "discharge static electricity". This can be done by touching the door striker, for example.
- Observe all measures when installing the front seat. Refer to → Chapter "Front Seat, Removing and Installing".
Install in reverse order of removal. Note the following:
Installation notes, for example tightening specifications, replacing components. Refer to → Chapter "Overview - Front Backrest, Multi-contour Seat".