Audi A6 Typ 4G: Overview - Front Seat
Overview - Front Seat, Standard Seat/Sport Seat
Standard Seat/Sport Seat (Manual)
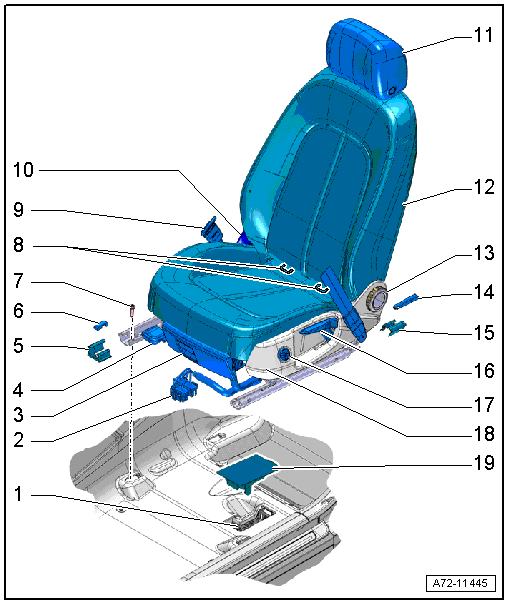
1 - Connector Station
- Connector assignment. Refer to → Wiring diagrams, Troubleshooting & Component locations.
- Removing and installing
2 - Connector
- With a corrugated tube for the modular wiring routing
- Modular wiring with corrugated tube on front seat. Refer to → Chapter "Front Seat Wire Routing".
3 - Storage Compartment
- Equipment levels
- Overview. Refer to → Chapter "Overview - Seat Pan, Storage Compartment".
4 - Seat Forward/Back Adjuster
- Overview
5 - Front Cover
- For the seat rail
- Quantity: 2
- Removing and installing. Refer to → Chapter "Seat Rail Cover, Removing and Installing".
- Push onto the seat rail until it audibly latches
6 - Front Spindle Cover
- Quantity: 2
- Removing and installing. Refer to → Chapter "Front Seat, Removing and Installing".
- Push onto the seat rail until it audibly latches
7 - Bolt
- 50 Nm
- Quantity: 4
8 - Child Seat Anchor
- Equipment levels
- for the front passenger seat only
- Overview. Refer to → Chapter "Overview - Front LATCH Child Seat Anchors".
- For checking after an accident. Refer to → Chapter "LATCH Child Seat Anchors, Checking After a Collision".
9 - Seat Belt Latch
- Removing and installing. Refer to → Chapter "Front Seat Belt Latch, Removing and Installing, Standard Seat/Sport Seat/Super Sport Seat".
10 - Tunnel-Side Trim
- Removing and installing. Refer to → Chapter "Seat Side Trim on the Tunnel Side, Removing and Installing".
11 - Headrest
- Equipment levels
- Removing and installing. Refer to → Chapter "Headrest, Removing and Installing".
12 - Standard Seat/Sport Seat
Vehicles with:
- Seat/backrest heating
- Lumbar Support
- Footwell lamp
- Rear seat entertainment
- Seat angle adjustment only for sport seat
- Seat depth adjustment only for sport seat
- Removing and installing. Refer to → Chapter "Front Seat, Removing and Installing".
13 - Hand Wheel
- For backrest adjustment
- Removing and installing. Refer to → Chapter "Seat Side Trim on Sill Panel Side, Removing and Installing, Front Seat (Manual)".
14 - Spindle Rear Cover
- Quantity: 2
- Removing and installing. Refer to → Chapter "Front Seat, Removing and Installing".
- Push onto the seat rail bolt until it audibly latches
15 - Rear Cover
- For the seat rail
- Quantity: 2
- Removing and installing. Refer to → Chapter "Seat Rail Cover, Removing and Installing".
- Push onto the seat rail until it audibly latches
16 - Seat Height Adjuster
- Overview
17 - Driver Seat Lumbar Support Adjustment Switch -E176-
- Front passenger side Front Passenger Seat Lumbar Support Adjustment Switch -E177-
- Equipment levels
- Removing and installing. Refer to → Chapter "Driver Seat Lumbar Support Adjustment Switch -E176-/Front Passenger Seat Lumbar Support Adjustment Switch -E177-, Removing and Installing".
- Lumbar Support, removing and installing. Refer to → Chapter "Lumbar Support Adjustment Motors -V125-/-V126-/-V129-/-V130-, Removing and Installing".
18 - Sill-Side Trim
- Removing and installing. Refer to → Chapter "Seat Side Trim on Sill Panel Side, Removing and Installing, Front Seat (Manual)".
19 - Cover
- For the connector station
- Removing and installing
Power Standard Seat/Sport Seat
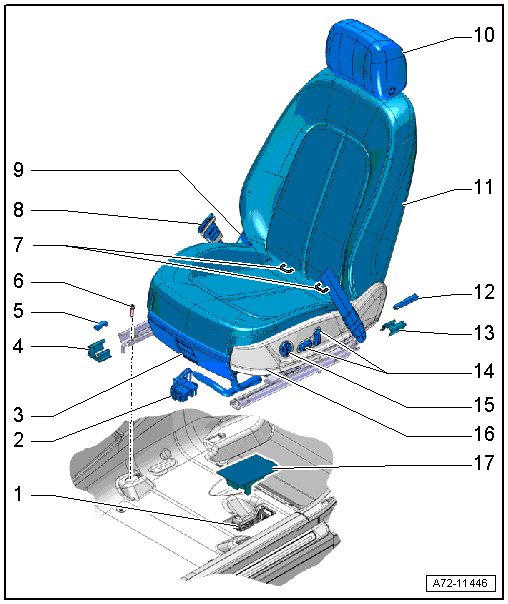
1 - Connector Station
- Connector assignment. Refer to → Wiring diagrams, Troubleshooting & Component locations.
- Removing and installing
2 - Connector
- With a corrugated tube for the modular wiring routing
- Modular wiring with corrugated tube on front seat. Refer to → Chapter "Front Seat Wire Routing".
3 - Storage Compartment
- Equipment levels
- Overview. Refer to → Chapter "Overview - Seat Pan, Storage Compartment".
4 - Front Cover
- For the seat rail
- Quantity: 2
- Removing and installing. Refer to → Chapter "Seat Rail Cover, Removing and Installing".
- Push onto the seat rail until it audibly latches
5 - Front Spindle Cover
- Quantity: 2
- Removing and installing. Refer to → Chapter "Front Seat, Removing and Installing".
- Push onto the seat rail until it audibly latches
6 - Bolt
- 50 Nm
- Quantity: 4
7 - Child Seat Anchor
- Equipment levels
- For the front passenger seat only
- Overview. Refer to → Chapter "Overview - Front LATCH Child Seat Anchors".
- For checking after an accident. Refer to → Chapter "LATCH Child Seat Anchors, Checking After a Collision".
8 - Seat Belt Latch
- Removing and installing. Refer to → Chapter "Front Seat Belt Latch, Removing and Installing, Standard Seat/Sport Seat/Super Sport Seat".
9 - Tunnel-Side Trim
- Removing and installing. Refer to → Chapter "Seat Side Trim on the Tunnel Side, Removing and Installing".
10 - Headrest
- Removing and installing. Refer to → Chapter "Headrest, Removing and Installing".
11 - Standard Seat/Sport Seat
Vehicles with:
- Memory function
- Seat and backrest heating
- Seat Ventilation
- Footwell lamp
- Rear seat entertainment
- Seat depth adjustment only for sport seat
- Removing and installing. Refer to → Chapter "Front Seat, Removing and Installing".
- Driver/Front Passenger Seat Forward/Back Adjustment Motor -V28-/-V31- or faulty Memory Seat/Steering Column Adjustment Control Module -J136-/Front Passenger Memory Seat Control Module -J521-. Refer to → Chapter "Front Seat with Faulty Seat Forward/Back Adjustment Motor or Faulty Control Module, Removing".
12 - Spindle Rear Cover
- Quantity: 2
- Removing and installing. Refer to → Chapter "Front Seat, Removing and Installing".
- Push onto the seat rail bolt until it audibly latches
13 - Rear Cover
- For the seat rail
- Quantity: 2
- Removing and installing. Refer to → Chapter "Seat Rail Cover, Removing and Installing".
- Push onto the seat rail until it audibly latches
14 - Driver Seat Adjustment Control Head -E470-
- Front passenger side: Front Passenger Seat Adjustment Control Head -E471-
- Overview
15 - Driver Seat Lumbar Support Adjustment Switch -E176-
- Front passenger side Front Passenger Seat Lumbar Support Adjustment Switch -E177-
- Removing and installing. Refer to → Chapter "Driver Seat Lumbar Support Adjustment Switch -E176-/Front Passenger Seat Lumbar Support Adjustment Switch -E177-, Removing and Installing".
- Lumbar Support, removing and installing. Refer to → Chapter "Lumbar Support Adjustment Motors -V125-/-V126-/-V129-/-V130-, Removing and Installing".
16 - Sill-Side Trim
- Removing and installing. Refer to → Chapter "Seat Side Trim on Sill Panel Side, Removing and Installing, Front Seat (Power)".
17 - Cover
- For the connector station
- Removing and installing
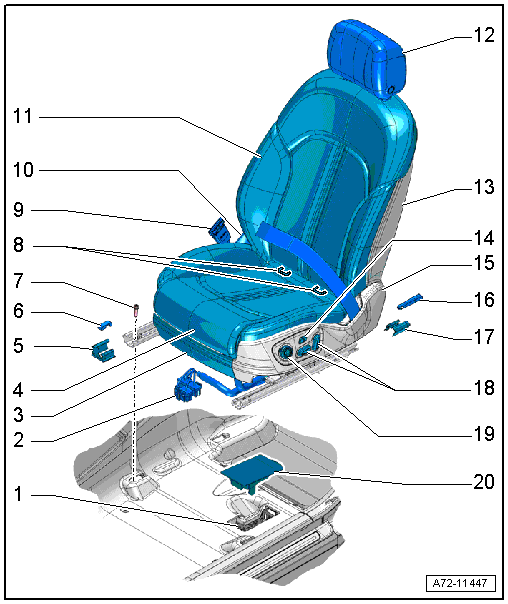
Overview - Front Seat, Super Sport Seat

1 - Connector station
- Connector assignment → Wiring diagrams, Troubleshooting & Component locations.
- Removing and installing
2 - Connector
- With a corrugated tube for the modular wiring routing
- Modular wiring with corrugated tube on front seat. Refer to → Chapter "Front Seat Wire Routing".
3 - Storage Compartment
- Equipment levels
- Removing and installing. Refer to → Chapter "Storage Compartment, Removing and Installing".
4 - Seat Depth Adjuster
- Removing and installing. Refer to → Chapter "Seat Depth Adjuster, Removing and Installing, Sport Seat/Super Sport Seat".
5 - Front Cover
- For the seat rail
- Quantity: 2
- Removing and installing. Refer to → Chapter "Seat Rail Cover, Removing and Installing".
- Push onto the seat rail until it audibly latches
6 - Front Spindle Cover
- Quantity: 2
- Removing and installing. Refer to → Chapter "Front Seat, Removing and Installing".
- Push onto the seat rail until it audibly latches
7 - Bolt
- Quantity: 4
- 50 Nm
8 - Child Seat Anchor
- Equipment levels
- for the front passenger seat only
- Removing and installing. Refer to → Chapter "Front LATCH Child Seat Anchor, Removing and Installing".
- For checking after an accident. Refer to → Chapter "LATCH Child Seat Anchors, Checking After a Collision".
9 - Seat Belt Latch
- Removing and installing. Refer to → Chapter "Front Seat Belt Latch, Removing and Installing, Standard Seat/Sport Seat/Super Sport Seat".
10 - Tunnel-Side Trim
- Removing and installing. Refer to → Chapter "Seat Side Trim on the Tunnel Side, Removing and Installing".
11 - Super Sport Seat
Vehicles with:
- Memory function
- Seat/backrest heating
- Footwell lamp
- Rear seat entertainment
- Removing and installing. Refer to → Chapter "Front Seat, Removing and Installing".
12 - Sill-Side Trim
- Removing and installing. Refer to → Chapter "Seat Side Trim on Sill Panel Side, Removing and Installing, Front Seat (Power)".
13 - Rear Cover
- For the seat rail
- Quantity: 2
- Removing and installing. Refer to → Chapter "Seat Rail Cover, Removing and Installing".
- Push onto the seat rail until it audibly latches
14 - Driver Seat Adjustment Control Head -E470-
- Front passenger side: Front Passenger Seat Adjustment Control Head -E471-
- Removing and installing. Refer to → Chapter "Seat Adjustment Control Head, Removing and Installing".
15 - Driver Seat Lumbar Support Adjustment Switch -E176-
- Front passenger side Front Passenger Seat Lumbar Support Adjustment Switch -E177-
- Removing and installing. Refer to → Chapter "Driver Seat Lumbar Support Adjustment Switch -E176-/Front Passenger Seat Lumbar Support Adjustment Switch -E177-, Removing and Installing".
- Lumbar Support, removing and installing. Refer to → Chapter "Lumbar Support Adjustment Motors -V125-/-V126-/-V129-/-V130-, Removing and Installing".
16 - Cover
- For the connector station
- Removing and installing
Overview - Front Seat, Multi-contour Seat
 Note
Note
The overview is based on the driver seat. The passenger seat is similar and the components are installed reversed from left to right.
1 - Connector Station
- Connector assignment → Wiring diagrams, Troubleshooting & Component locations.
- Removing and installing
2 - Connector
- With a corrugated tube for the modular wiring routing
- Modular wiring with corrugated tube on front seat. Refer to → Chapter "Front Seat Wire Routing".
3 - Front Trim
- Removing and installing. Refer to → Chapter "Seat Side Trim on Sill Panel Side/Front Seat Trim, Removing and Installing, Multi-contour Seat".
4 - Seat Depth Adjuster
- Overview
5 - Front Cover
- For the seat rail
- Quantity: 2
- Removing and installing. Refer to → Chapter "Seat Rail Cover, Removing and Installing".
- Push onto the seat rail until it audibly latches
6 - Front Spindle Cover
- Quantity: 2
- Removing and installing. Refer to → Chapter "Front Seat, Removing and Installing".
- Push onto the seat rail until it audibly latches
7 - Bolt
- Quantity: 4
- 50 Nm
8 - Child Seat Anchor
- Equipment levels
- for the front passenger seat only
- Overview. Refer to → Chapter "Overview - Front LATCH Child Seat Anchors".
- For checking after an accident. Refer to → Chapter "LATCH Child Seat Anchors, Checking After a Collision".
9 - Seat Belt Latch
- Removing and installing. Refer to → Chapter "Front Seat Belt Latch, Removing and Installing, Multi-contour Seat".
10 - Tunnel-Side Trim
- Removing and installing. Refer to → Chapter "Seat Side Trim on the Tunnel Side, Removing and Installing".
11 - Multi-contour Seat
Vehicles with:
- Seat and backrest heating
- Seat Ventilation
- Footwell lamp
- Rear seat entertainment
- Removing and installing. Refer to → Chapter "Front Seat, Removing and Installing".
- Driver/Front Passenger Seat Forward/Back Adjustment Motor -V28-/-V31- or faulty Memory Seat/Steering Column Adjustment Control Module -J136-/Front Passenger Memory Seat Control Module -J521-. Refer to → Chapter "Front Seat with Faulty Seat Forward/Back Adjustment Motor or Faulty Control Module, Removing".
12 - Headrest
- Equipment levels
- Removing and installing. Refer to → Chapter "Headrest, Removing and Installing".
13 - Backrest Cover
- Removing and installing. Refer to → Chapter "Backrest Cover, Removing and Installing, Multi-contour Seat".
14 - Driver Side Massage Function Button -E670-
- Front passenger side: Front Passenger Massage Function Button -E671-
- Removing and installing. Refer to → Chapter "Driver Side Massage Function Button -E670-/Front Passenger Massage Function Button -E671-, Removing and Installing".
15 - Sill-Side Trim
- Removing and installing. Refer to → Chapter "Seat Side Trim on Sill Panel Side/Front Seat Trim, Removing and Installing, Multi-contour Seat".
16 - Spindle Rear Cover
- Quantity: 2
- Removing and installing. Refer to → Chapter "Front Seat, Removing and Installing".
- Push onto the seat rail bolt until it audibly latches
17 - Rear Cover
- For the seat rail
- Quantity: 2
- Removing and installing. Refer to → Chapter "Seat Rail Cover, Removing and Installing".
- Push onto the seat rail until it audibly latches
18 - Driver Seat Switch Module -E663-
- Front passenger side: Front Passenger Seat Switch Module -E664-
- Overview
19 - Driver Seat Switch Module 2 -E667-
- Front passenger side: Front Passenger Seat Switch Module 2 -E668-
- Overview
20 - Cover
- For the connector station
- Removing and installing
