Audi A6 Typ 4G: Suspension Strut, Removing and Installing
Suspension Strut, Removing and Installing, Coil Spring Shock Absorber
Special tools and workshop equipment required
- Torque Wrench 1331 5-50Nm -VAG1331-
- Torque Wrench 1332 40-200Nm -VAG1332-
- Spreader Tool -3424-
- Tensioning Strap -T10038-
- Wood block (hardwood) 30 x 50 x 100 mm
Removing
- Place the vehicle on a hoist.
- Remove the tower brace. Refer to → Chapter "Tower Brace, Removing and Installing".
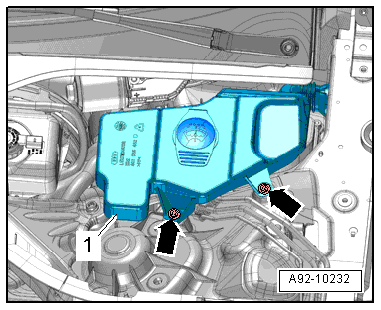
- Remove the bolts -arrows- and move the windshield washer fluid reservoir -1- slightly to the side.
- Remove the wheel. Refer to → Chapter "Wheels and Tires".
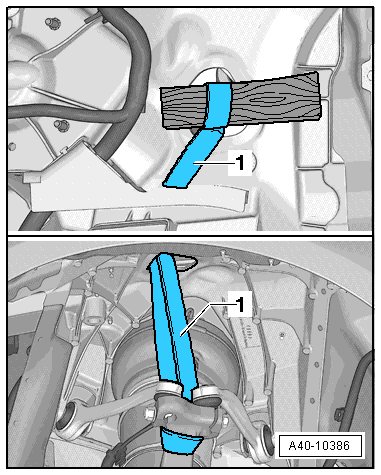
- Secure the wheel bearing housing using a Tensioning Strap -T10038--1-, as illustrated.
Applies to Vehicles with Dynamic Ride Control (DRC)
- Bleed the DRC (Dynamic Ride Control) system. Refer to → Chapter "Dynamic Ride Control (DRC), Draining and Filling".
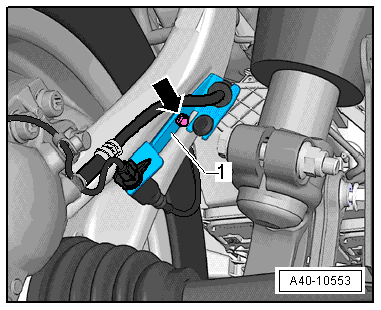
- In vehicles with switchable DRC and variable damping, remove the connector -1- on the additional component with integrated electric motor from the bracket, disconnect it, and free it up.
- Remove the union bolt -2- and free up the hose line.
- Protect any open connections against dirt.

Applies to All
- Remove the bolt -arrow- and remove the bracket -1- brake line and electric wires from the wheel bearing housing.
- Remove the shock absorber fork. Refer to → Chapter "Shock Absorber Fork, Removing and Installing".
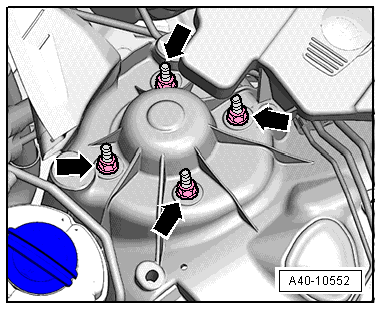
- Remove the nuts -arrows- and remove the steel spring damper.
 Note
Note
Be careful not to damage the protective sleeves on the steering and drive axle removing the steel spring damper.
Installing
Install in reverse order of removal. Note the following:
- Attach the steel spring damper to the body first.
- Tighten the new nuts -arrows- diagonally.
Applies to vehicles with DRC
- Fill the DRC system. Refer to → Chapter "Dynamic Ride Control (DRC), Draining and Filling".
- Install the wheel. Refer to → Chapter "Wheels and Tires".
Suspension Strut, Removing and Installing, Air Spring Damper
Special tools and workshop equipment required
- Torque Wrench 1331 5-50Nm -VAG1331-
- Torque Wrench 1332 40-200Nm -VAG1332-
- Torque Wrench 1783 - 2-10Nm -VAG1783-
- Torque Wrench 1783 - Open Jaw - 10mm -VAG1783/1-
- Wood block (hardwood) 30 x 50 x 1000 mm
- Spreader Tool -3424-
- Tensioning Strap -T10038-
- Vehicle Diagnostic Tester
Removing
Note
During assembly work, make sure no pressure points form on the suspension strut boot.
- Place the vehicle on a hoist. Refer to → Chapter "Raising and Lowering with Open and Closed Air Suspension System".
- Remove the tower brace. Refer to → Chapter "Tower Brace, Removing and Installing".
- Remove the bolts -arrows- and move the windshield washer fluid reservoir -1- slightly to the side.
- Remove wheel trim cap, remove cover cap on light-alloy wheels (removal hook in vehicle tool kit).
- Remove the wheel. Refer to → Chapter "Wheels and Tires".
- Clean air connection on the air spring damper.
- Disconnect the connector -1-.
- Remove the connecting piece from the residual pressure retaining valve -2-. Air escapes then.
- Remove the clip -arrow- and free up the lines -3-.
Note
Do not loosen or remove the residual pressure retaining valve -2-.
- Seal both connections. Make sure that no dust particles enter connections.

- Secure the wheel bearing housing using a Tensioning Strap -T10038--1-, as illustrated.
- Remove the bolt -arrow- and remove the bracket -1- brake line and electric wires from the wheel bearing housing.
- Remove the shock absorber fork. Refer to → Chapter "Shock Absorber Fork, Removing and Installing".
- Remove the nuts -arrows- and remove the air spring damper.
Note
When removing the air spring damper, make sure the protective sleeves on the steering, drive axle and air spring damper are not damaged.
If the air spring damper will be replaced. Refer to → Chapter "Suspension Strut, Filling".
Installing
Install in reverse order of removal. Note the following:
Note
During assembly work, make sure no pressure points form on the suspension strut boot.
- First secure the air spring damper on the body.
- Tighten the new nuts -arrows- diagonally.
- Install the wheel. Refer to → Chapter "Wheels and Tires".
- Air suspension system, filling. Refer to → Chapter "System, Venting or Filling".
- Re-adapt control position → Chapter "Control Position, Programming"
